Using BIMS with the Field Book App
Overview
This section describes the integrated use of BIMS and the Field Book App in a breeding program. The Field Book App is used to collect data, while BIMS provides data storage and management capabilities. Data collected with Field Book can be transferred to BIMS in two ways: manual transfer via file export/import or automatic transfer via BrAPI. BrAPI stands for Breeding Application Programming Interface. It facilitates data exchange and interoperability between BIMS and the Field Book App. The steps for setting up and using BIMS/Field Book in a breeding program are summarized below. Short training videos are available on the MainLab Youtube channel.
Creating a Field in BIMS
Load accession/trait descriptors/site to BIMS
Download respective templates from BIMS (go to Data Import/Template list), fill in data (all columns marked with an asterisk must be completed), and upload to BIMS (go to Data Import/Upload data). Detailed instructions on how to fill in the individual templates are available in the ‘Entering Data into Templates’ section of the manual. Video instructions on how to fill in the trait descriptor template and accession template are also available on the MainLab YouTube channel.
How to create a field in BIMS
After loading the templates above, create a field in BIMS. First, download a phenotype template (go to Data Import/Template list/Phenotype). Complete all required columns (columns with asterisks). This field file does not need to have observation data. It will serve as a field map for the Field Book App. Accession names must be the same as those earlier loaded in the accession template. If a new accession is to be added, first create the new accession (go to Manage Breeding/Accession/Accession Admin Menu/Add a new accession) or upload a new accession template containing the new accession. Only new accessions will be added. If an accession in the template is already loaded to the same BIMS program, it will be ignored. Note that you do not need to have trait columns in this field file, since traits have been loaded earlier using the trait descriptor template. If new traits are to be added to your program, first create new traits (go to Manage Breeding/Trait/Admin Menu for Trait/Add a new trait) or upload a new trait descriptor template containing the new traits. Traits in the template that are already loaded to BIMS will be ignored. Then upload the field file to BIMS.
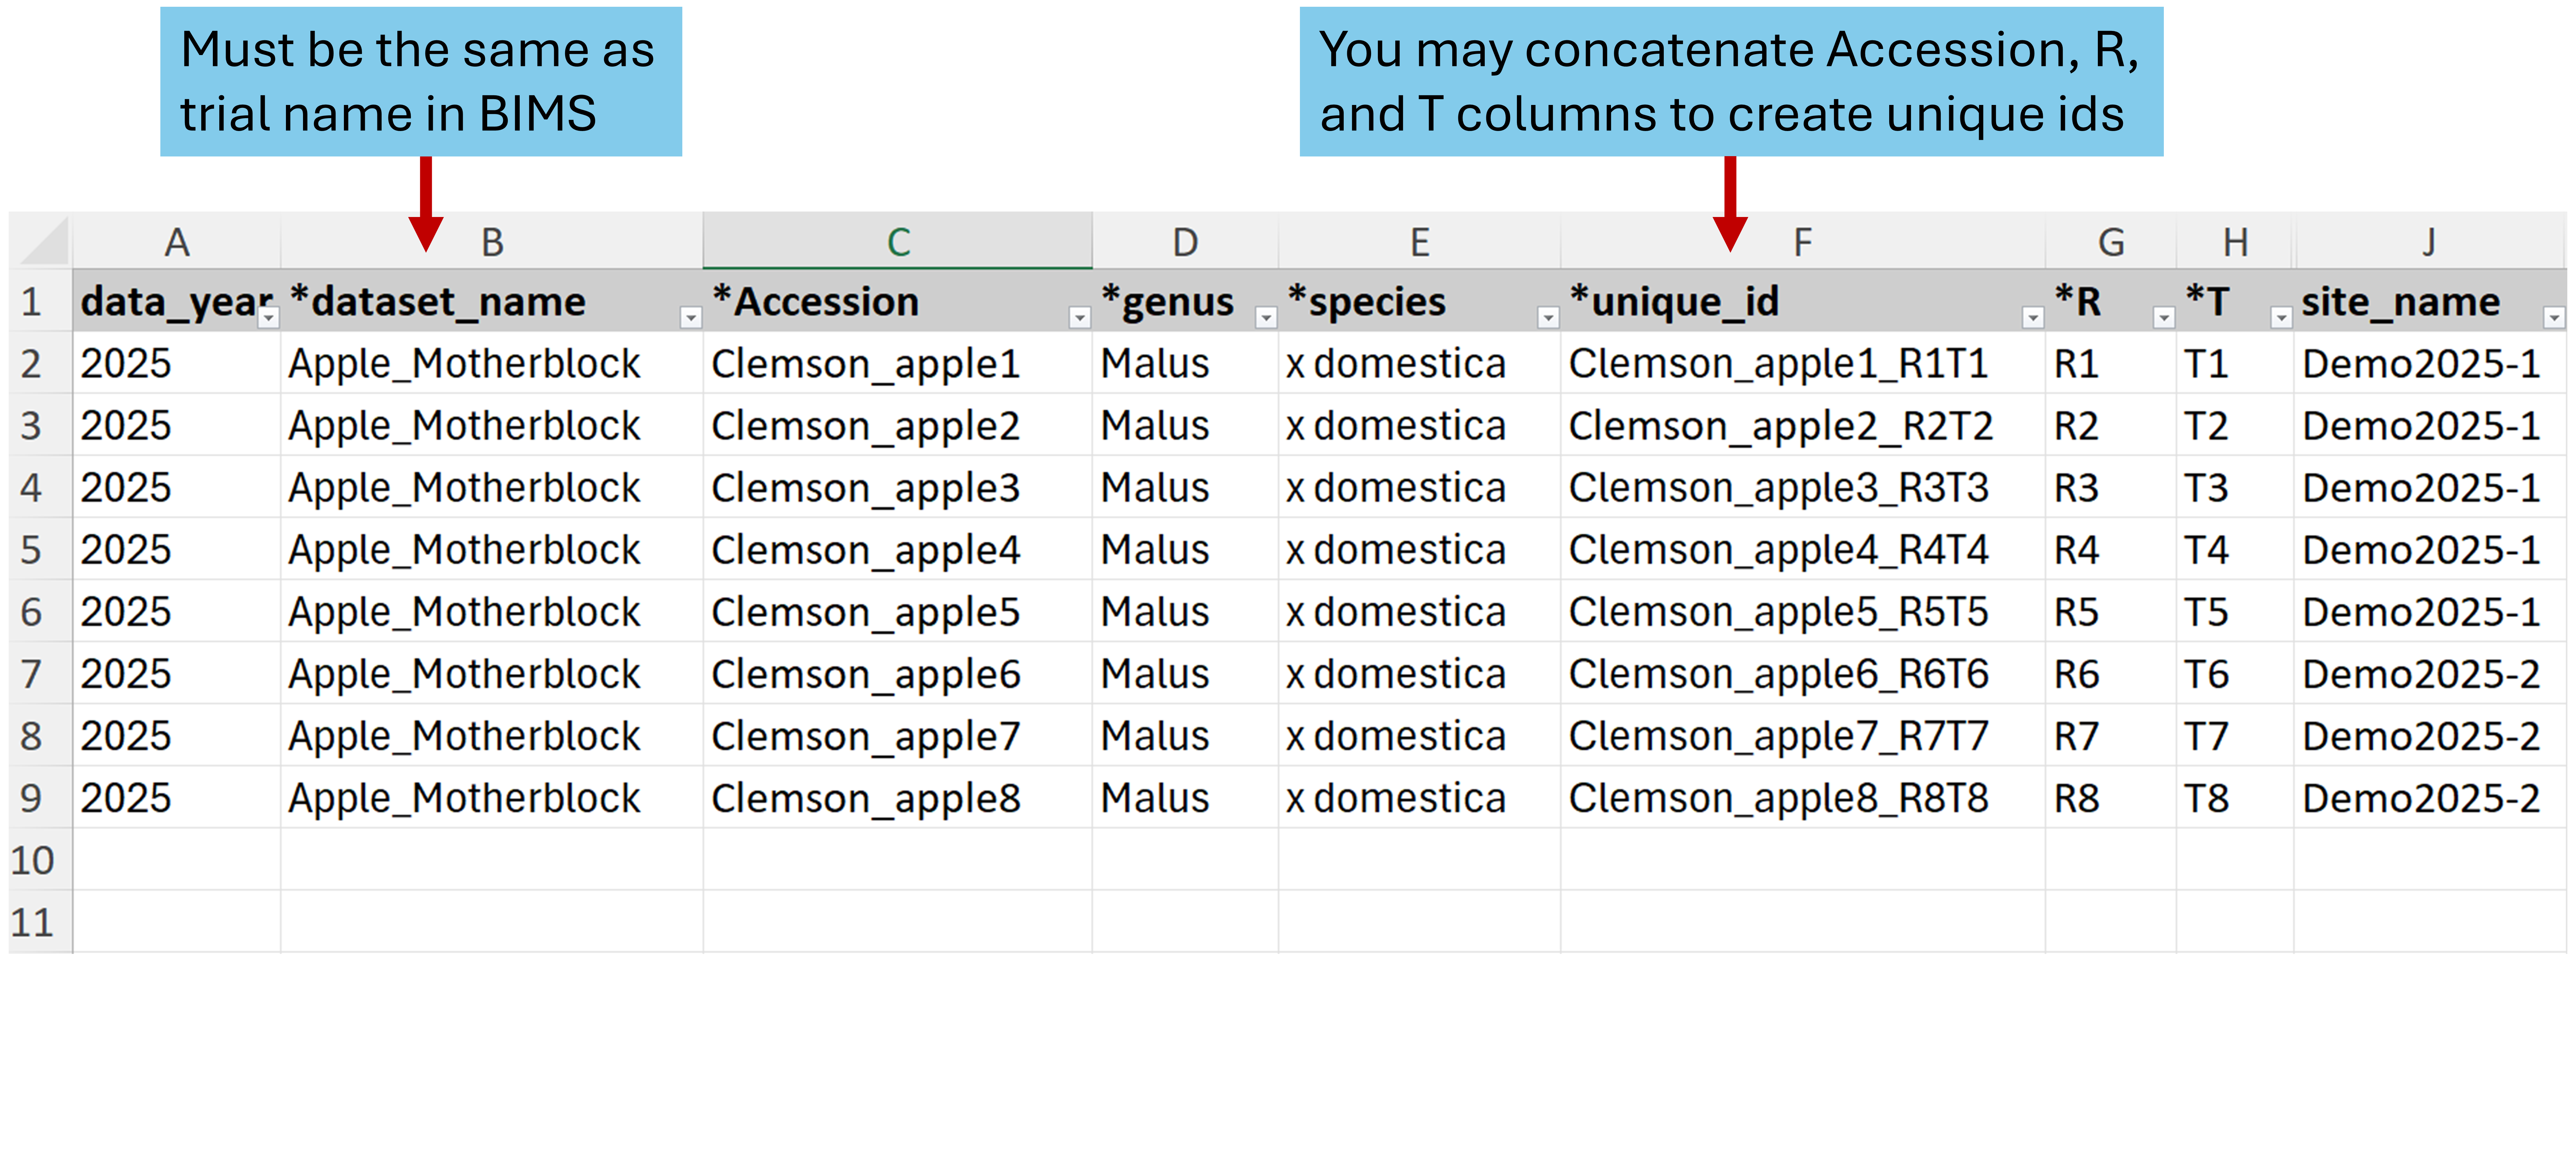
Figure. Preparing a field using the phenotype template.
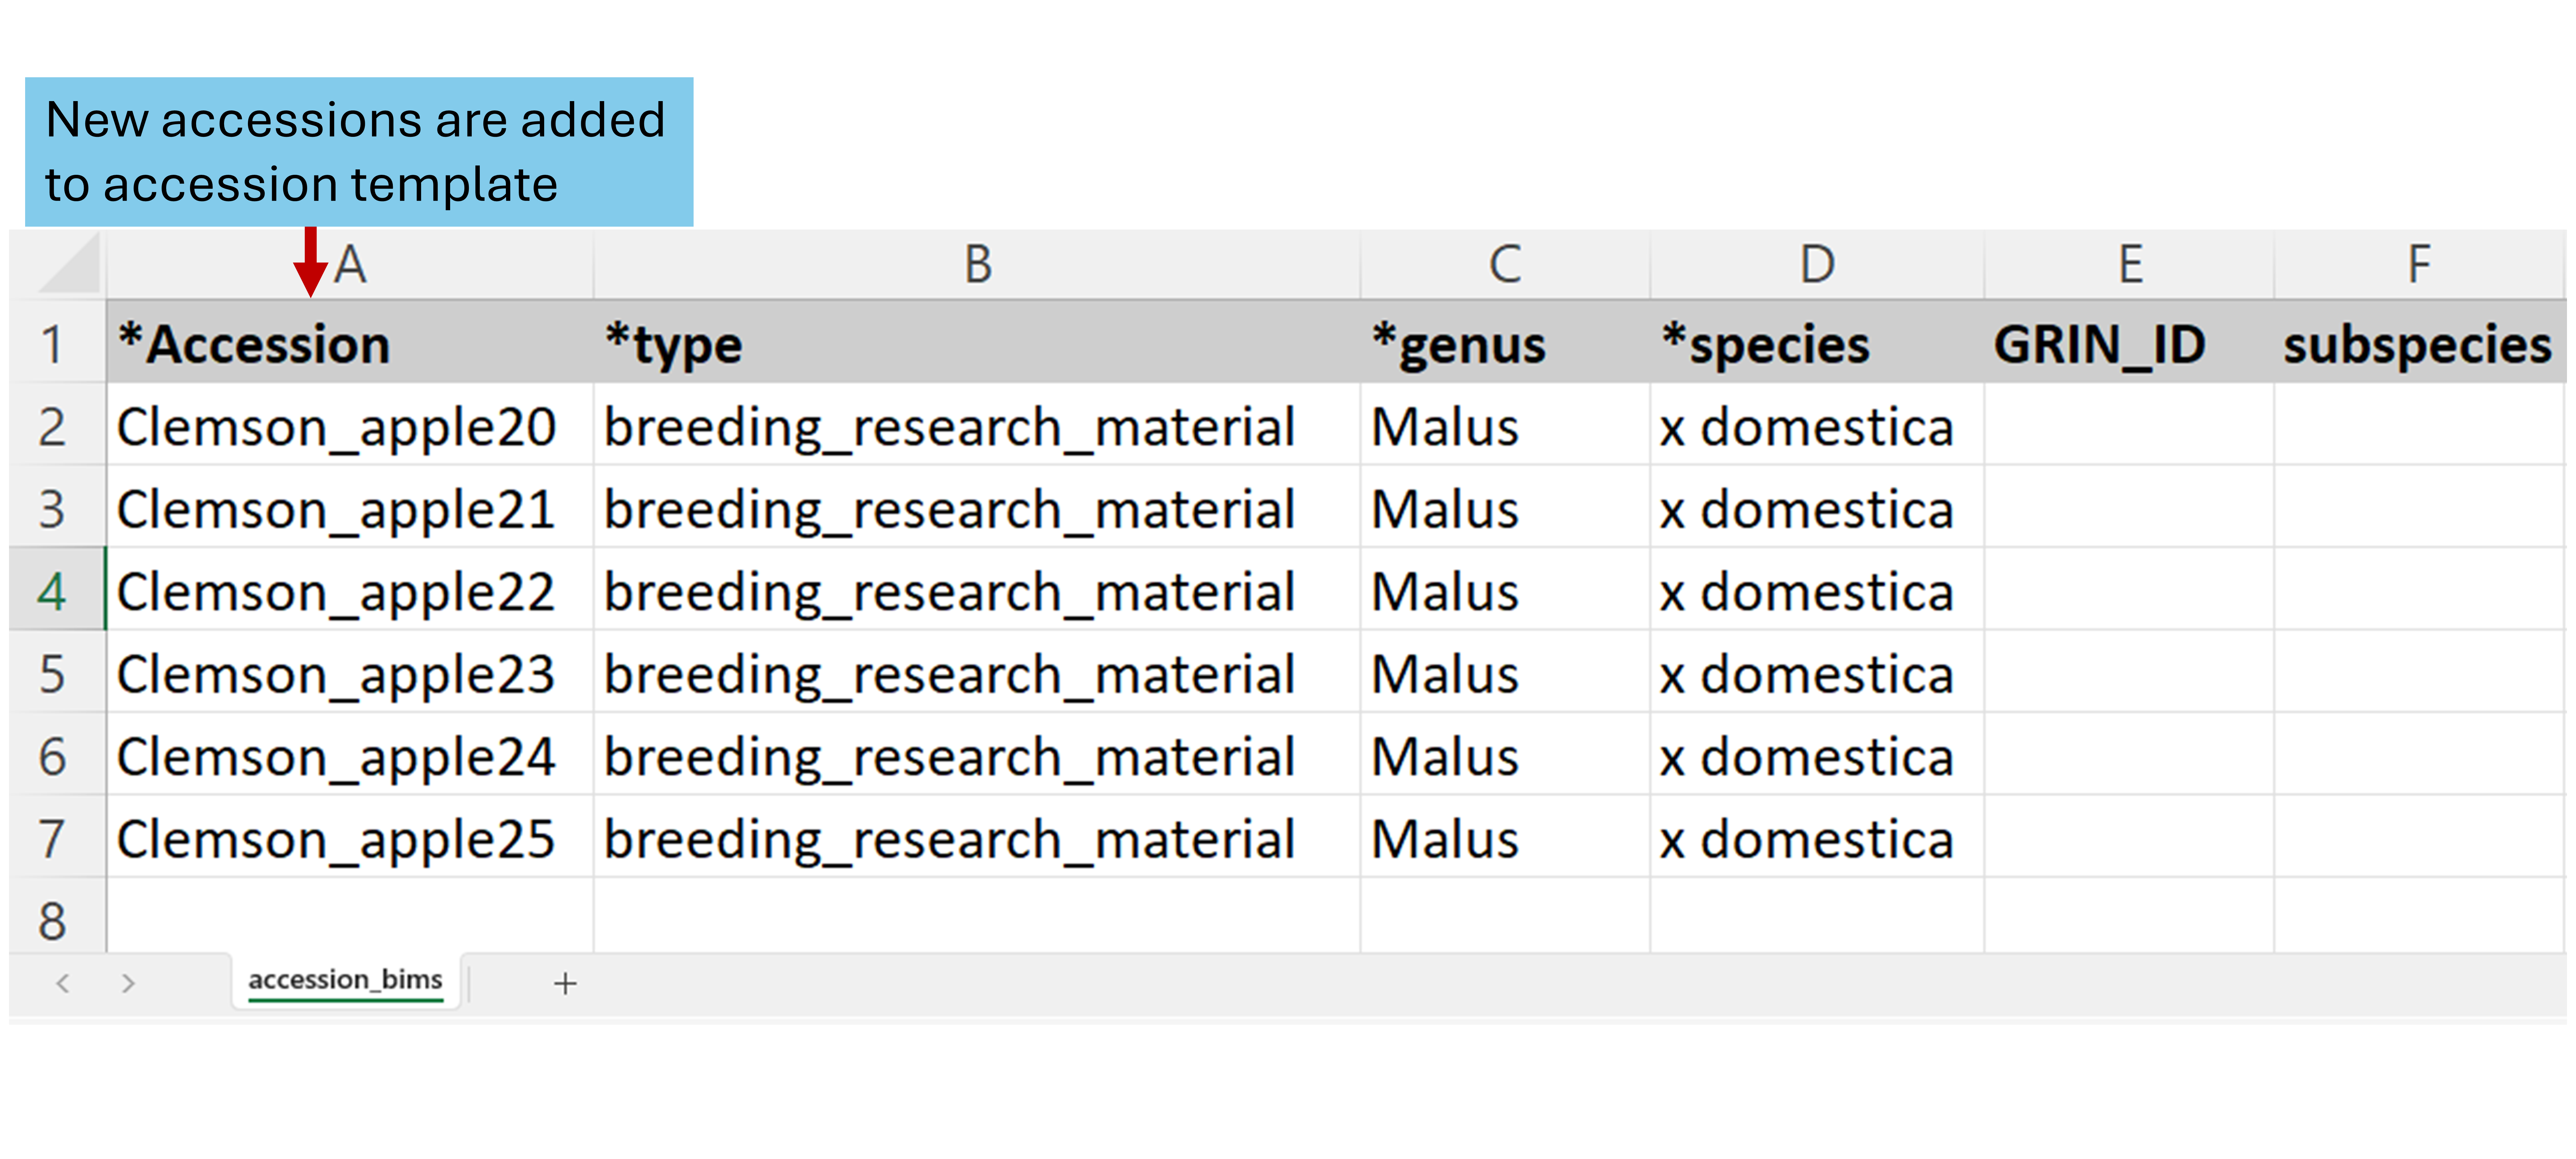
Figure. Preparing a separate accession template for new accessions.
You may add new accessions to the accession template and upload alongside the field file (phenotype template) in the same Excel file. Note that BIMS will ignore the already loaded accessions. The field file sheet must be named “phenotype_bims”, and the accession template sheet must be named “accession_bims”. In this example, columns *R (row) and *T (tree ID) represent primary and secondary orders, respectively.
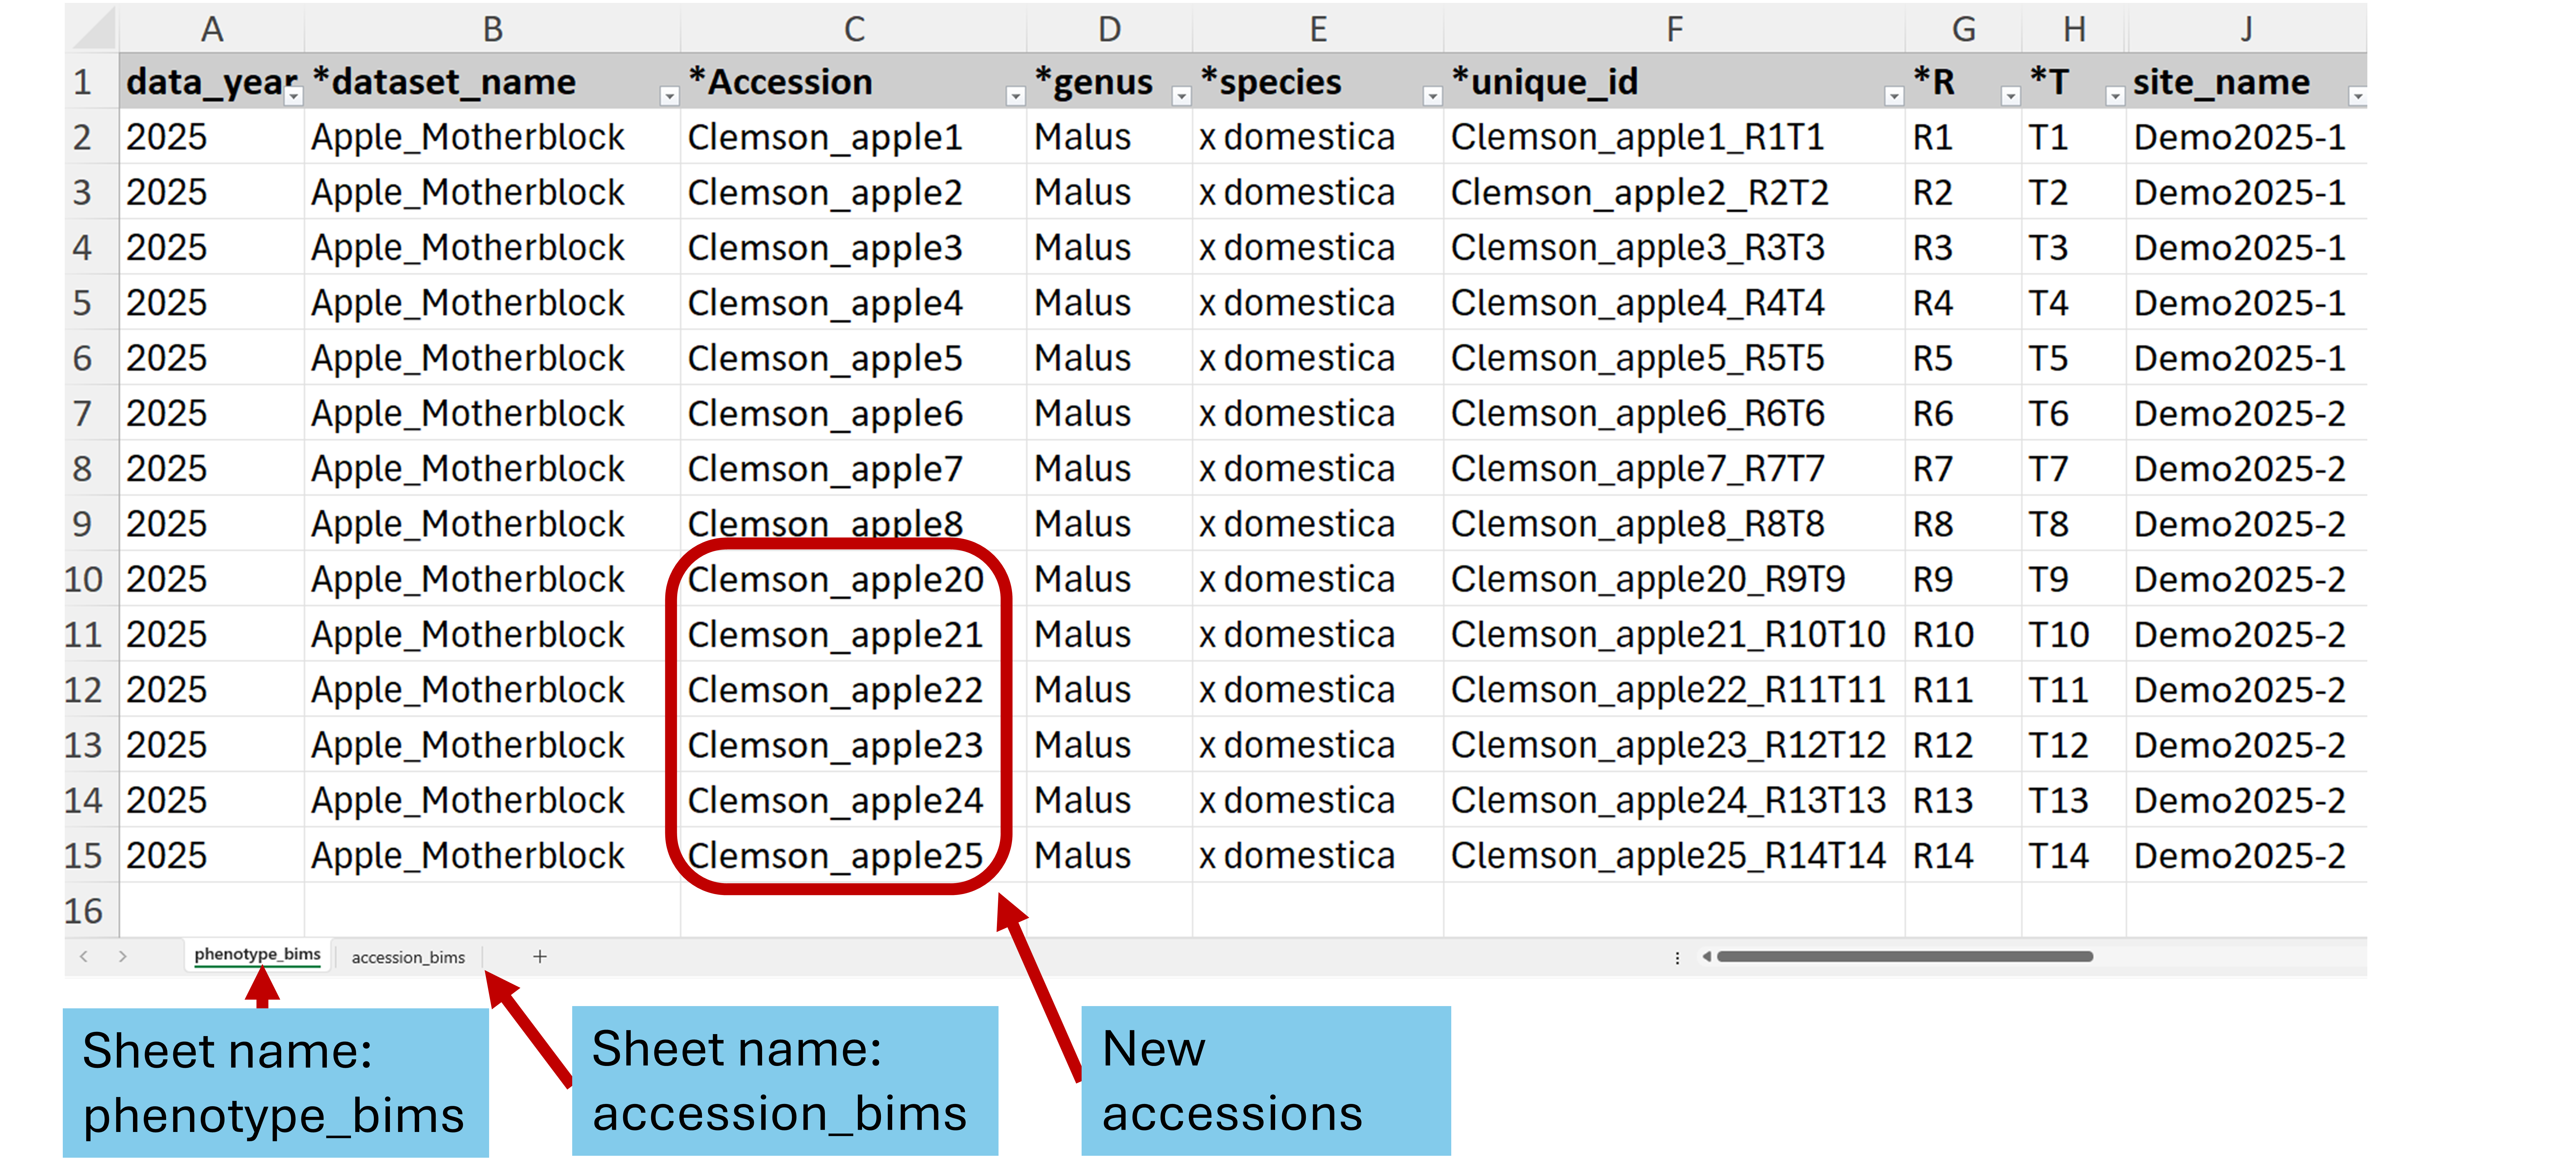
Figure. Adding new accessions to the old accession sheet and loading different data sheets together in one Excel file for convenience.
How to design your field if a tertiary order is required
If your experiment requires a tertiary order (block), use the column labeled “block” as shown below. In this example, the field is divided into 5 blocks: each of the first four blocks contains three rows, while block 5 contains two rows.
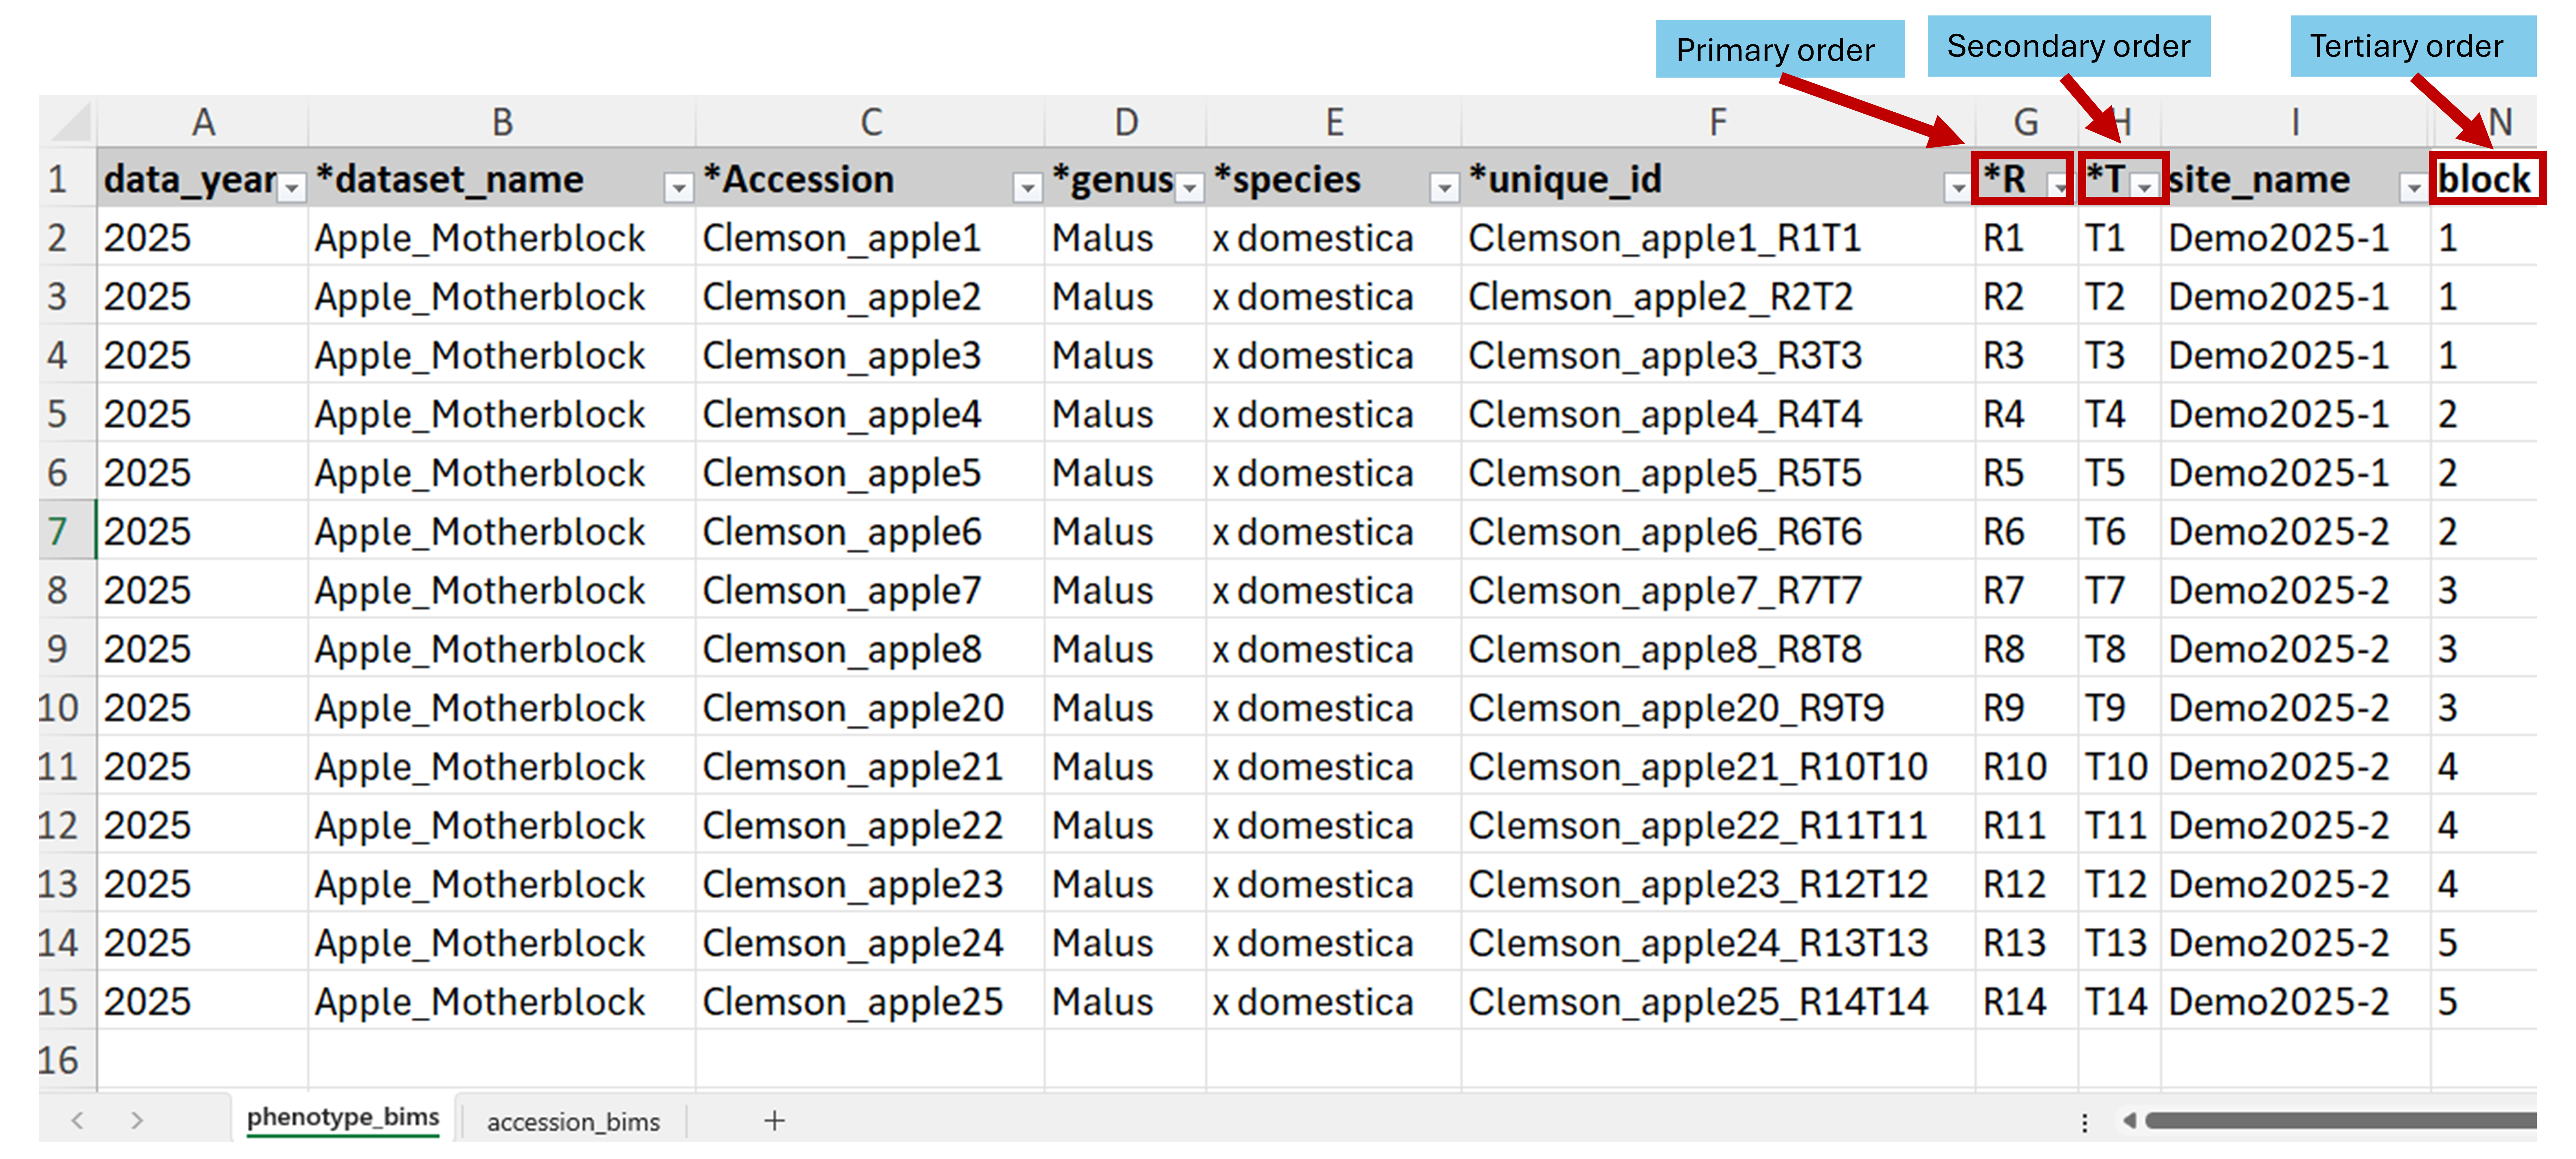
Figure. Field design with a tertiary order.
Transferring Data to Field Book App
After creating a field in BIMS, there are two ways to transfer it to the Field Book App; 1) Import the field automatically from BIMS to Field Book via BrAPI; or 2) Generate an input field file in BIMS and upload it to Field Book using a local drive.

Figure. Field data transfer from BIMS to Field Book using input files or via BrAPI.
Via BrAPI
The compliance of BIMS and Field Book with the Breeding API (BrAPI) enables seamless data transfer between them. To start the transfer of data from BIMS to Field Book, configure BrAPI on Field Book by going to the ‘Settings’ on Field Book main menu and enable BrAPI.
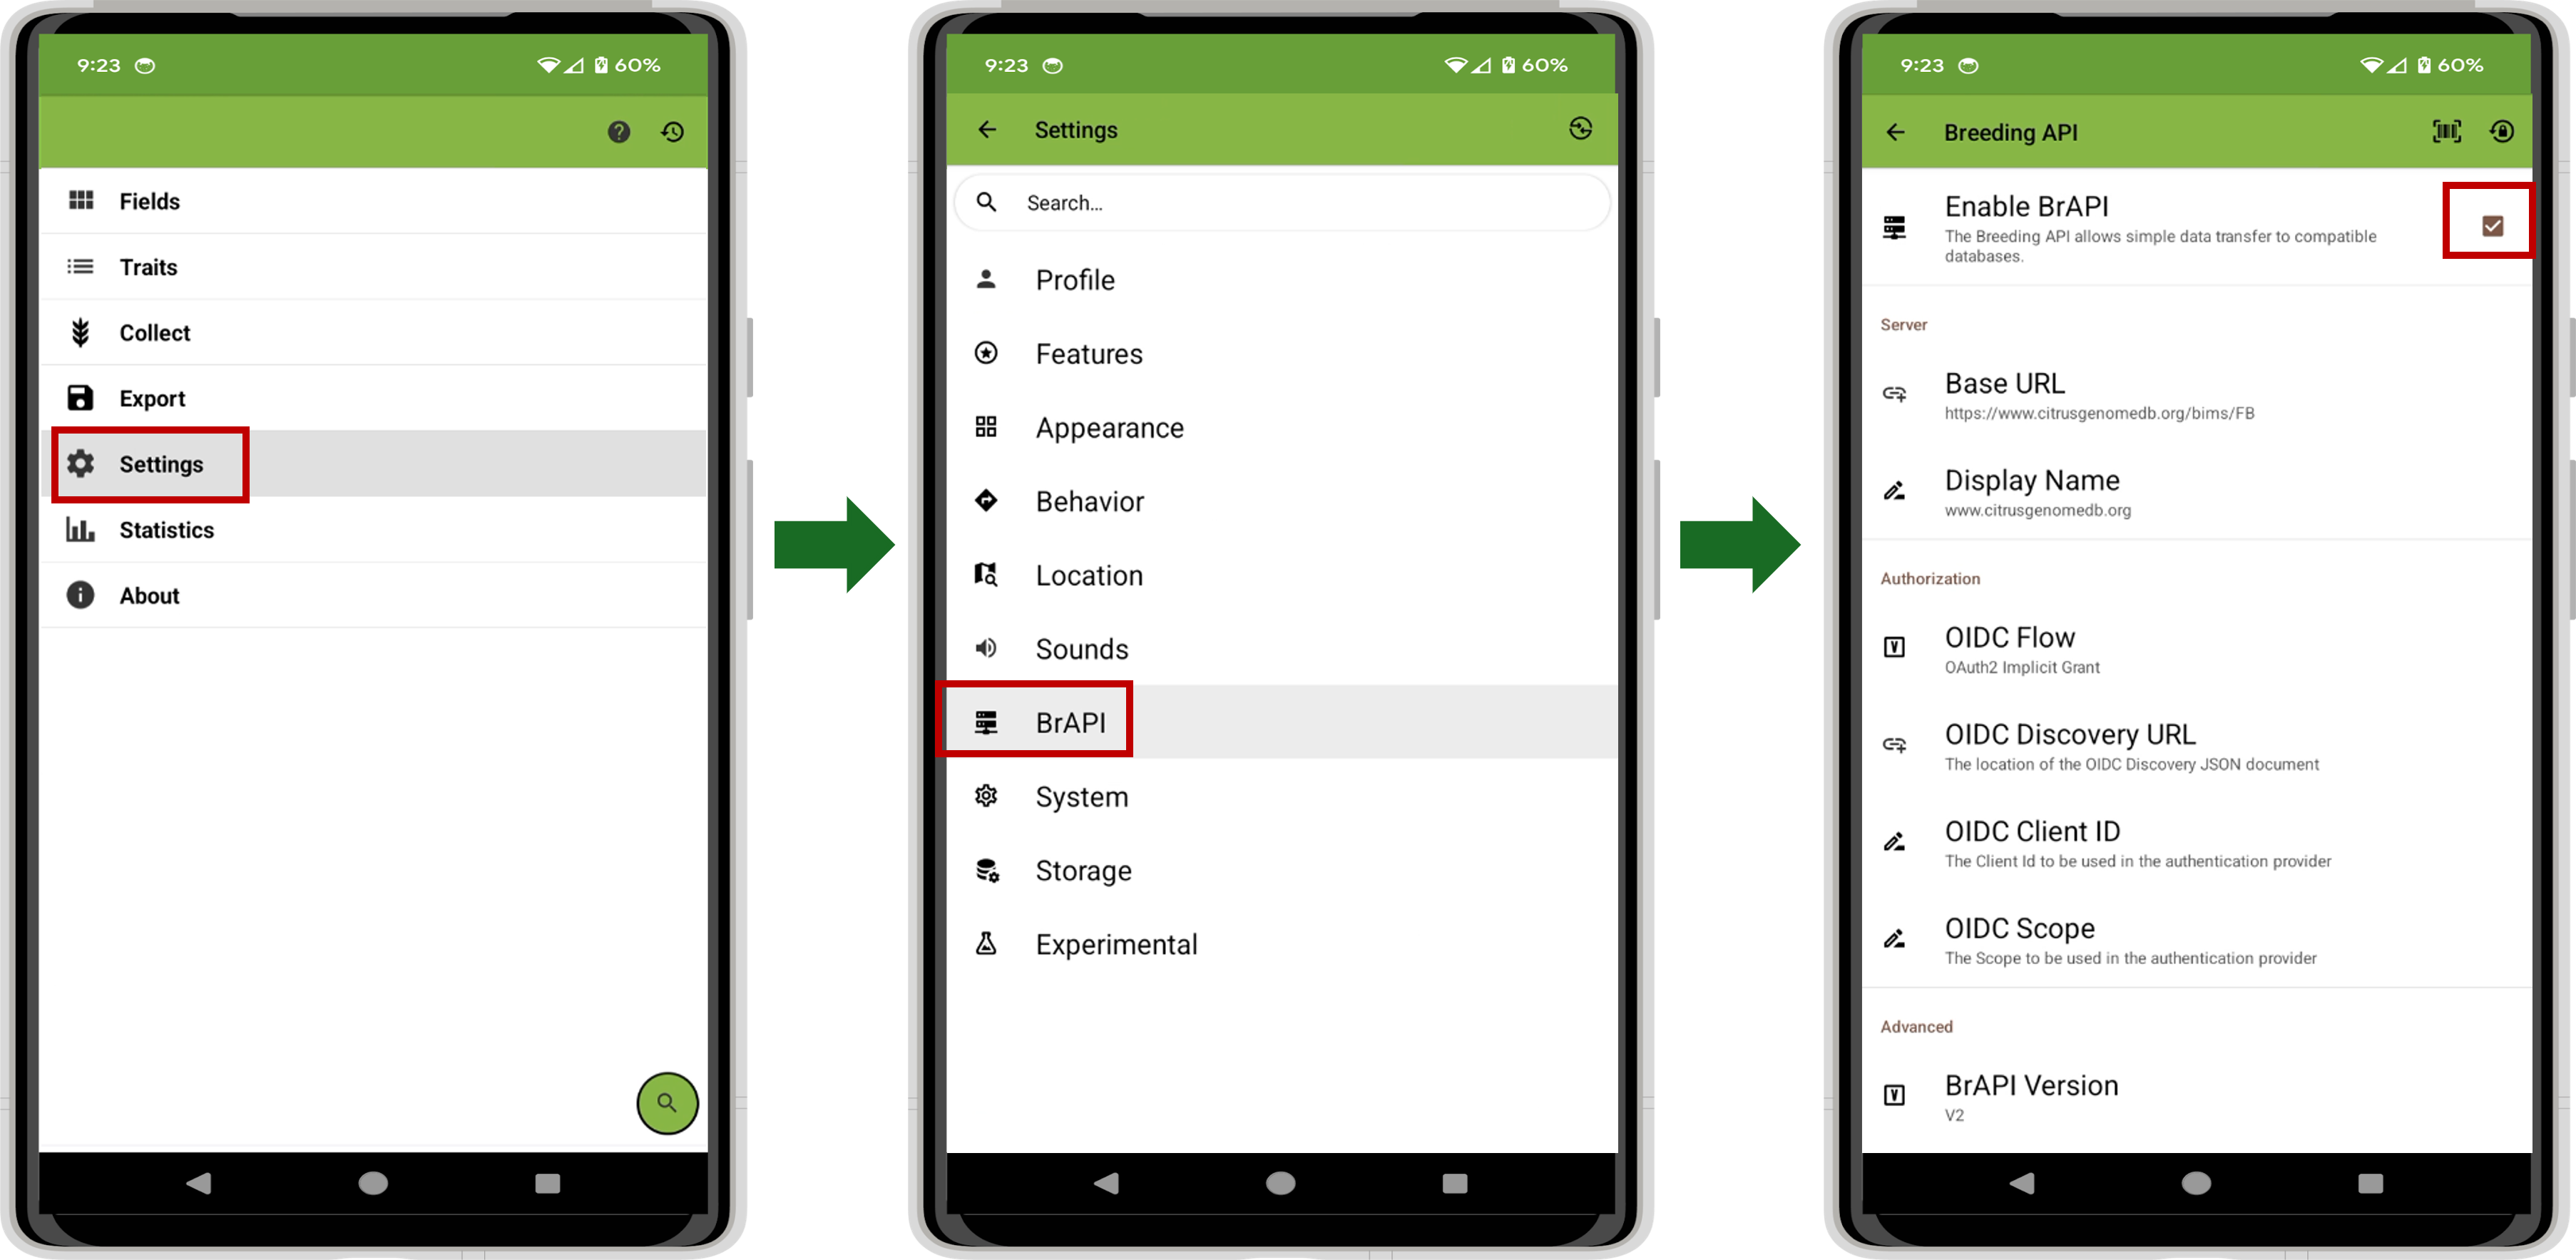
Figure. Enable BrAPI on Field Book.
After enabling BrAPI, click ‘Base URL’ to configure BrAPI with your Base URL in BIMS. Click ‘Scan’ to scan your Base URL QR code in BIMS. To access your Base URL in BIMS, go to your BIMS account and click on the “Instructions” under the submenu BrAPI in the Field Book Management. After scanning your Base URL QR code, a prompt will appear on Field Book to log in to your BIMS account. Sign in with your BIMS account and then click a tab to authorize the request for Field Book to use your account to upload data. Tick on boxes for import/export to allow data transfer between BIMS and Field Book via BrAPI and then click ‘Save’.
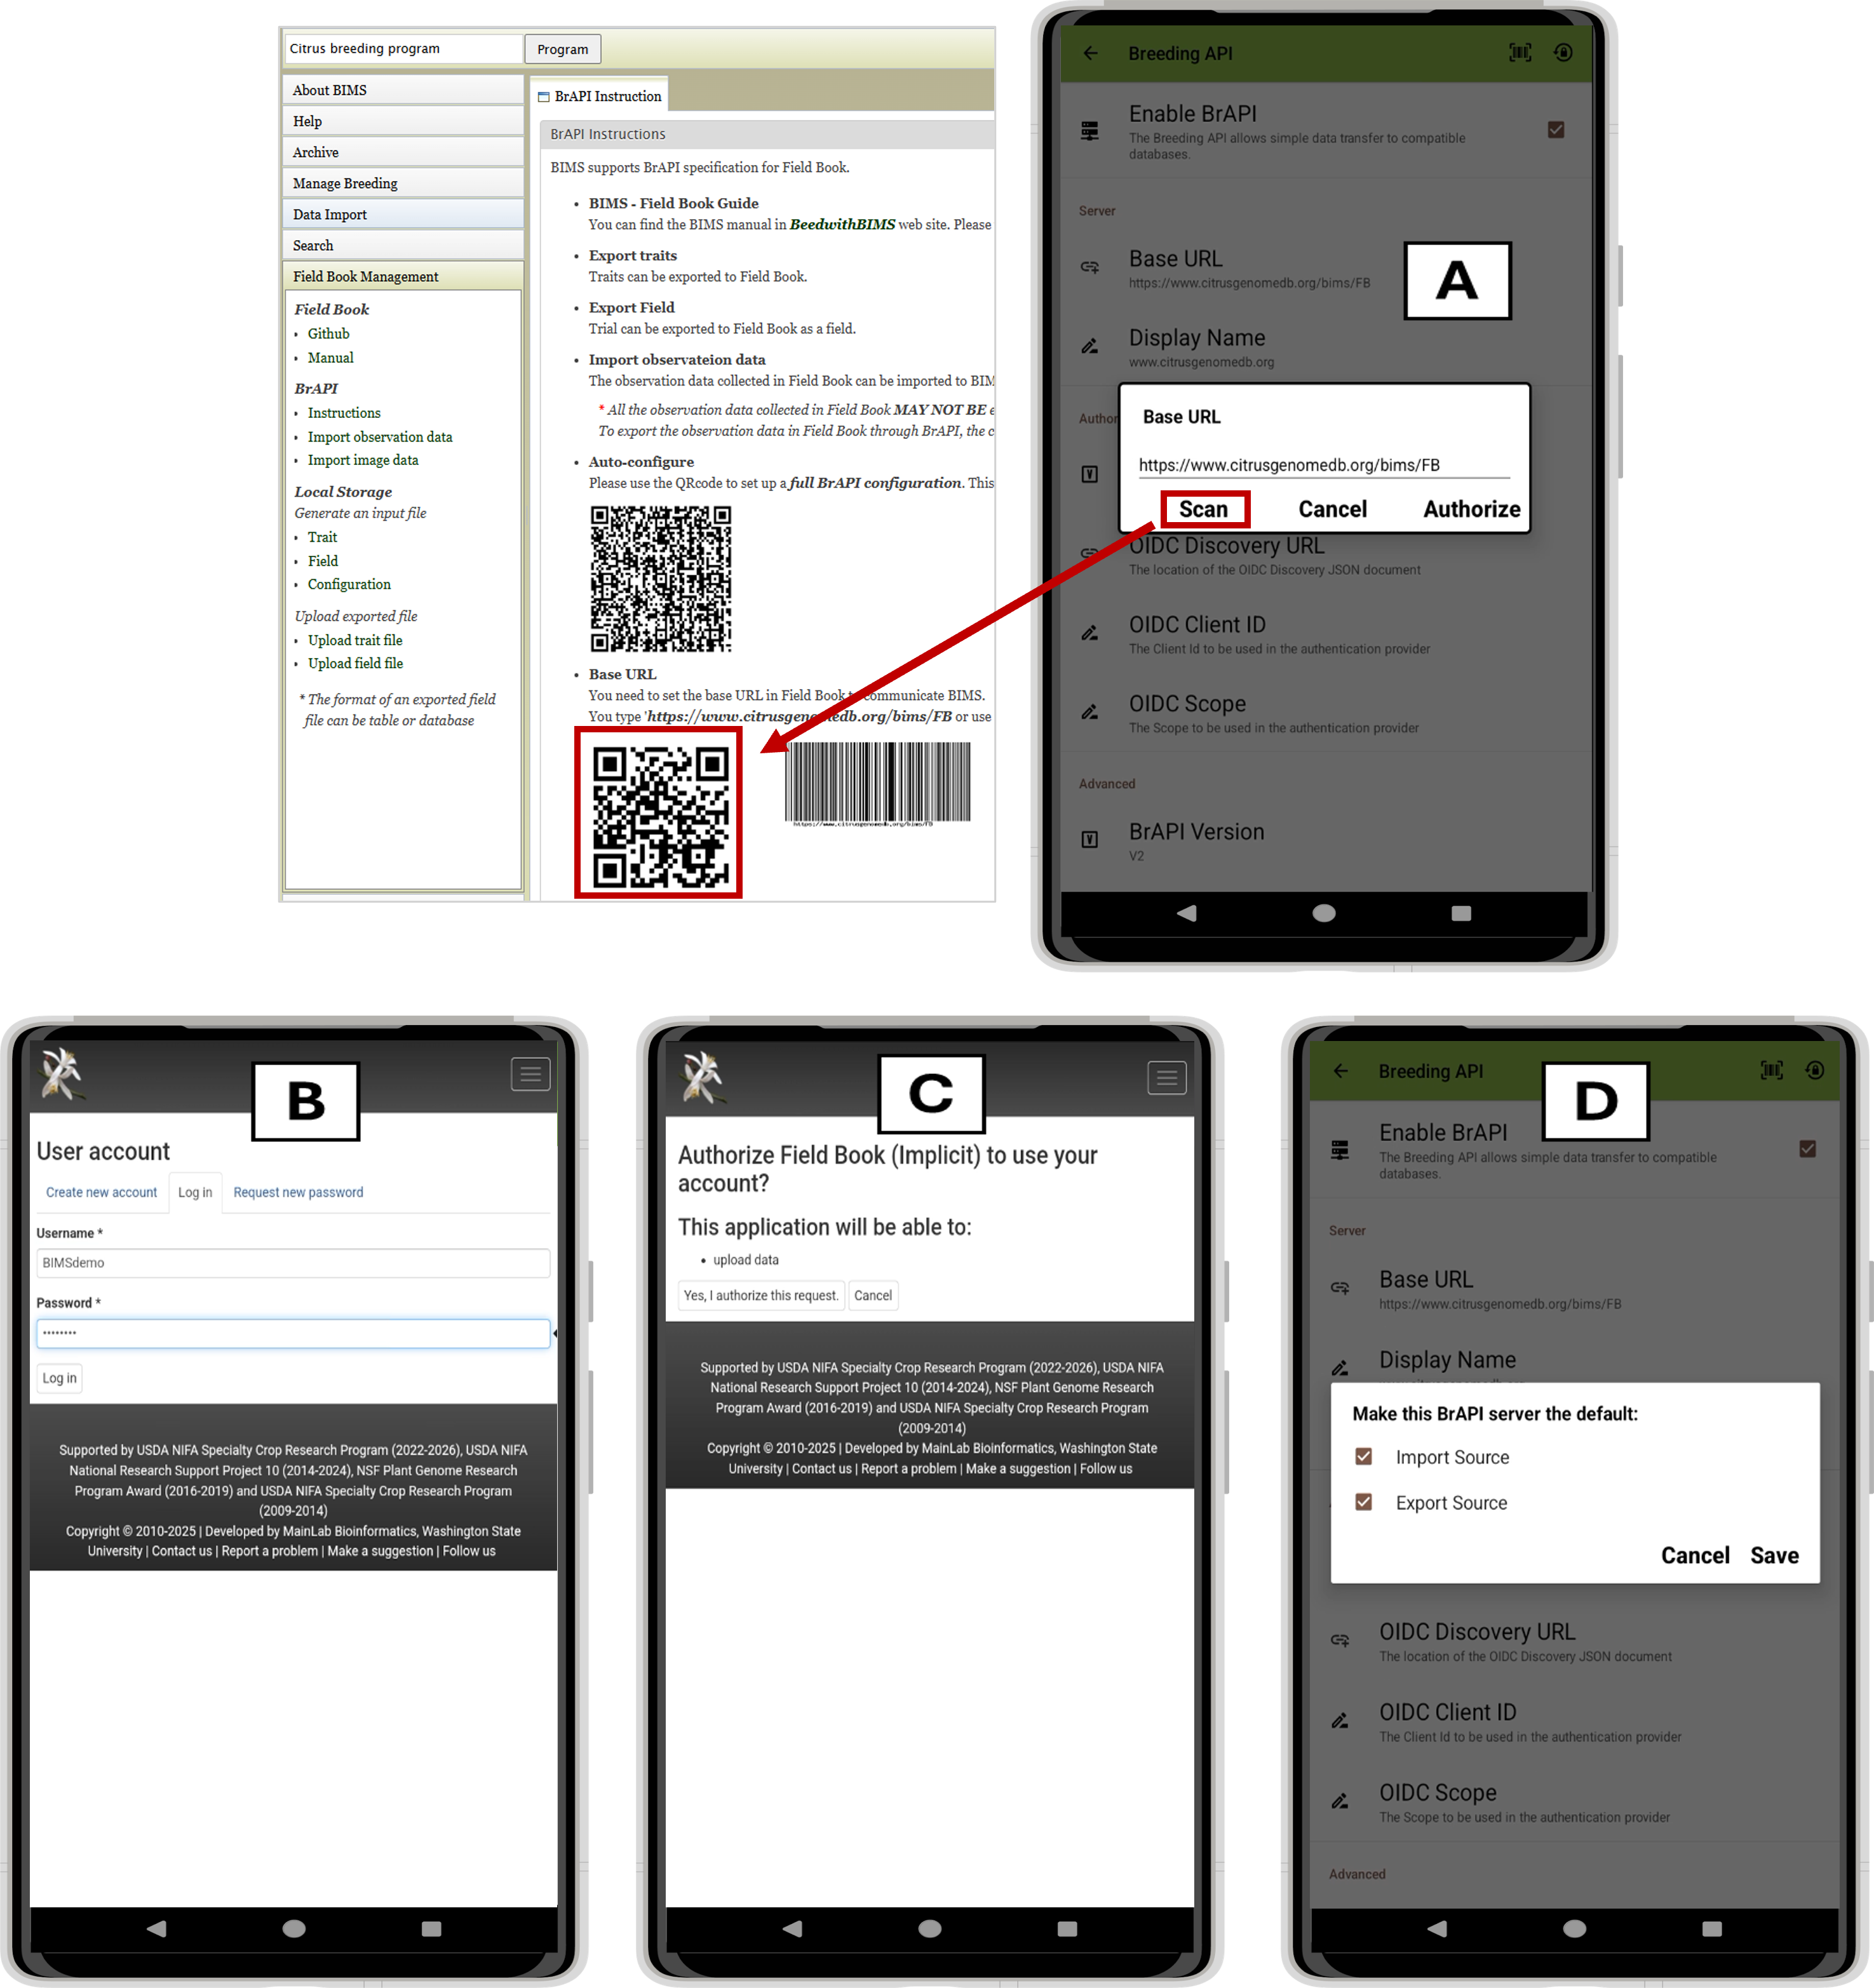
Figure. Configure BrAPI on Field Book using Base URL QR code from BIMS.
To import field data, go back to the main menu of Field Book, click “Fields” and click the plus sign at the bottom to add a new field. Select the desired field trial in BrAPI Field Import, and then click ‘Import’. You can sort the field entry using different sample properties or sort it by “ObservationUnitDbld” to preserve the order of the plots (unique_id) in the BIMS phenotype template. Click ‘Save’. With this, both field and trait descriptors are successfully imported and ready for data collection on Field Book.
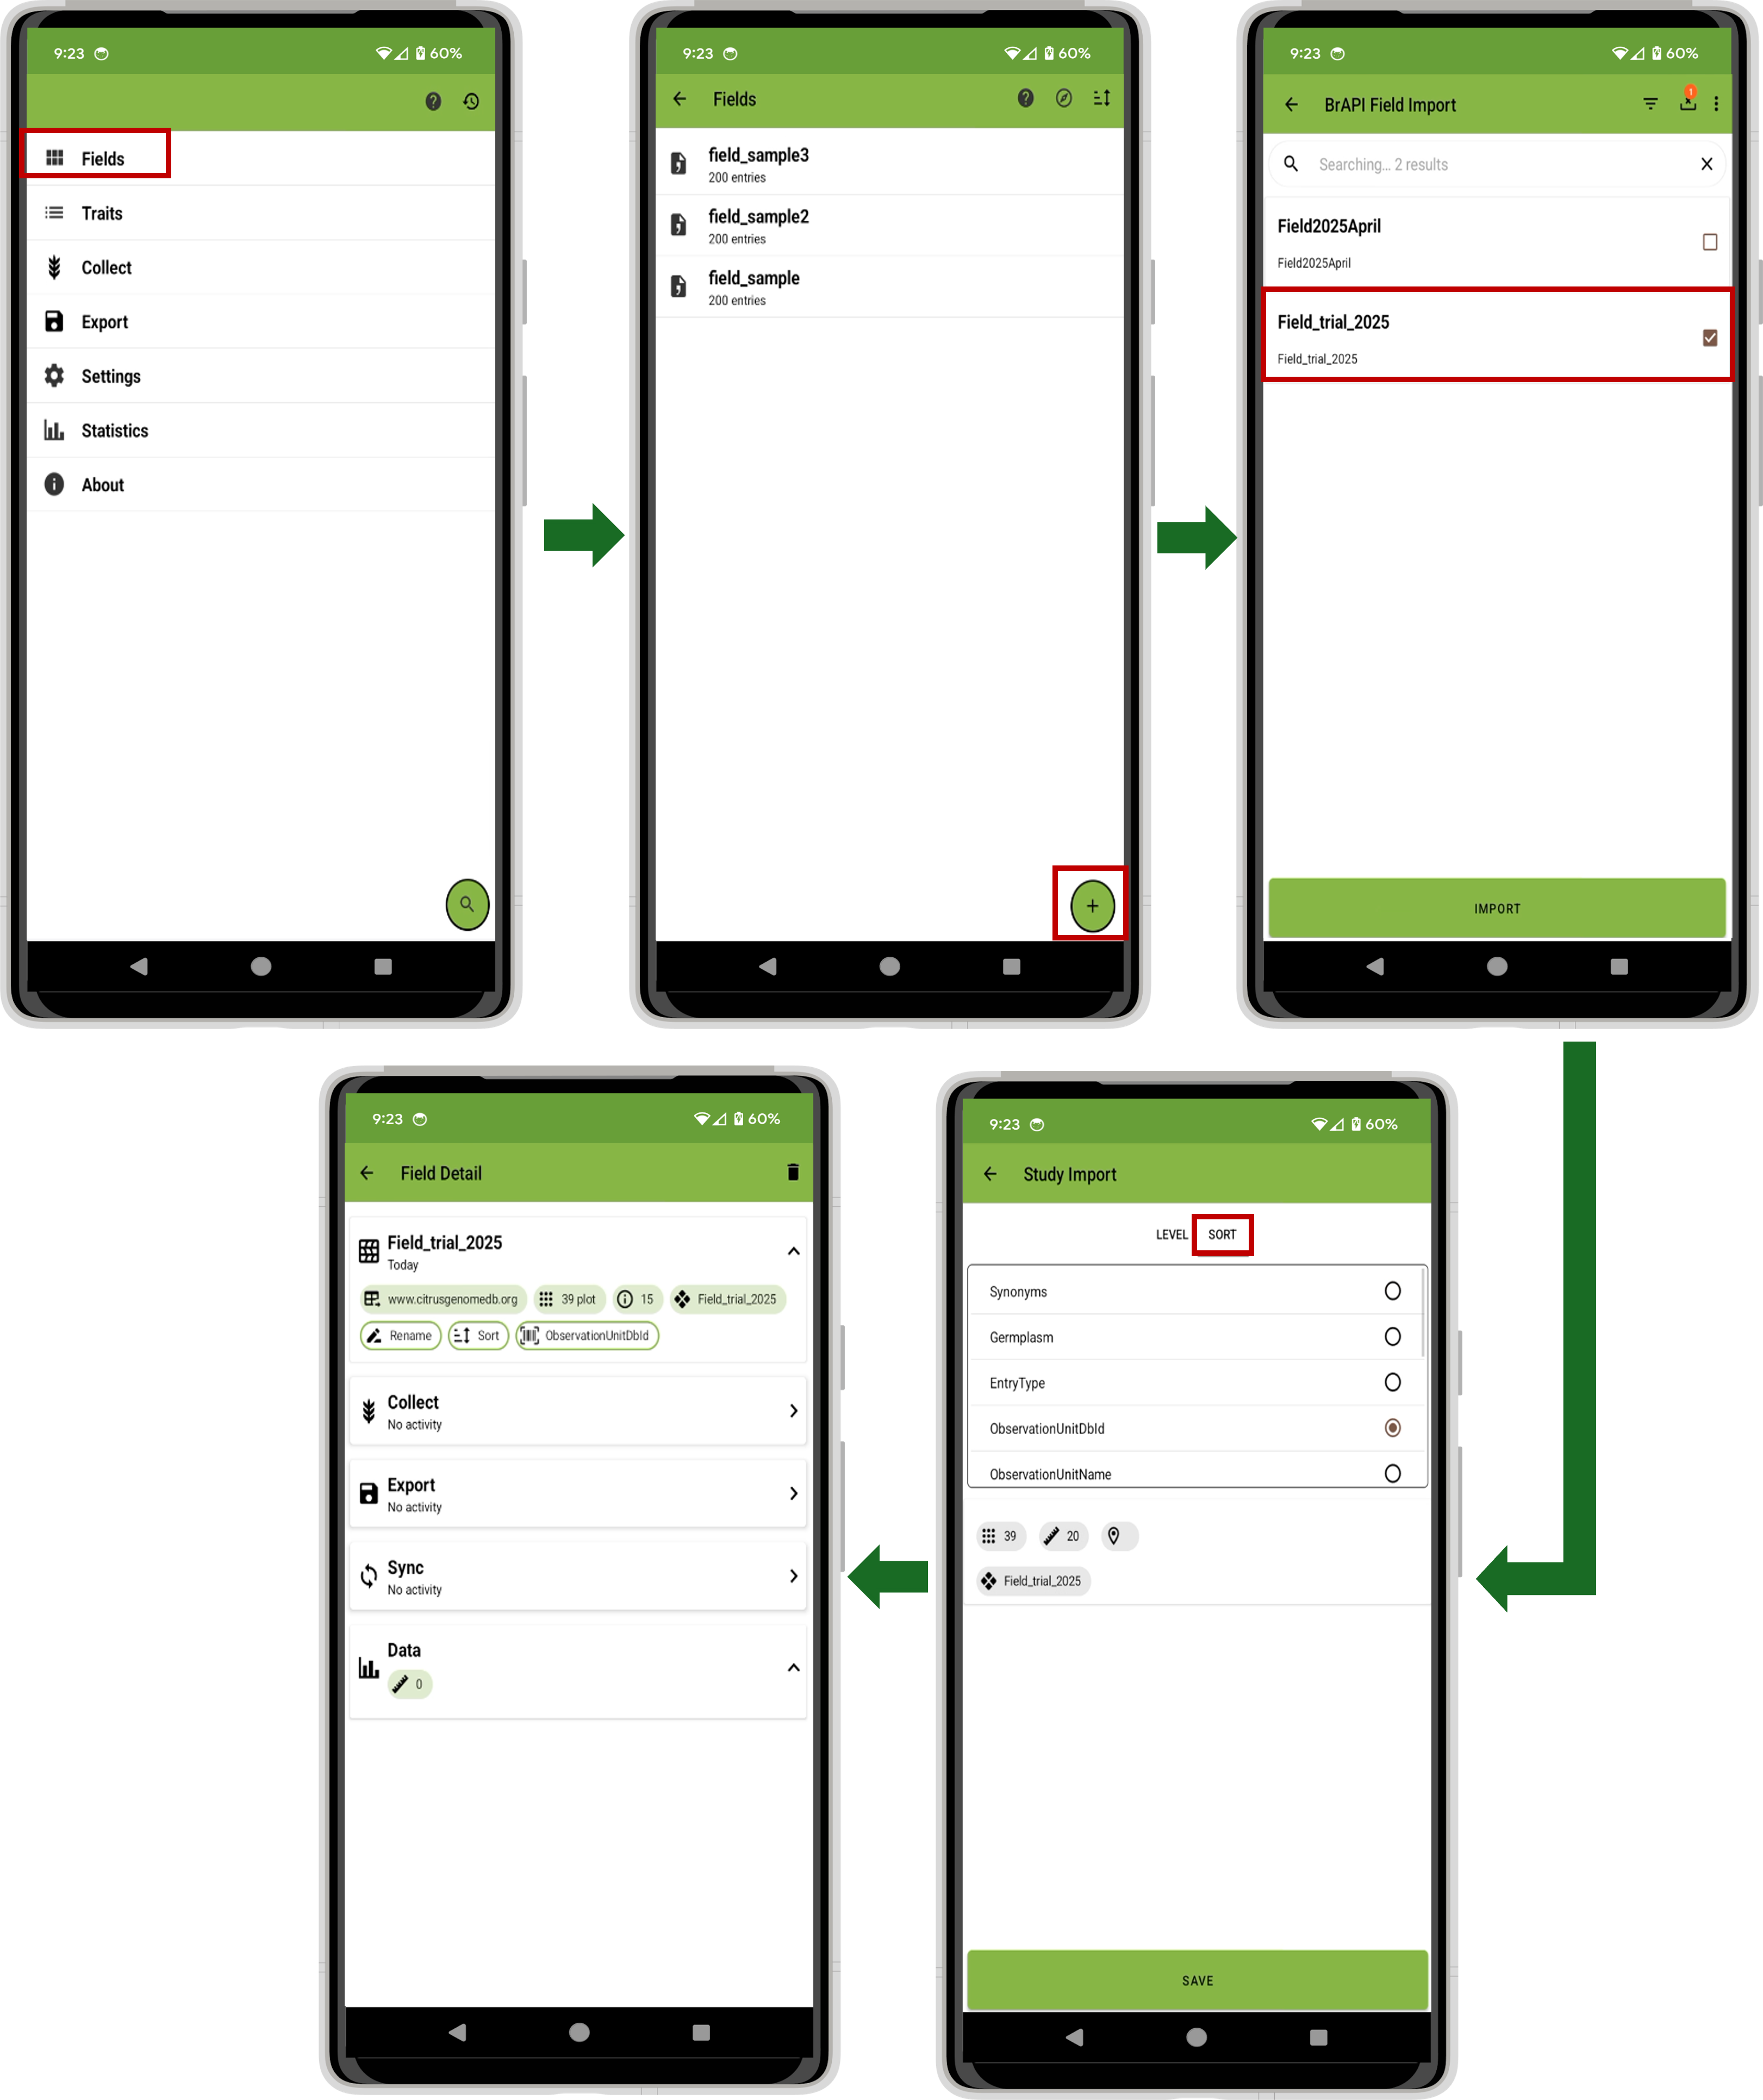
Figure. Import field data to Field Book via BrAPI.
Note: The BrAPI configuration on Field Book requires an internet connection on your phone/tablet device.
Via Local storage
To transfer a field to Field Book using a local drive, the first step is to generate an input field file in BIMS. Click on ‘Field’ under Local Storage in the Field Book Management menu in BIMS, then click on the drop-down menu under ‘Trial’ to select the existing field trial to generate for Field Book.
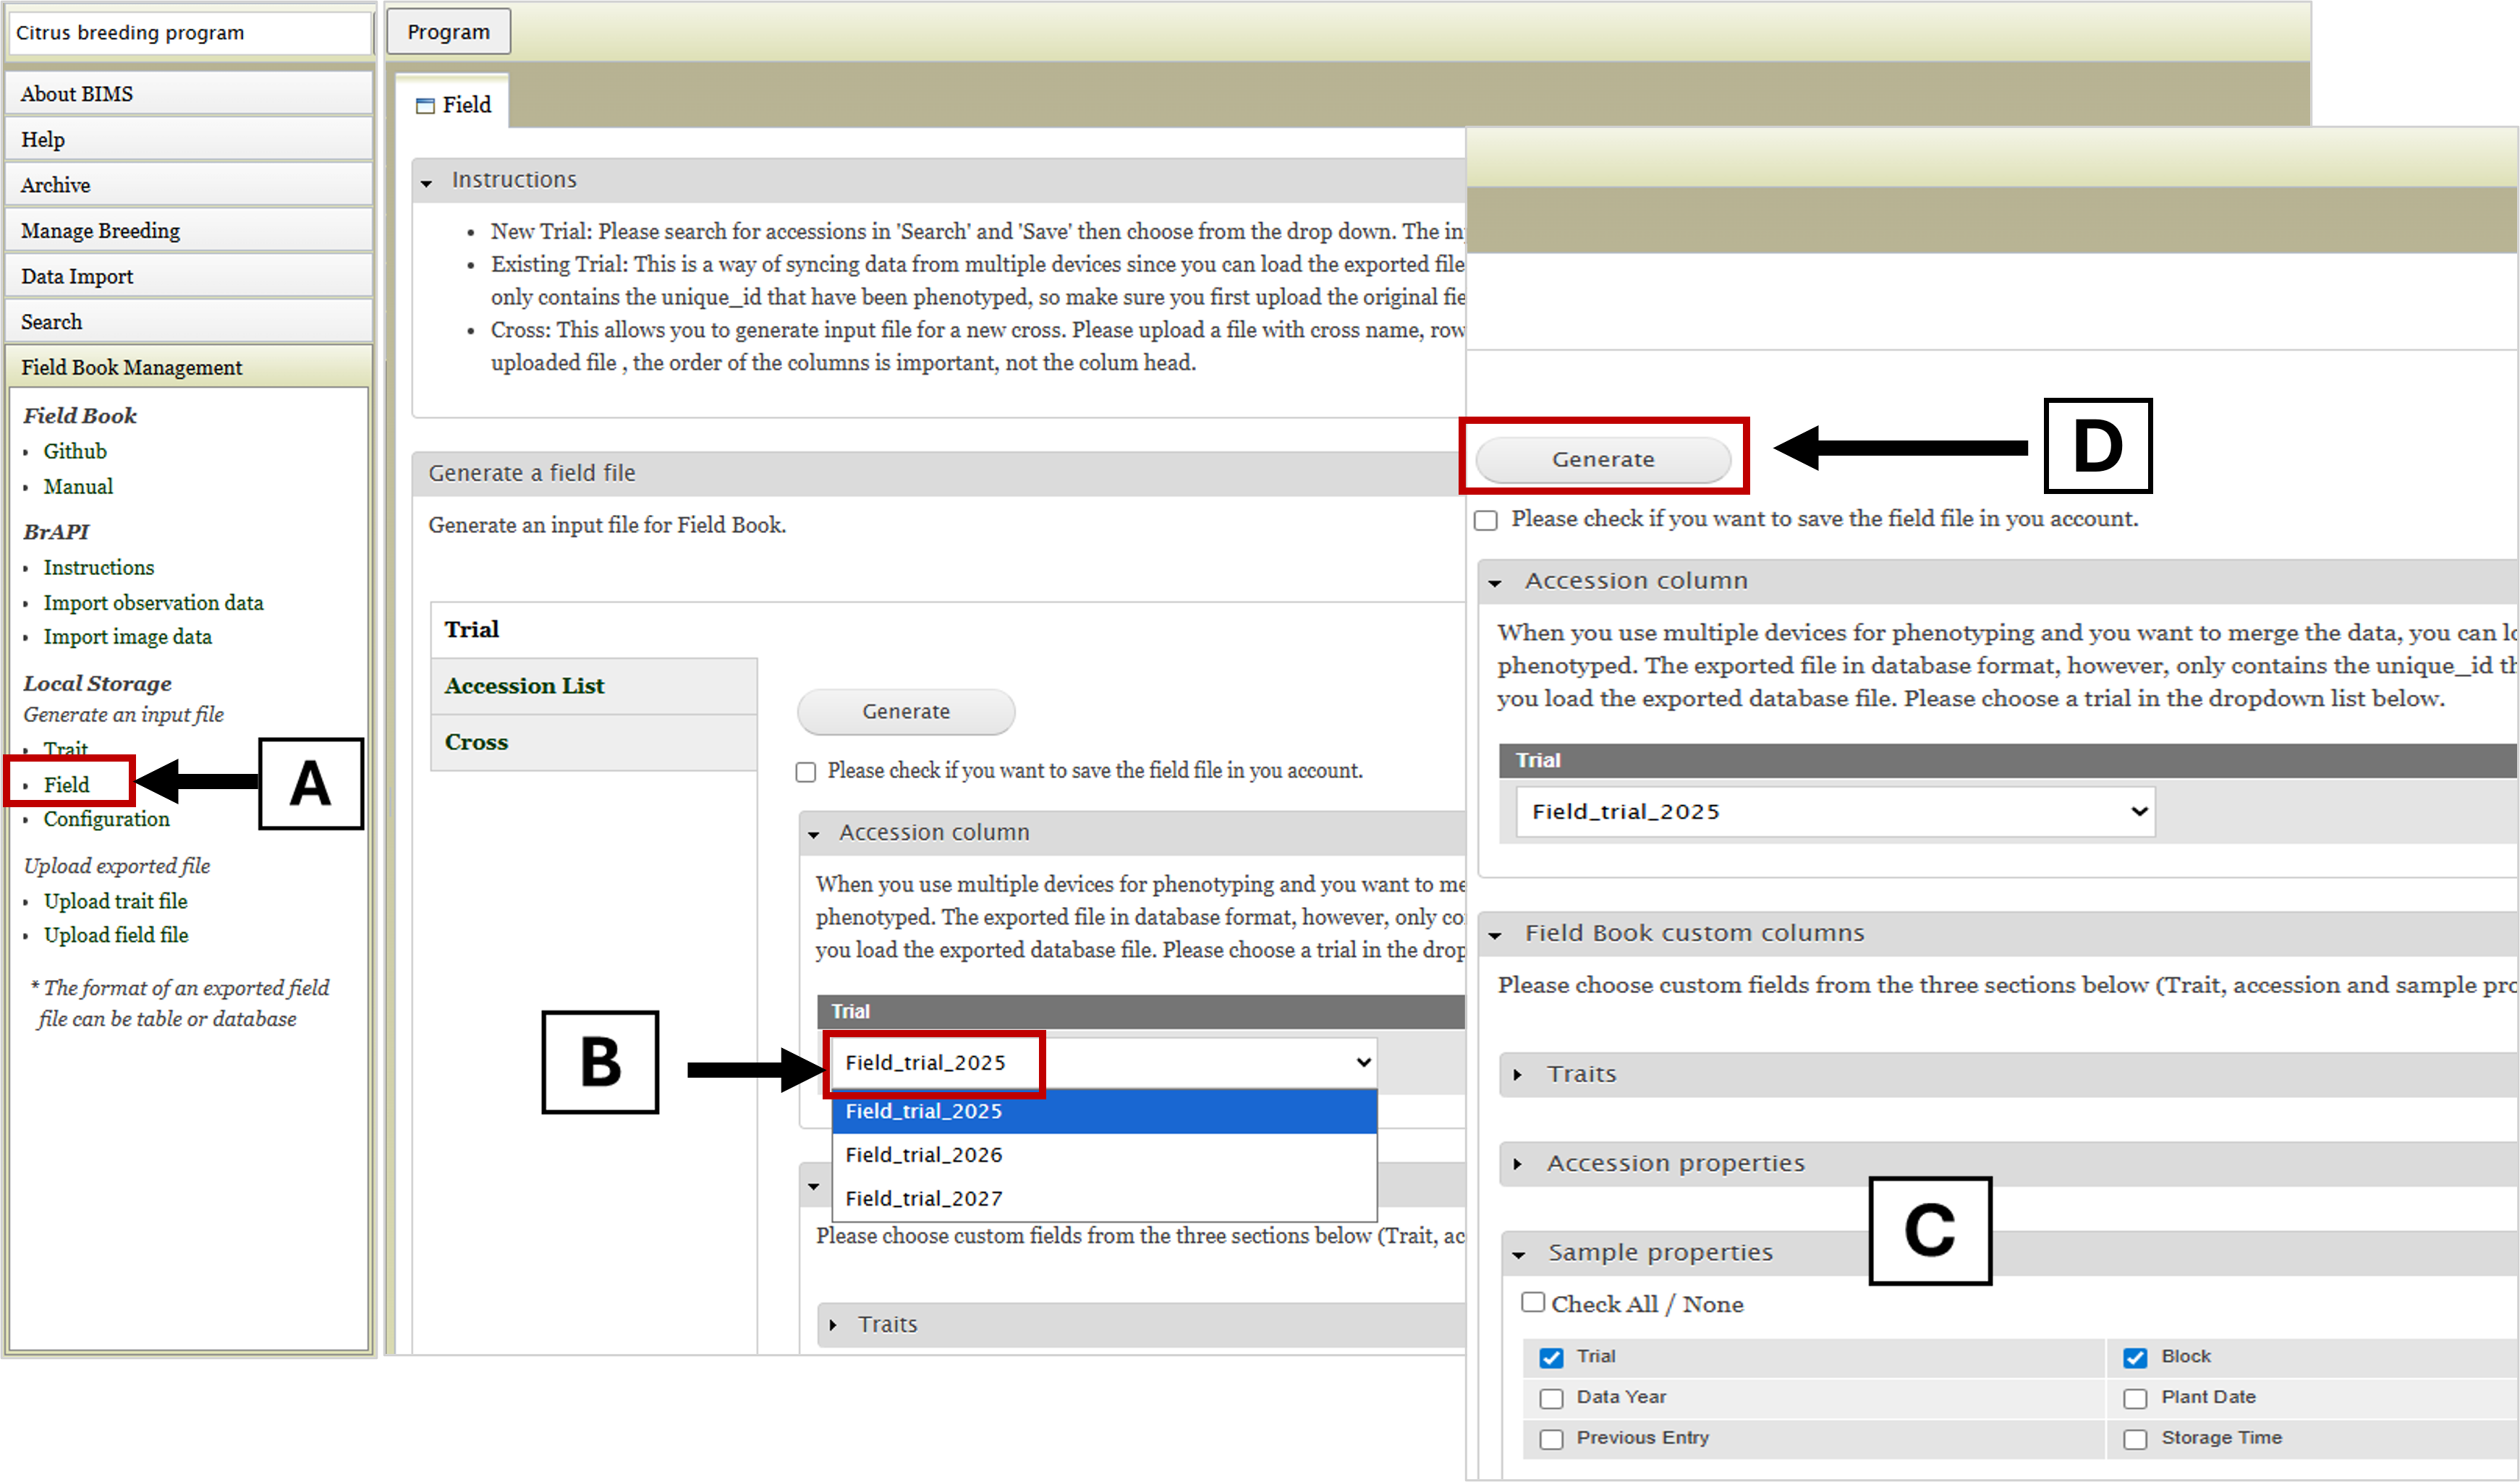
Figure. Generate a field file in BIMS.
Click the ‘Generate’ tab to download the field input file. The downloaded field is an Excel file containing five column attributes (i.e. sample_id, Accession, unique_id, primary order, and secondary order). Additional field attributes can be added by selecting sample or accession properties from the drop-down menu before generating the field file. In the sample input field shown, ‘Trial’ name and ‘Block’ ID were added in the field file.

Figure. Sample input field file generated in BIMS.
The next step is to generate a trait input file in BIMS. Click on ‘Trait’ under Local Storage in the Field Book Management menu in BIMS, then tick the box next to the traits to select the traits for Field Book. Click on the ‘Generate’ tab to download the trait input file. This file contains the trait name, the trait format, and other descriptors for each entry.

Figure. Generate a trait file in BIMS.
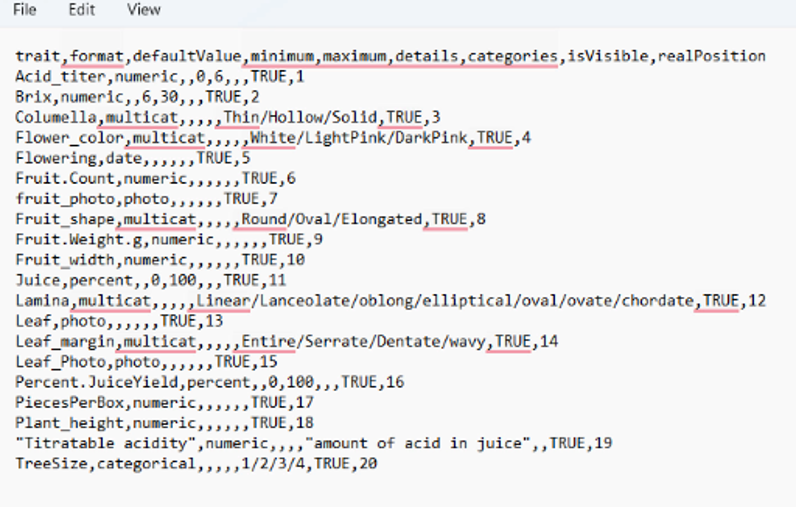
Figure. Sample trait input file generated in BIMS.
To import the field input file to Field Book, open Field Book App and click ‘Fields’ in the main menu. Click ‘+’ to add a new field. Navigate in local or cloud storage to access the input field data, then select the field file and click ‘Import’. After successful import of the field, you can sort the field entry using different sample properties such as ‘unique_id’, ‘Block’, etc.
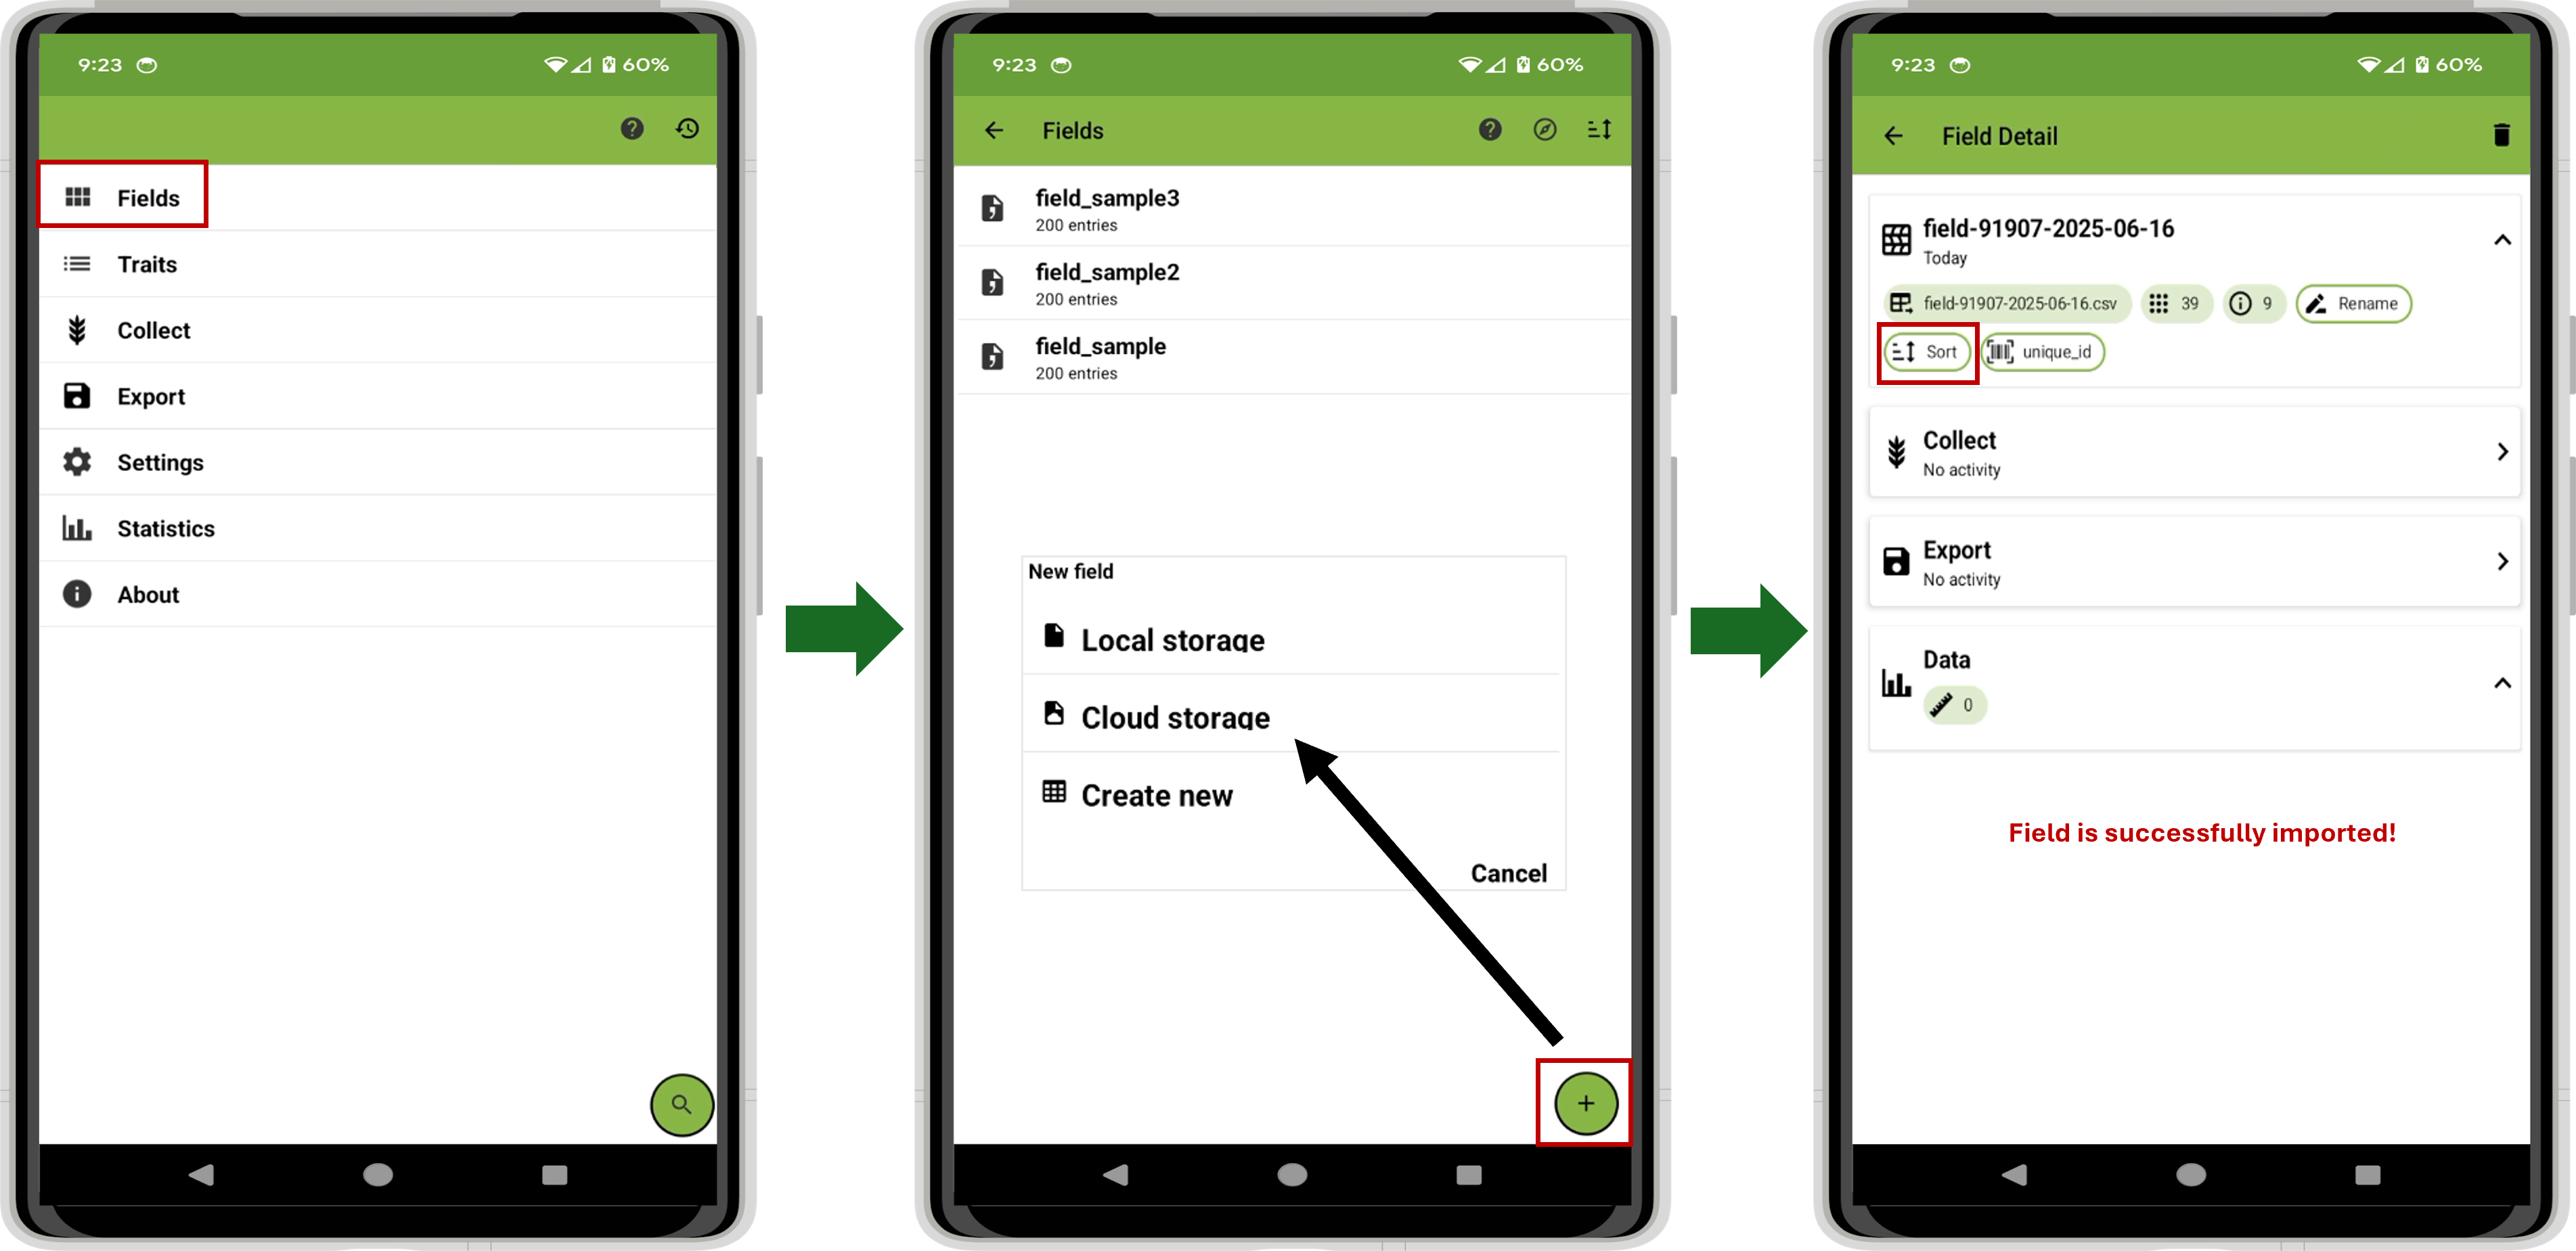
Figure. Import field file into Field Book from local storage.
The next step is to import an input trait file to Field Book. Click on the ‘Traits’ in the main menu. Click ‘+’ to add new traits then select import the trait from file. Access the trait file from local or cloud storage and select the trait file for import. Once the field and trait files are successfully imported, you can start collecting new data on Field Book.
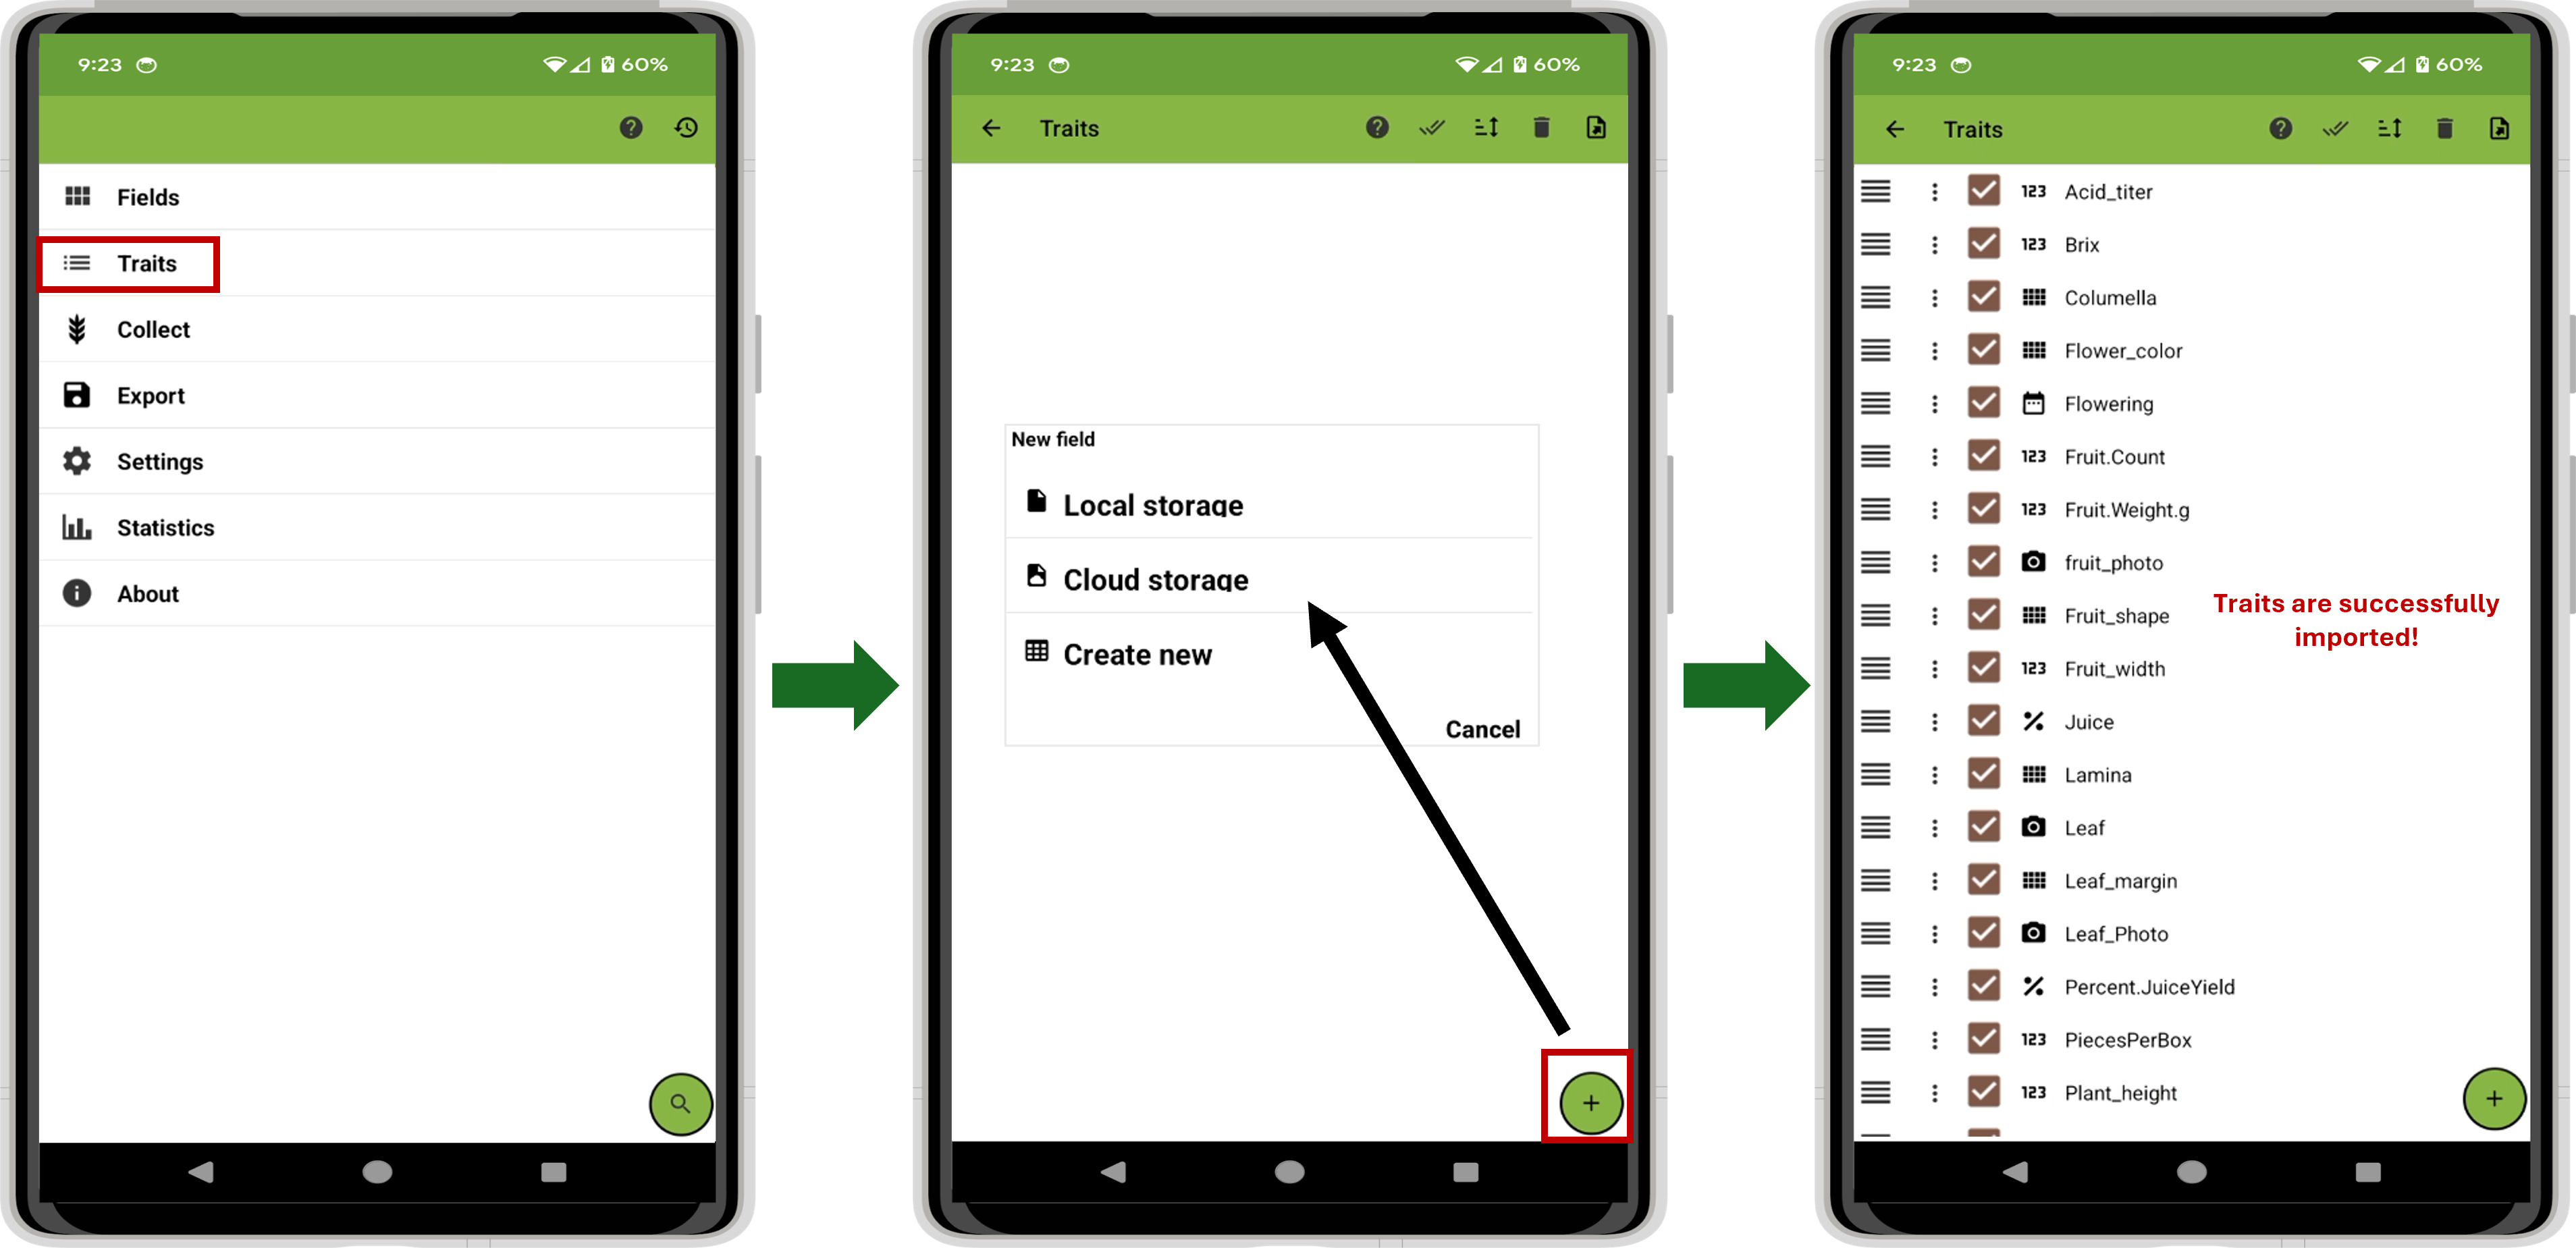
Figure. Import trait file into Field Book from local storage.
Collecting Data with Field Book App
After exporting the empty field file to Field Book, on the Field Book App, click on the Fields tab and select the field of interest. Click on the Collect tab. The screen displays various information, including germplasm, trait, row, and tree numbers. When the field is imported via BrAPI, notice the following changes in identifier names: *Accession is now germplasm, *Unique_ID becomes Plot, *R changes to Row, and *T becomes Column. Users can change the kind of information displayed in this infobar by clicking it and choosing it. Click on the green arrow to select the desired trait. Click on the black arrows to move to the desired row and column (plot). Collect data using the input method displayed. Different trait categories have different input methods. For numeric traits such as Apple_fruit_wt_g, the numeric keyboard is displayed. More information is available in the Field Book manual.
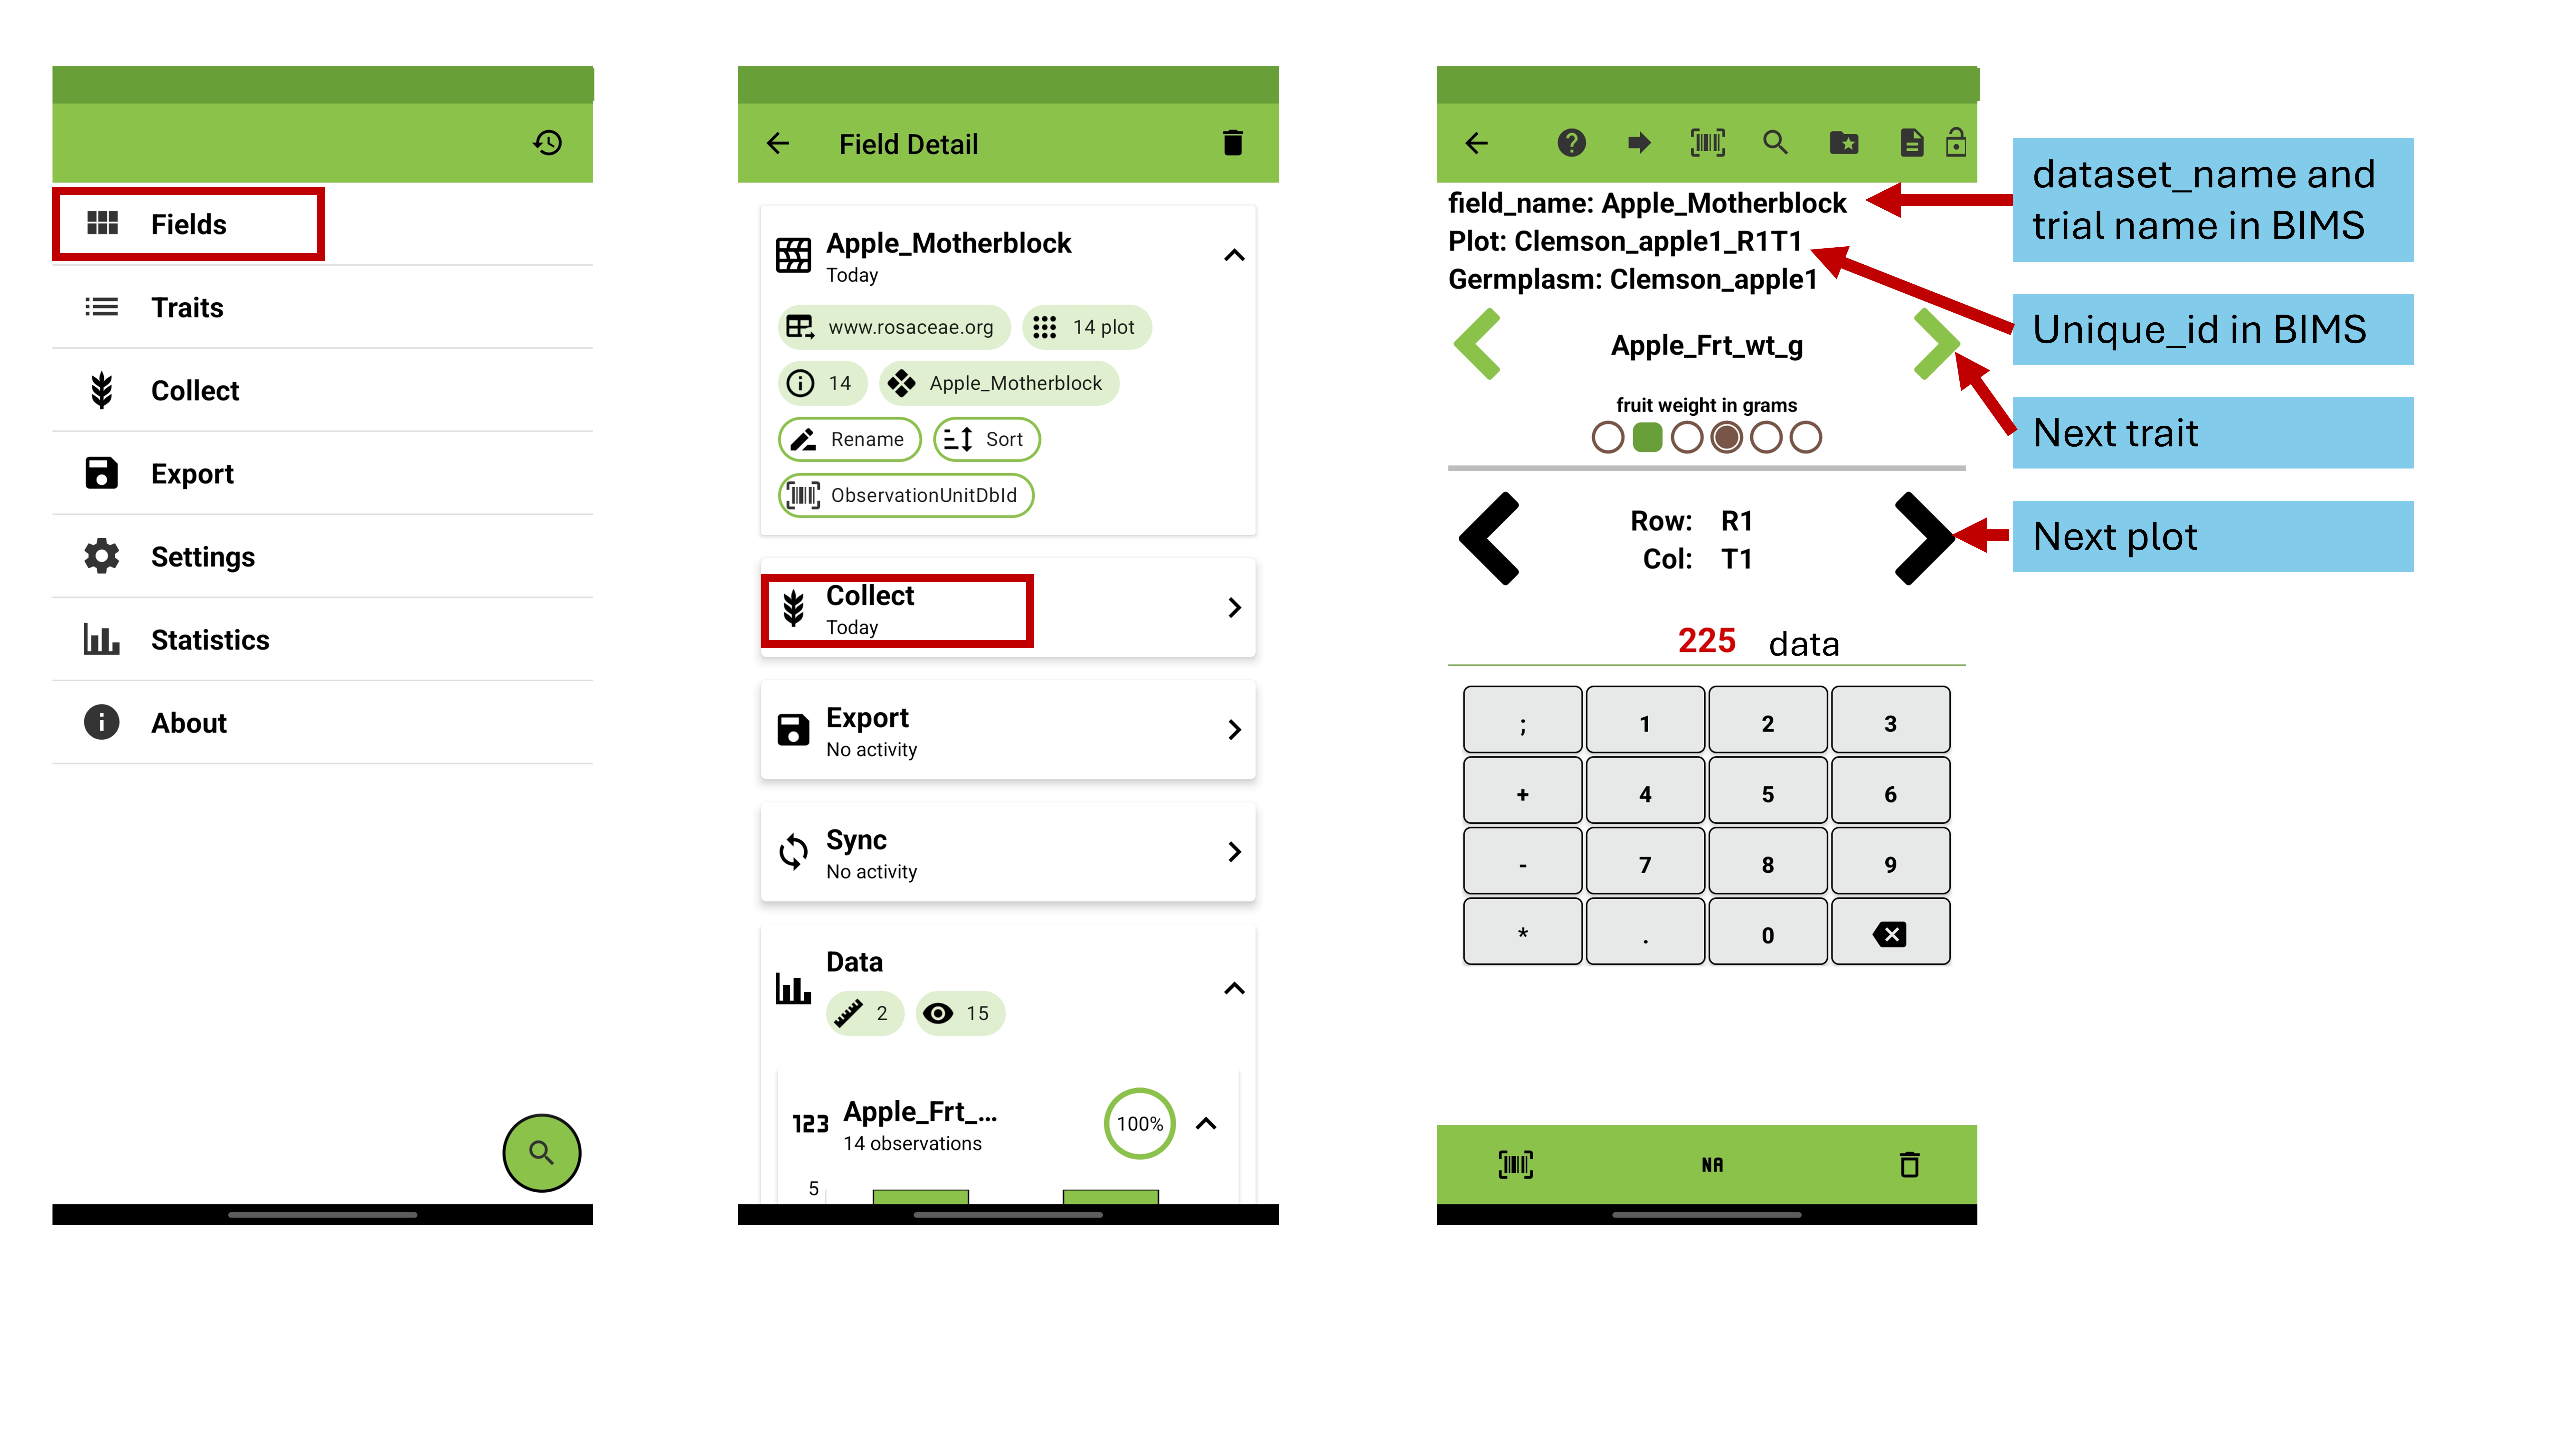
Figure. Collecting data with the Field Book App.
Transferring Data from Field Book to BIMS
Via BrAPI
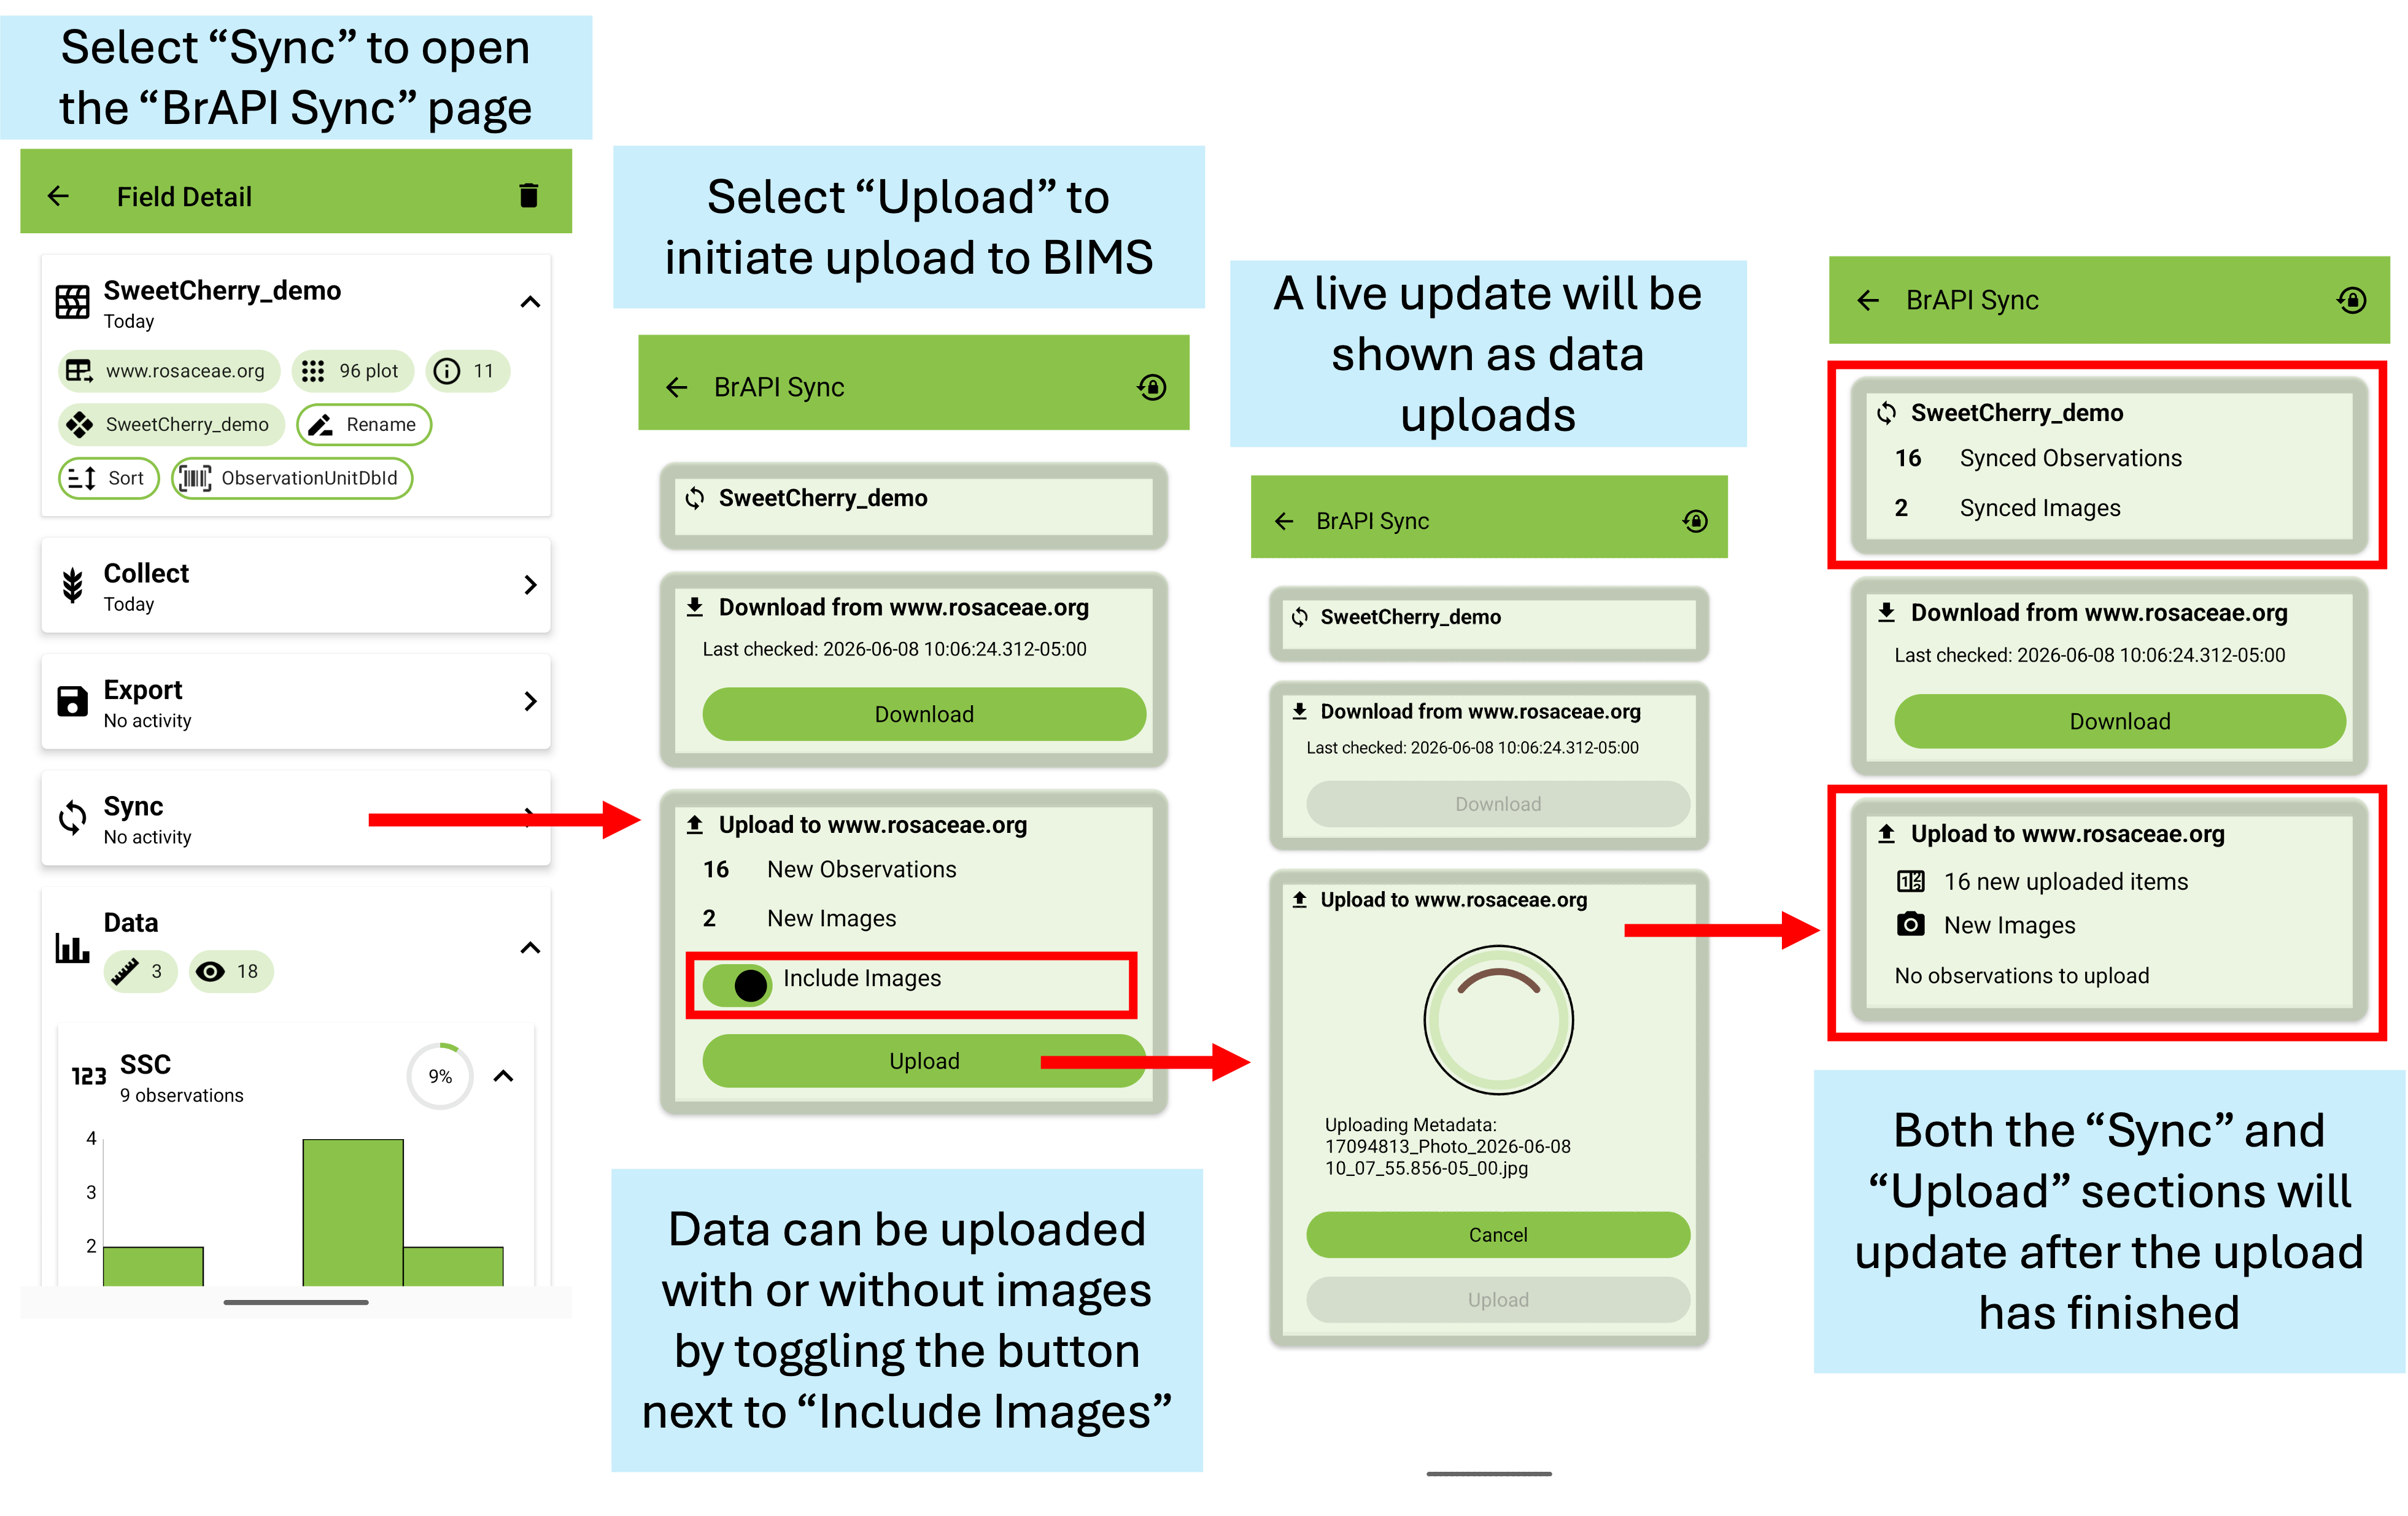
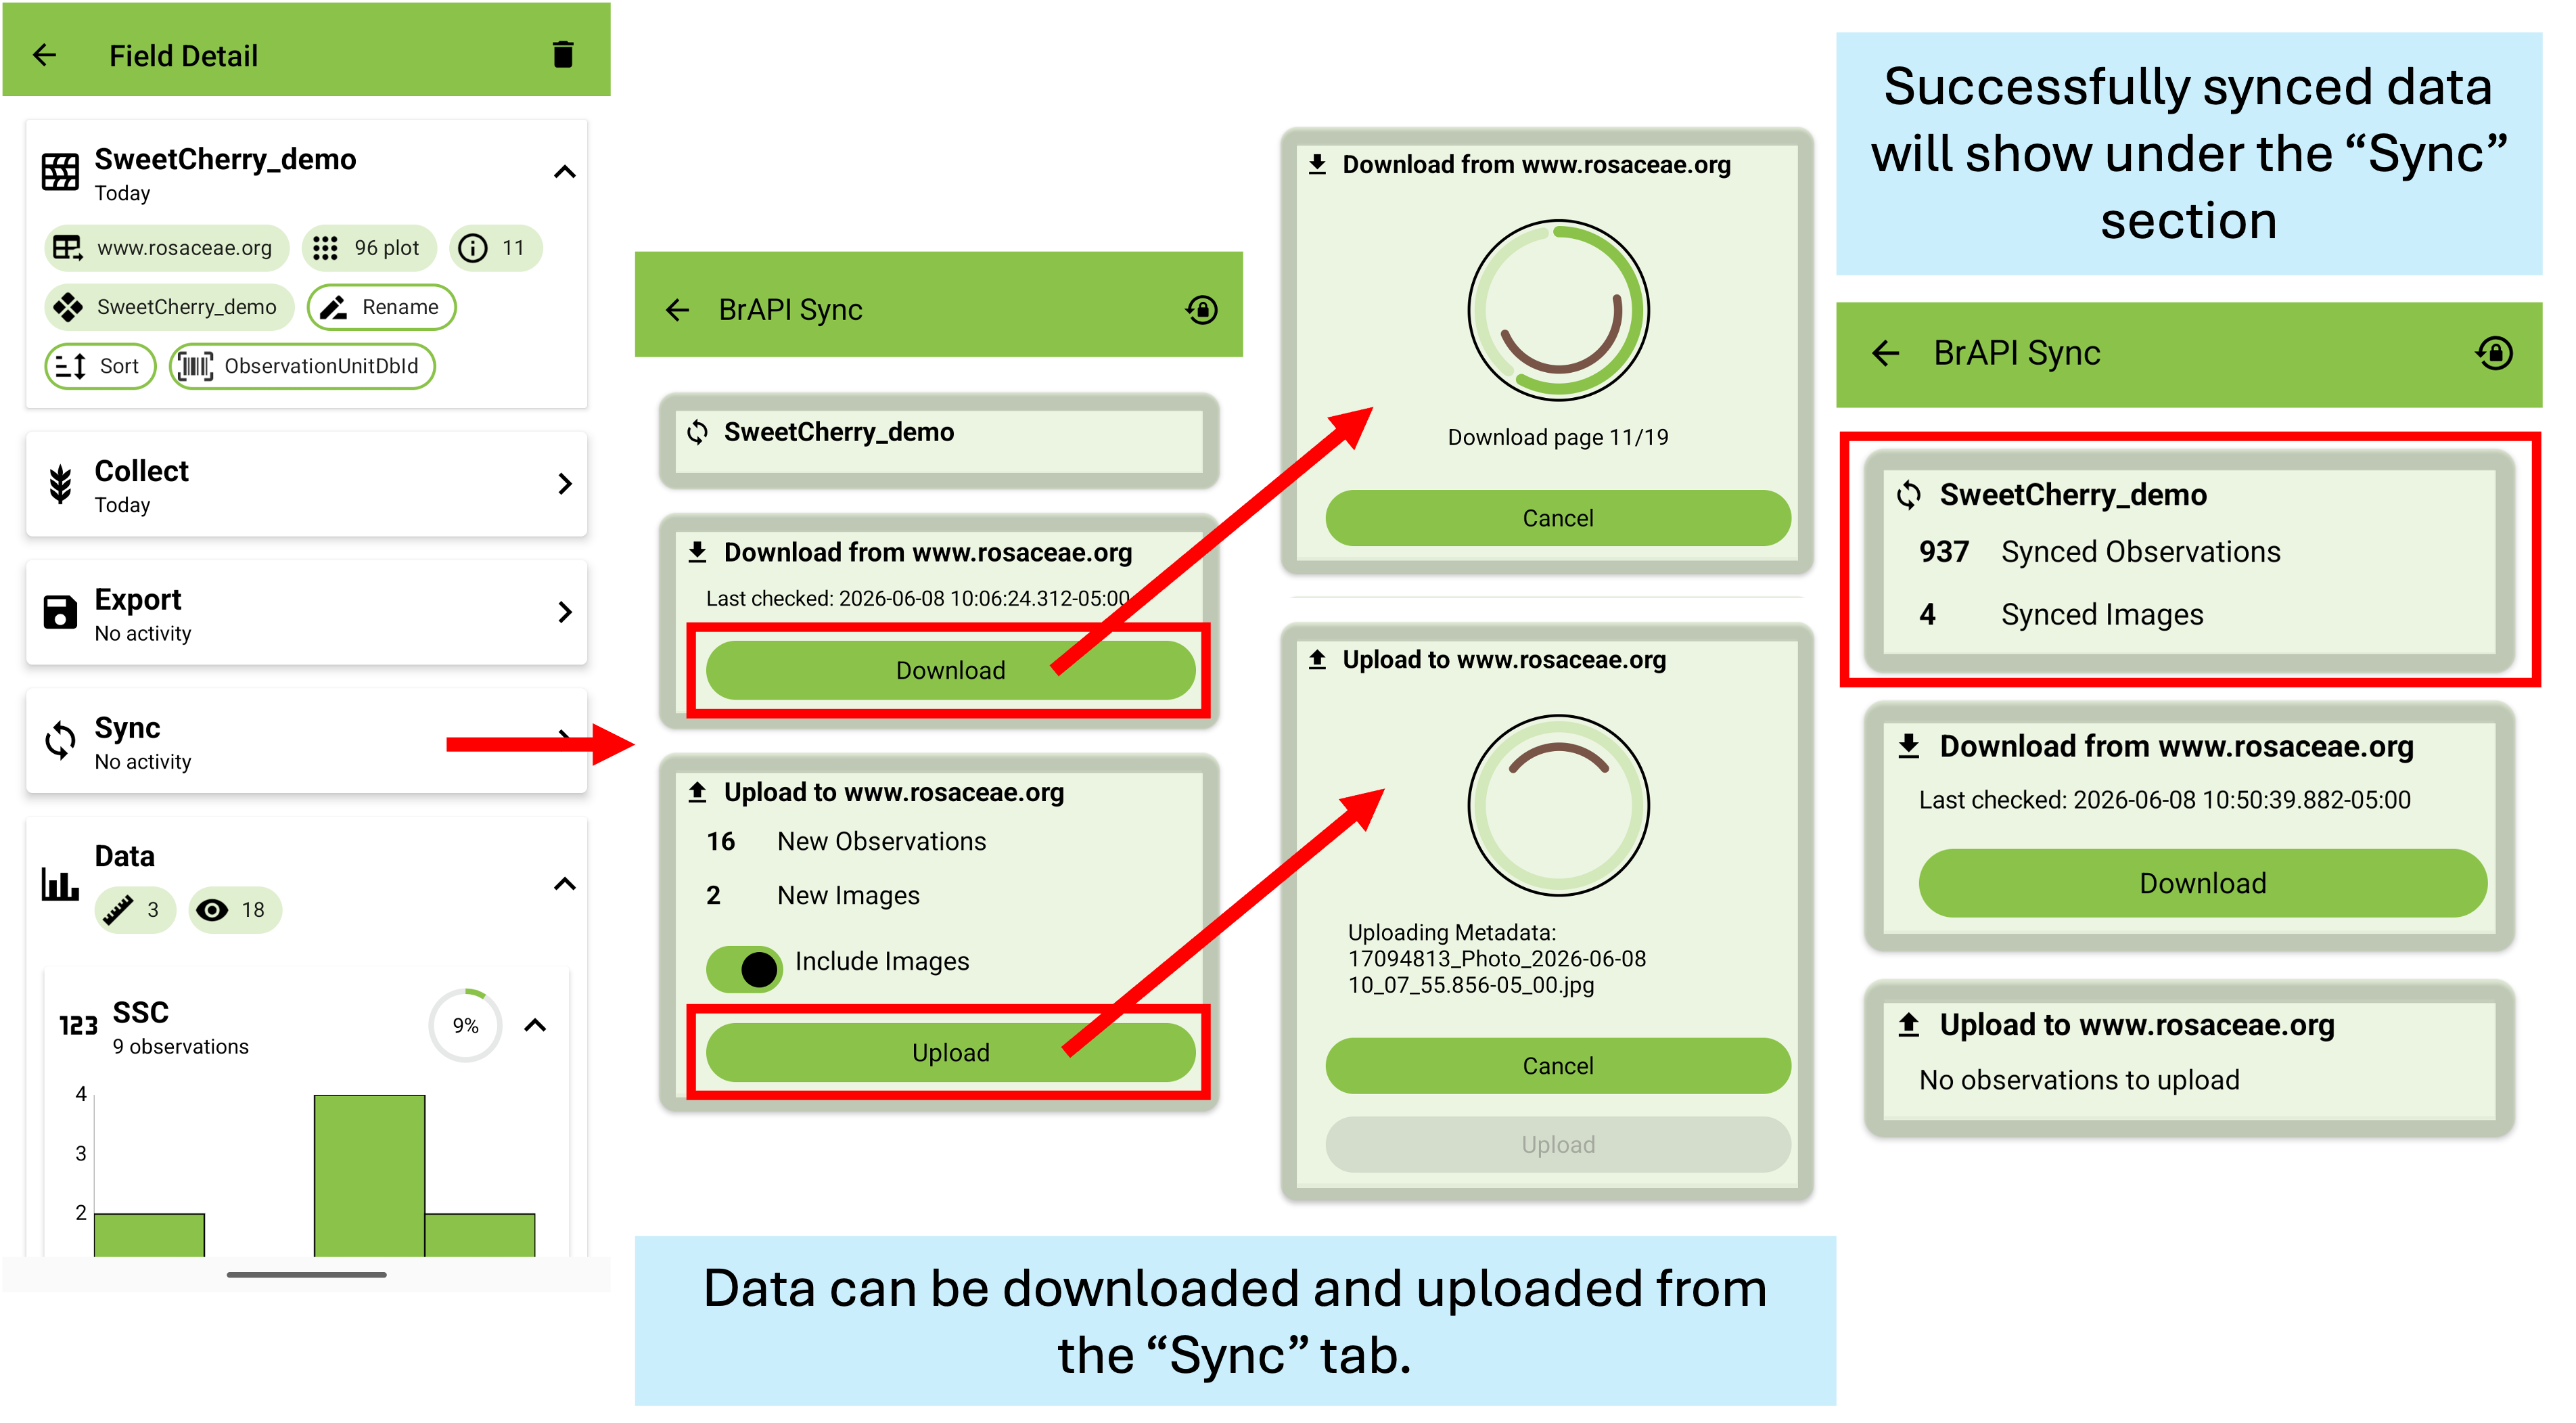
To transfer observation data to BIMS, select the field and click Sync. A new page will open with options to download or upload observations (the web link will be different for different crop databases linked to BIMS, E.g., www.rosaceae.org is for the Genomic Database for Rosaceae). In the upload section, you will see the number of observations available to upload, followed by an upload button. Data can be uploaded with or without images by toggling the button next to “Include Images”. Select “Upload” to send the recorded data to BIMS via BrAPI. Live updates will be displayed while uploading. After the upload is complete, the number of successful uploads will be displayed in the “Sync” and “Upload” sections. For more information, visit the Field Book manual.
Note: You can send data directly to BIMS ONLY if BrAPI was initially used to send the empty field file from BIMS to Field Book.
Via Local storage
To transfer observation data using a local file to BIMS, an export file can be created in two different ways. Similar to exporting via BrAPI, an export file can be generated from the field page by selecting “Export”. This will generate a pop-up in which you can select the format, field columns, traits, and the filename. In the Export dialogue box, select database. Note that only the database format can be loaded to BIMS. The downloaded file (.csv) contains multiple columns for different sample properties and observation data. It also indicates the person who collected the data and the timestamps when the data was collected using Field Book.
Export files can also be created from the homepage of Field Book by selecting “Export”. This action will generate the same “Export” pop-up as mentioned above. For more information, visit the Field Book manual.
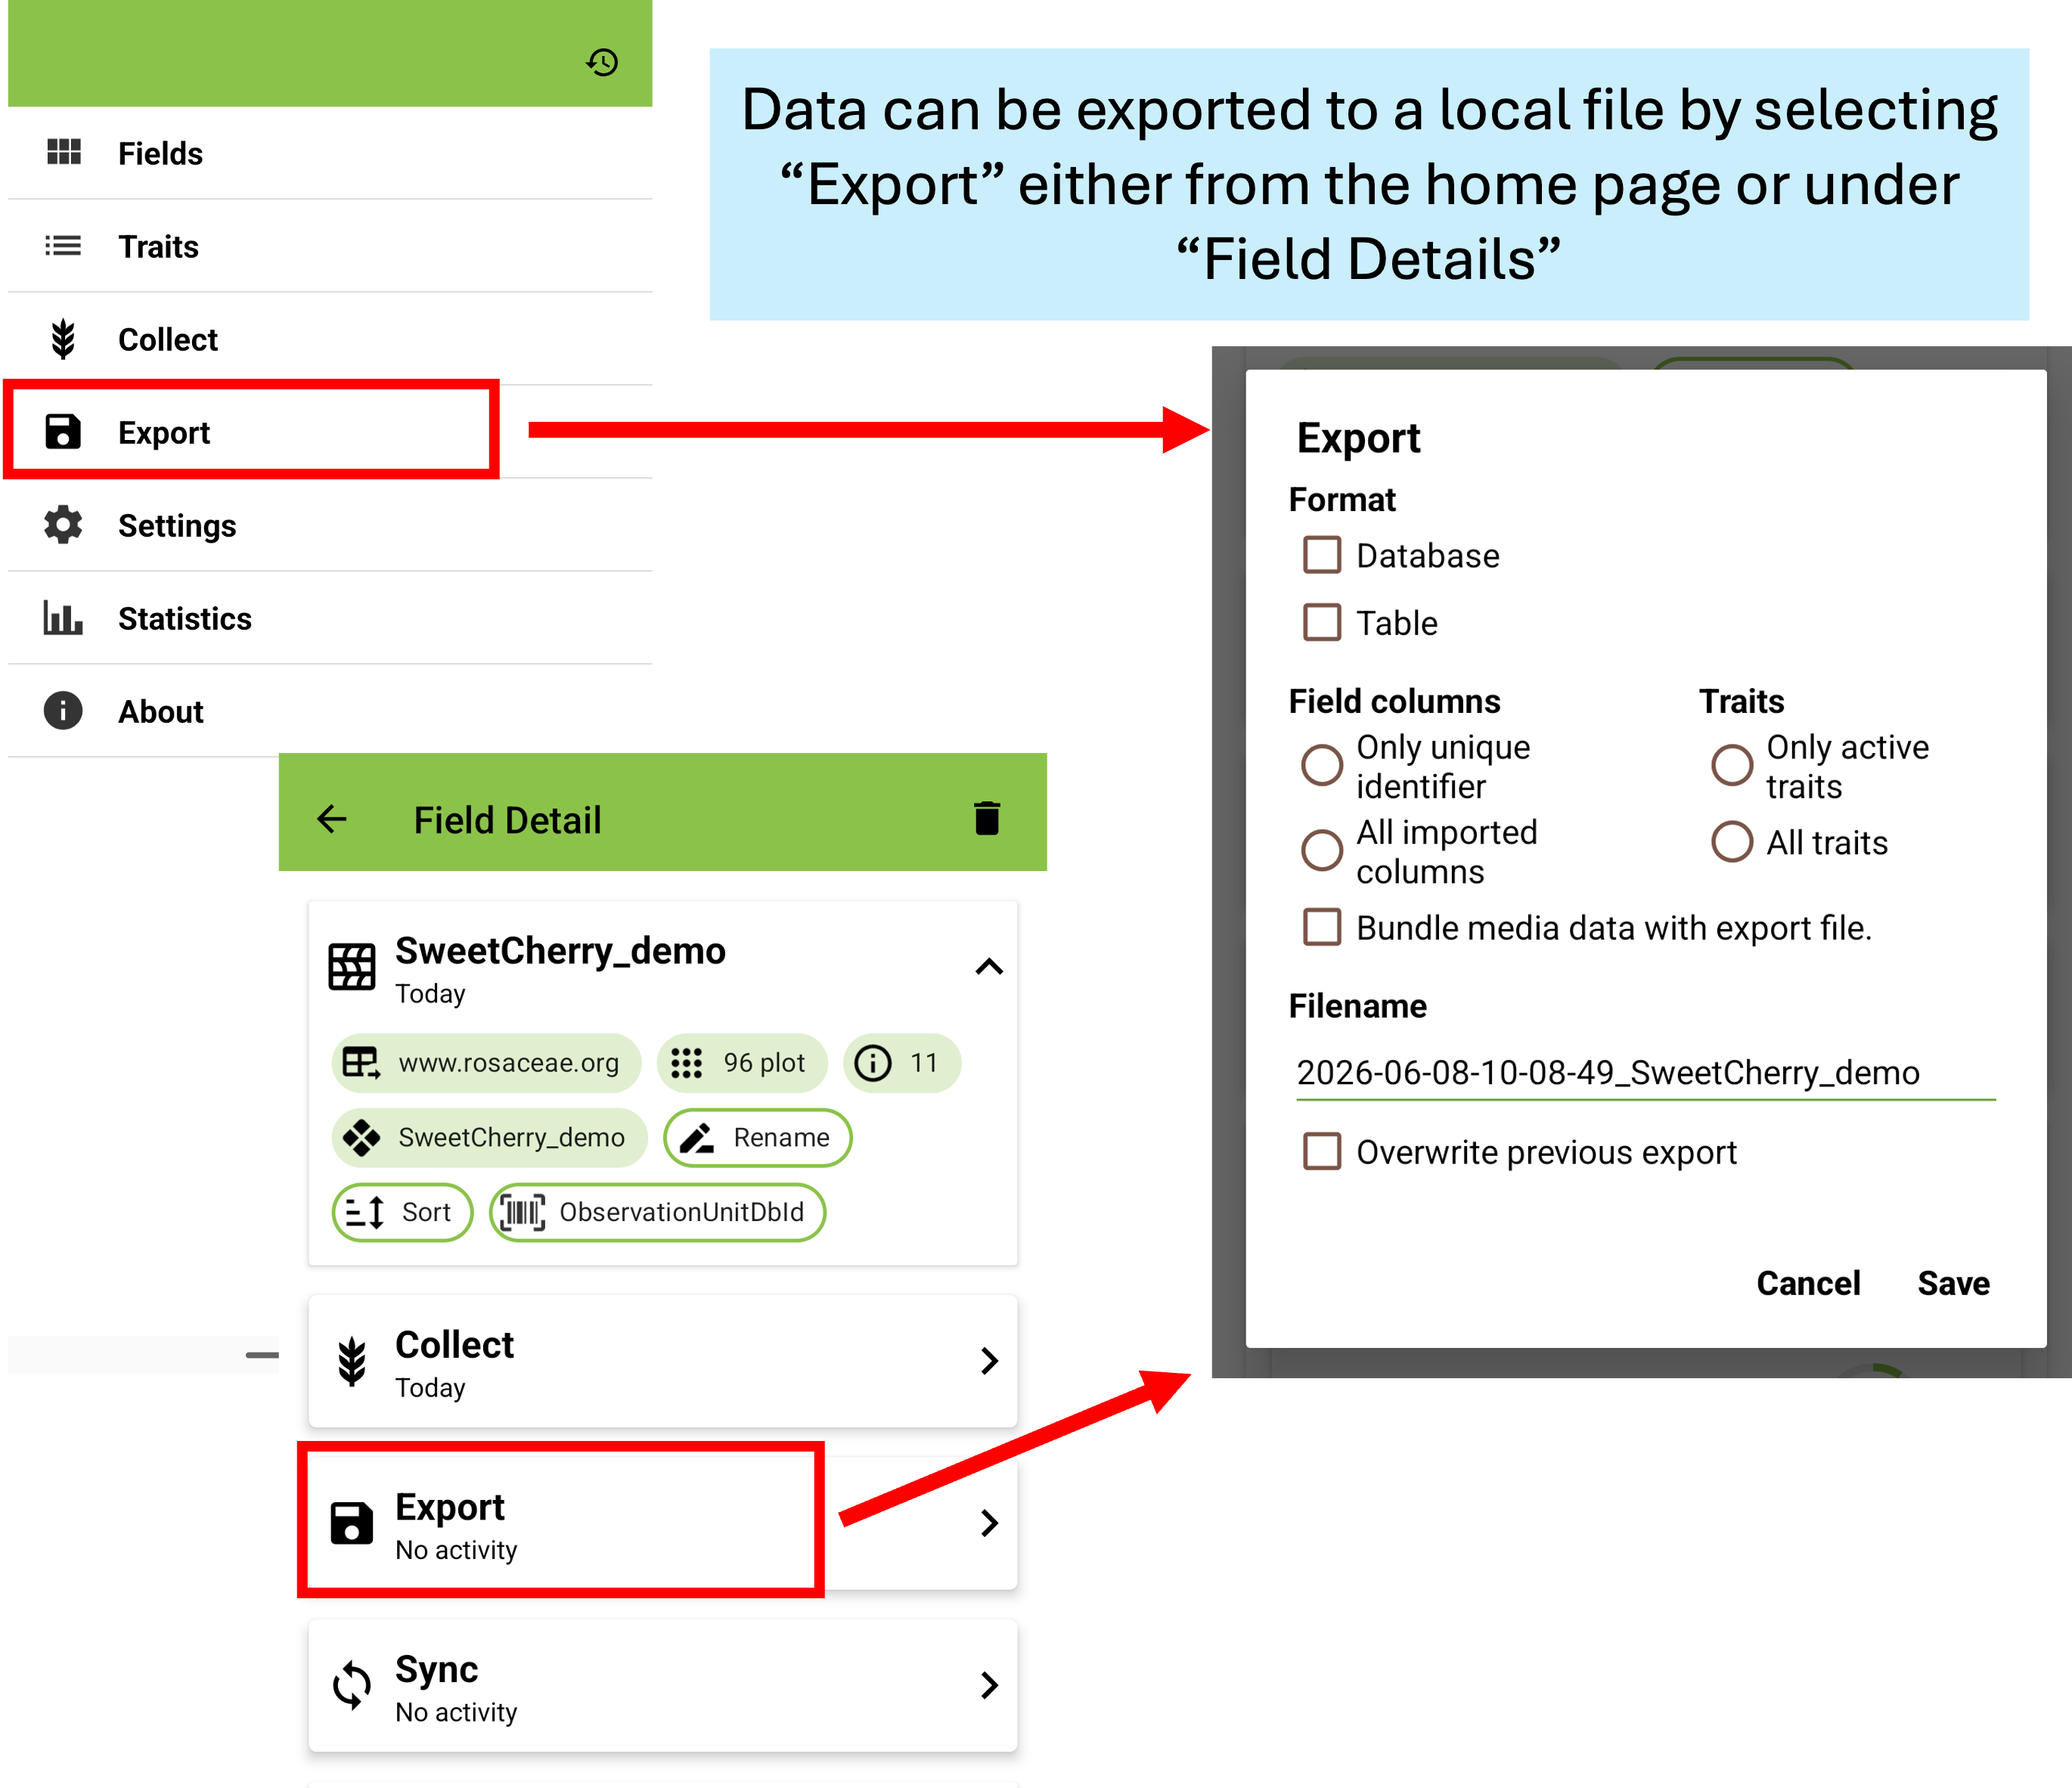
Figure. Export observation data to a local drive.
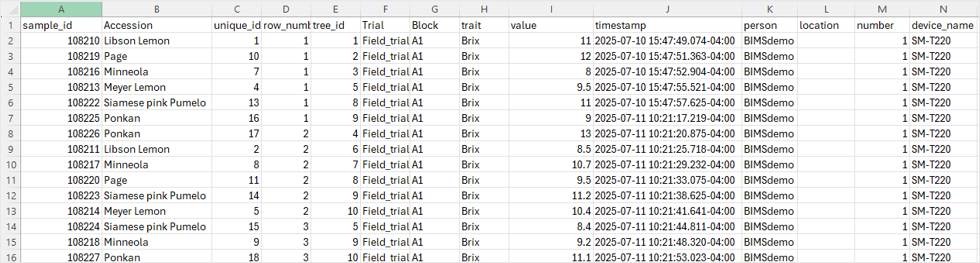
Figure. Sample observation data of exported Field Book file.
To upload the exported Field Book file in BIMS, find the submenu “Upload exported file” in the Field Book Management and click “Upload field file”. Choose the exported field file (.csv) and click ‘Upload’. The only required columns in the file include “unique_id”, “primary_order” and ”secondary_order”. Under the “Check Field” tab, you can select other columns to store as additional sample properties. Click “Submit” to start the data export in BIMS.

Figure. Upload exported Field Book file in BIMS.
To view the progress of an upload job, click on the file name under “Uploaded files”. Summary information about the file will appear below and then click the “View” button. The “Upload Job” tab appears and will show the “Job Details” table. On the table you can see the job progress. If the job is still running, you can click the “Refresh” button to update the job progress.

Figure. View progress of exported file in BIMS.
Managing Field Book Data Across Multiple Devices
Syncing via BrAPI
In many breeding programs involving several data collectors using different devices, all data collected can be synced using BrAPI. Under “Field Details” for the selected field, select “Sync”. This will open the same page that is used for uploading data to BIMS via BrAPI. Data can be synced by selecting “Download” and “Upload”. After completion, the number of synced observations will show under the “Sync” section at the top of the page. For more information, visit the Field Book manual.
Consolidating sample properties via files
Syncing observation data in Field Book across multiple devices through BIMS is only possible via BrAPI. When using BrAPI is not an option, users can still coordinate phenotyping across multiple devices by marking samples (plots, unique_IDs) that have already been phenotyped. This is accomplished by loading data from all devices to BIMS and transferring it back to each device, allowing users to see which samples have been completed. This feature is particularly useful in breeding programs where completing a specific trait measurement indicates that phenotyping is finished for that sample.
- To use this feature:
Load the observation data from each device into BIMS (see the Local Storage section under How to transfer data from Field Book to BIMS).
Generate a field file containing one trait that indicates phenotyping completion for each sample.
Note: Any column in the Field Book input file is treated as a property of a plot (sample, unique_ID) and can be displayed in the infobar. These properties are not loaded into the Field Book as traits.

Figure. Generate input field file with Traits as an option in BIMS.
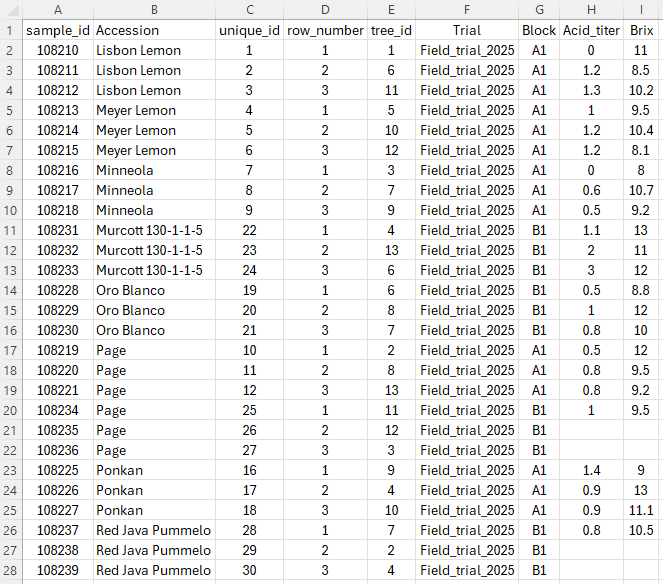
Figure. Sample field file with Traits option from BIMS.
Figure. Import field file into Field Book from a local storage.

Figure. Add Trait option on Infobar as a sample property to find observed data.
How to use GeoNav with Field Book
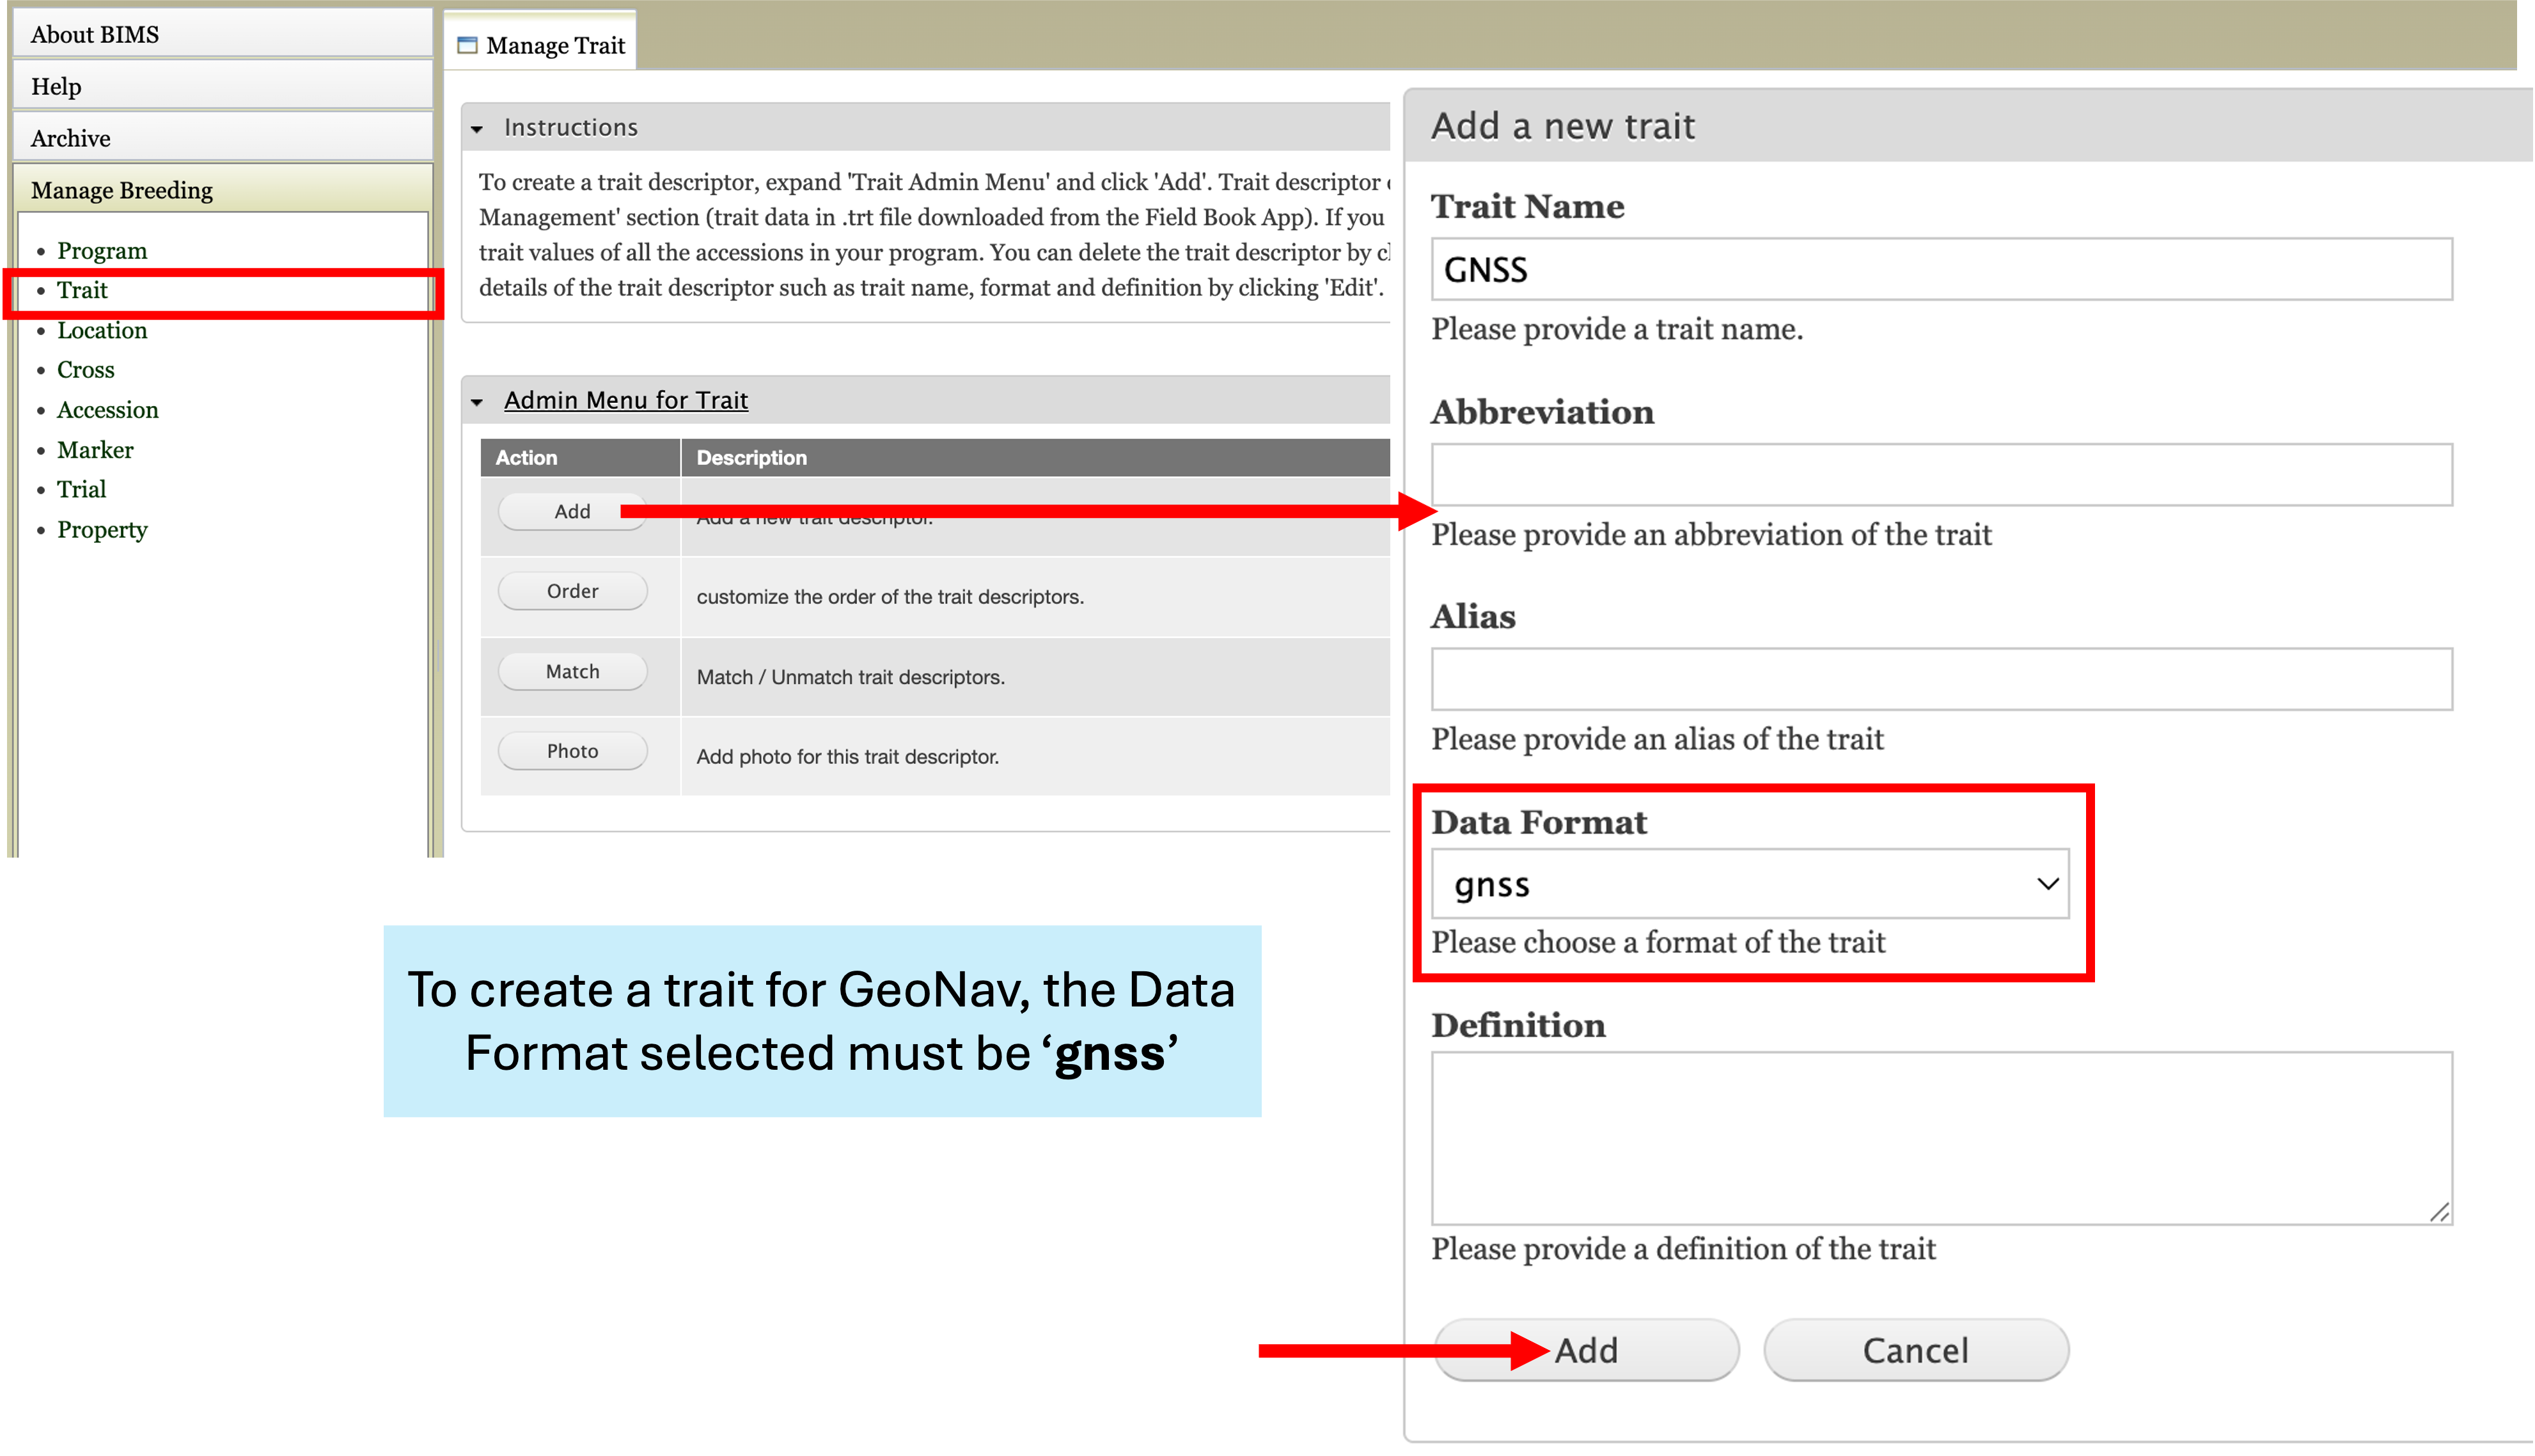
GeoNav can be used to automatically navigate between entries in the field by using the location of a high precision GNSS device. To use with BIMS, a compatible trait must be created within your BIMS program. To do so, select ‘Trait’ under the ‘Manage Breeding’ tab of the accordion menu. Expand the selection for “Admin Menu for Trait” and select ‘Add’. A new tab will pop-up to add the trait. The trait can have any name, but the Data Format must be selected as “gnss” from the dropdown.
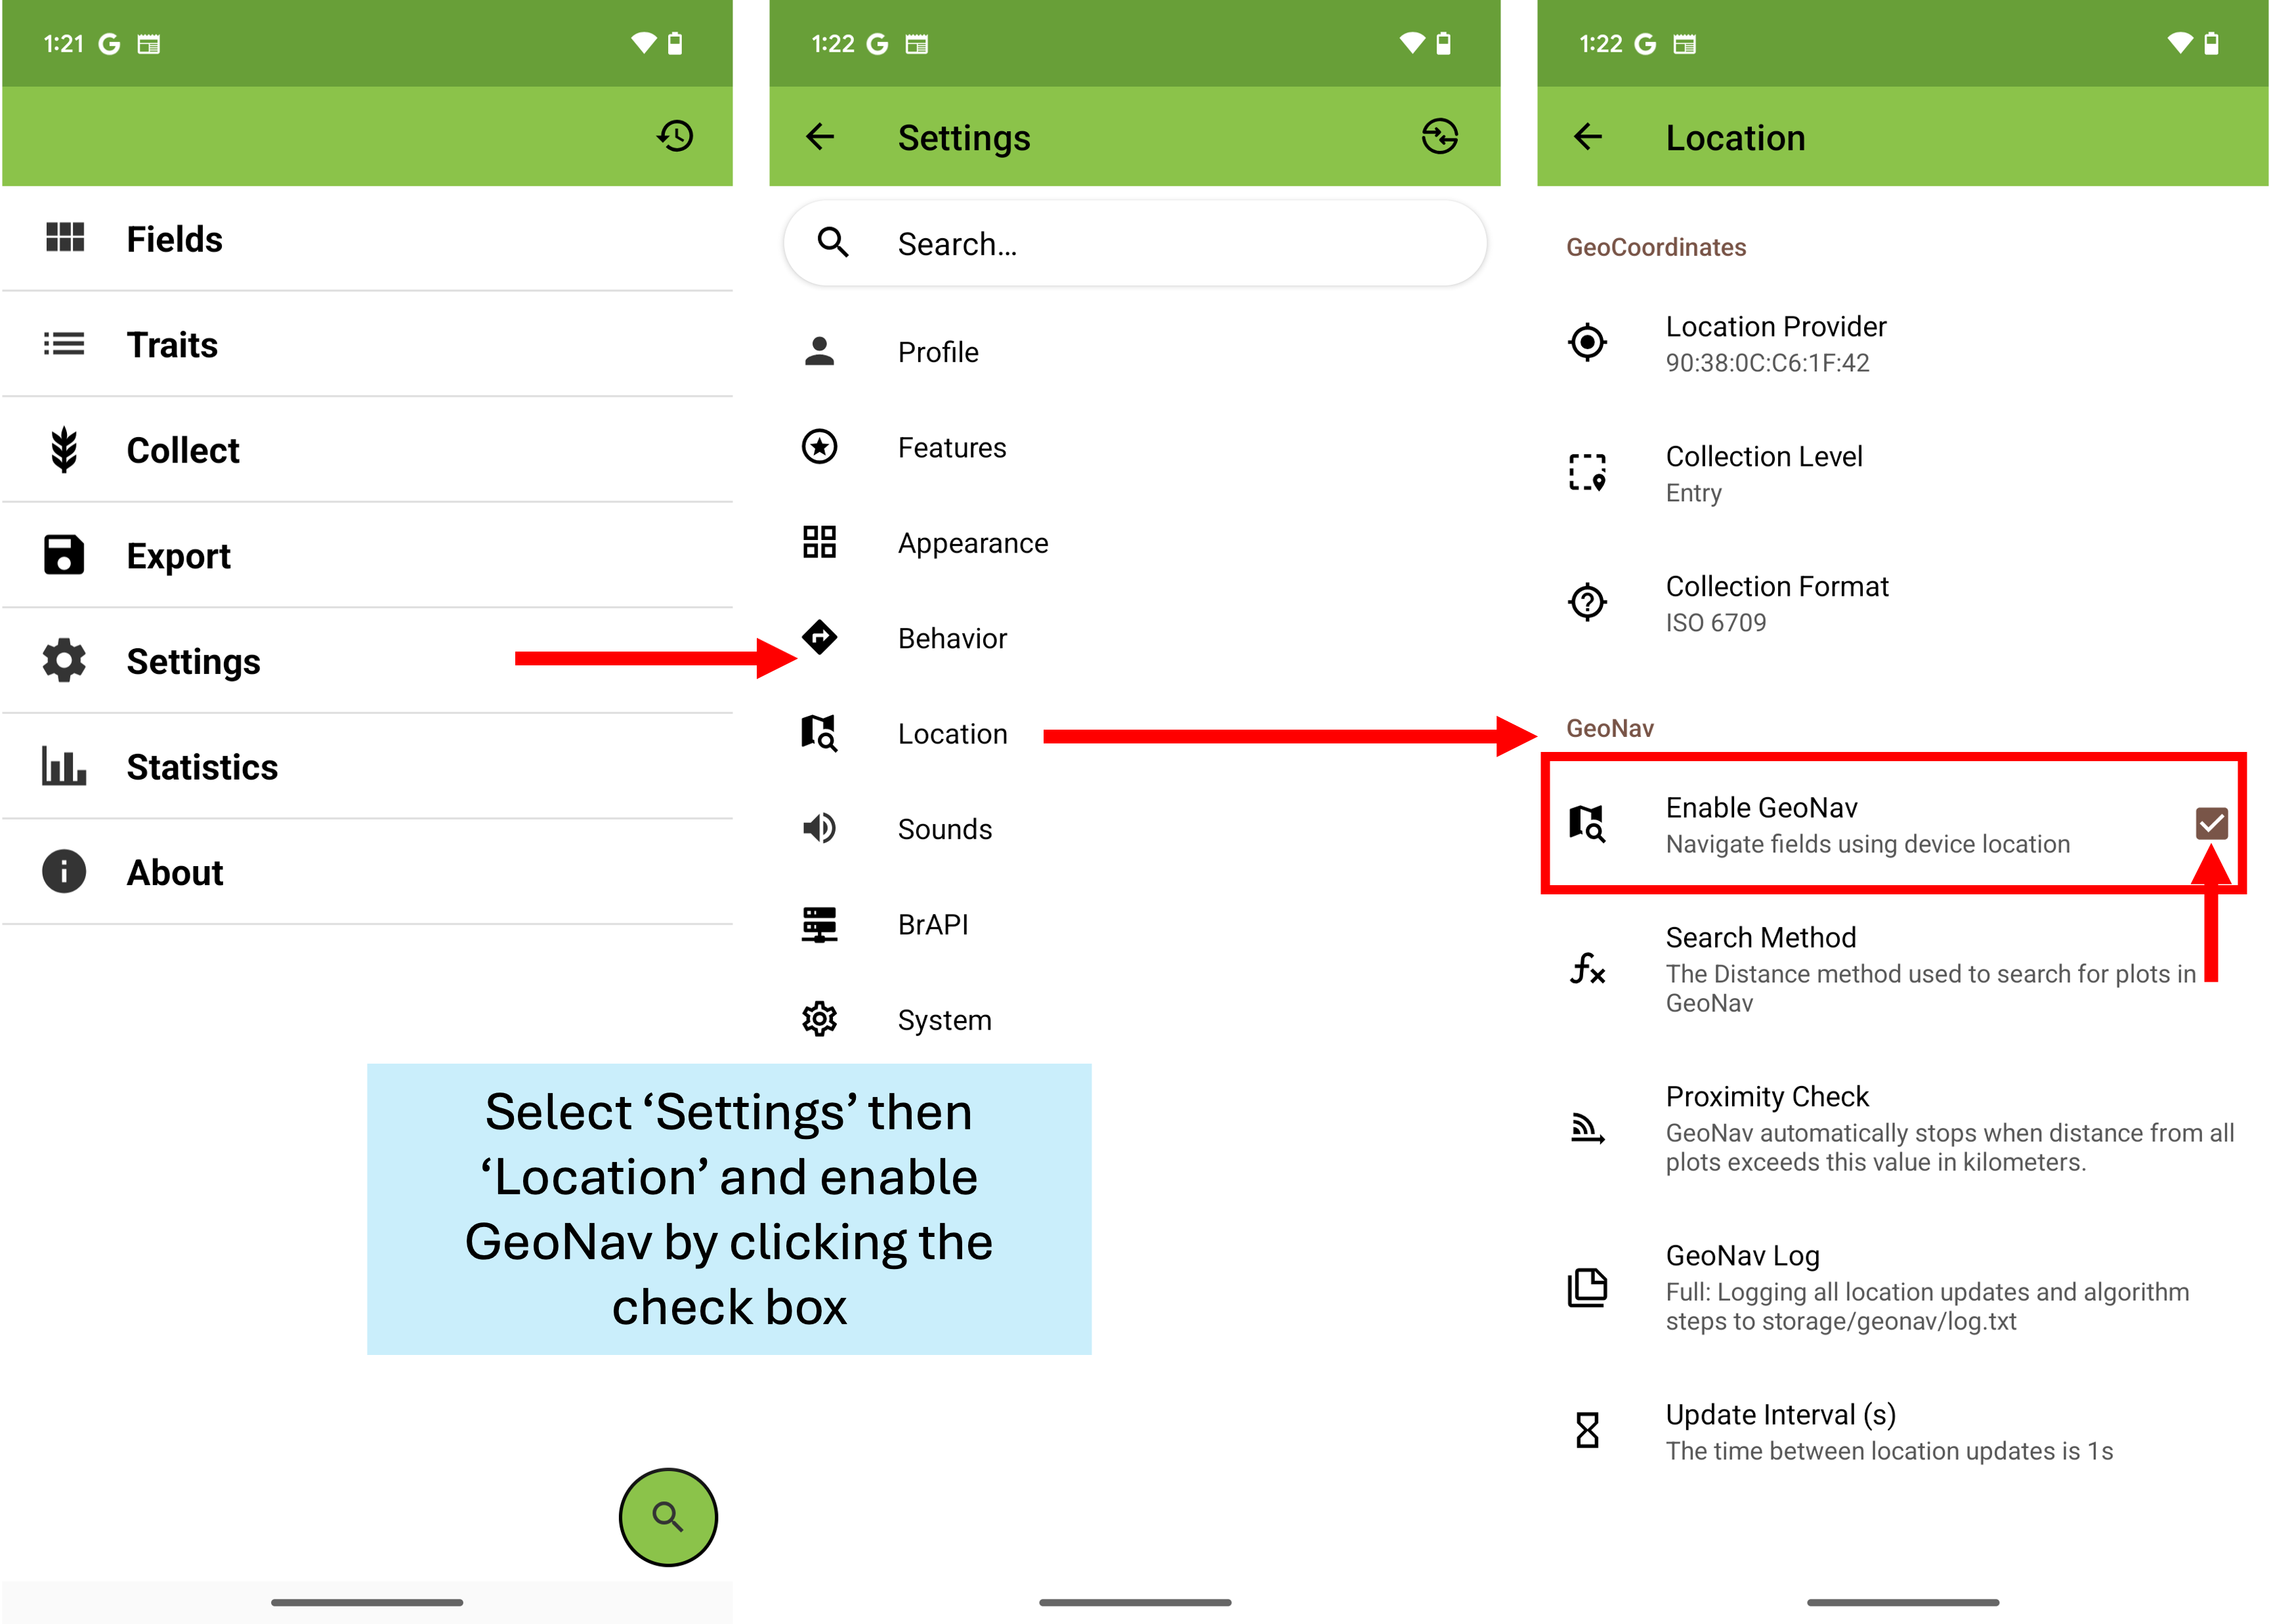
Once the trait has been created and synced to BIMS, the user can begin taking data with the Field Book app. In order to begin mapping the location-based data, you will need to navigate to Settings and Location within the Field Book App. On the Location page, you will need to check the box next to “Enable GeoNav”.
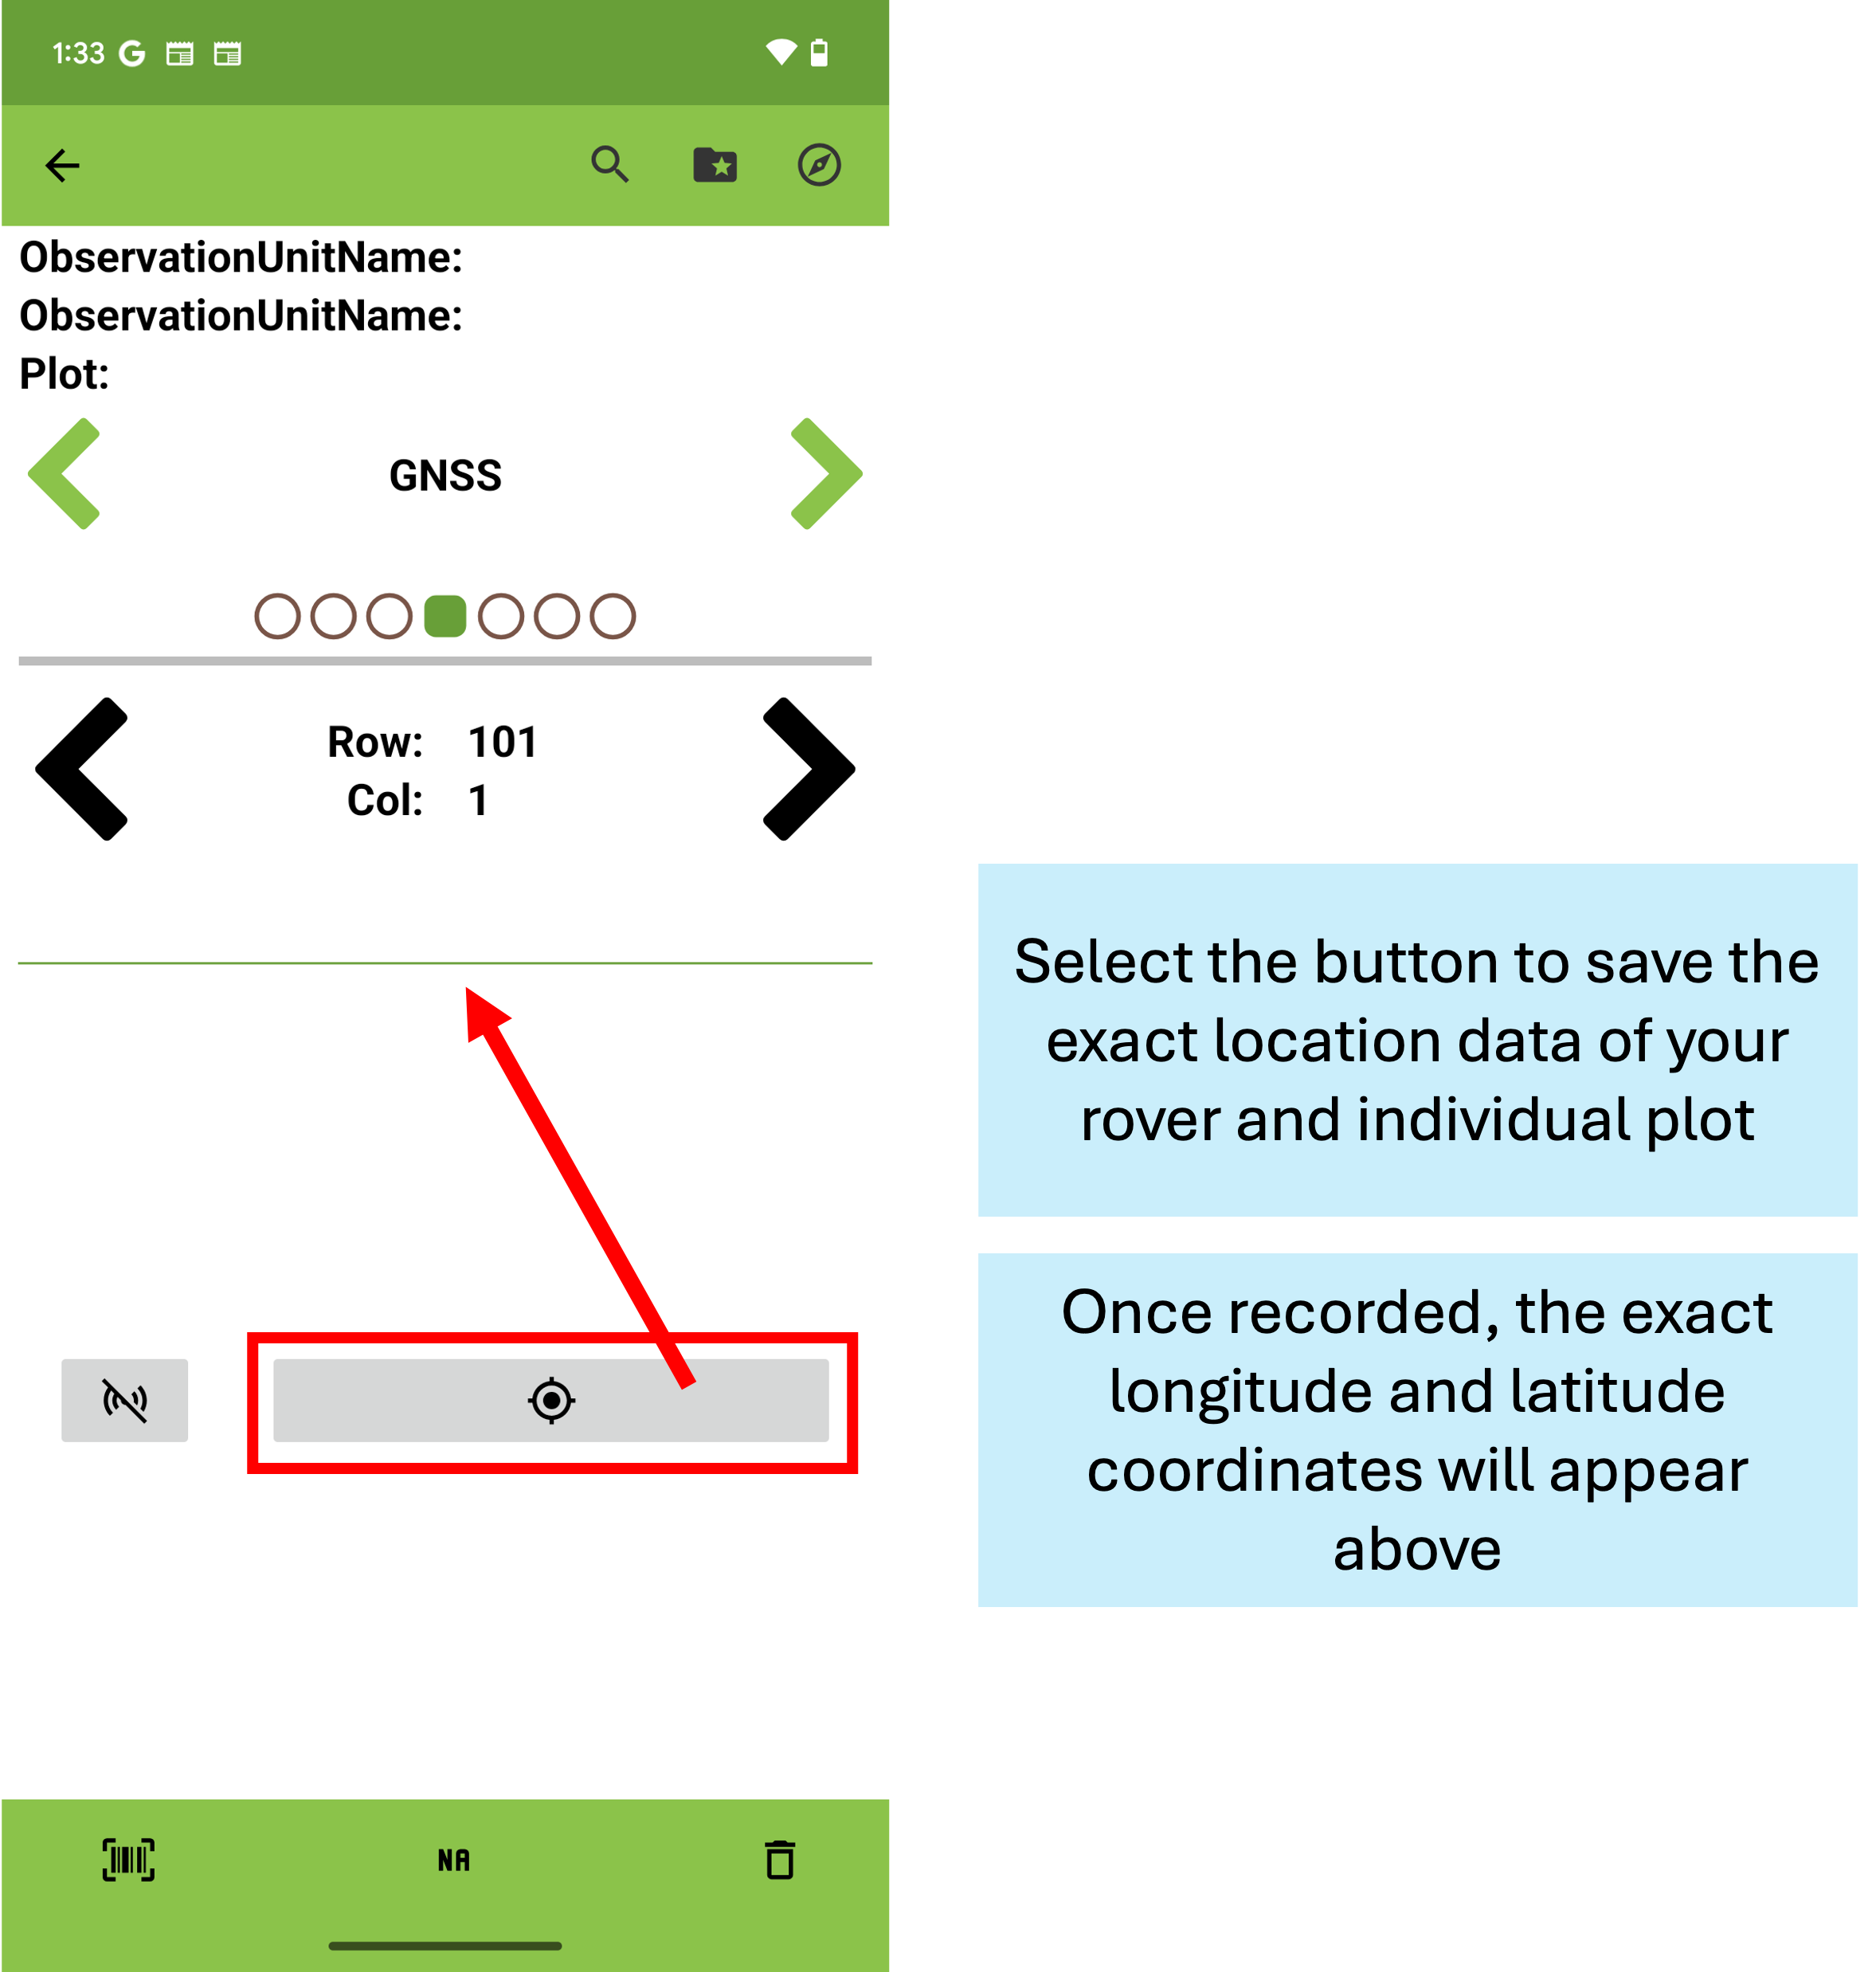
Next, you will need to connect your phone to your external receiver via Bluetooth. Once the connection has been established, you will be able to map individual plots using the GNSS trait. Simply select the bullseye button to collect the exact location of your rover. Once you have mapped the individual plots, the gnss data can be exported to BIMS via BrAPI. For more information on connecting and using the rover, visit the Field Book manual.
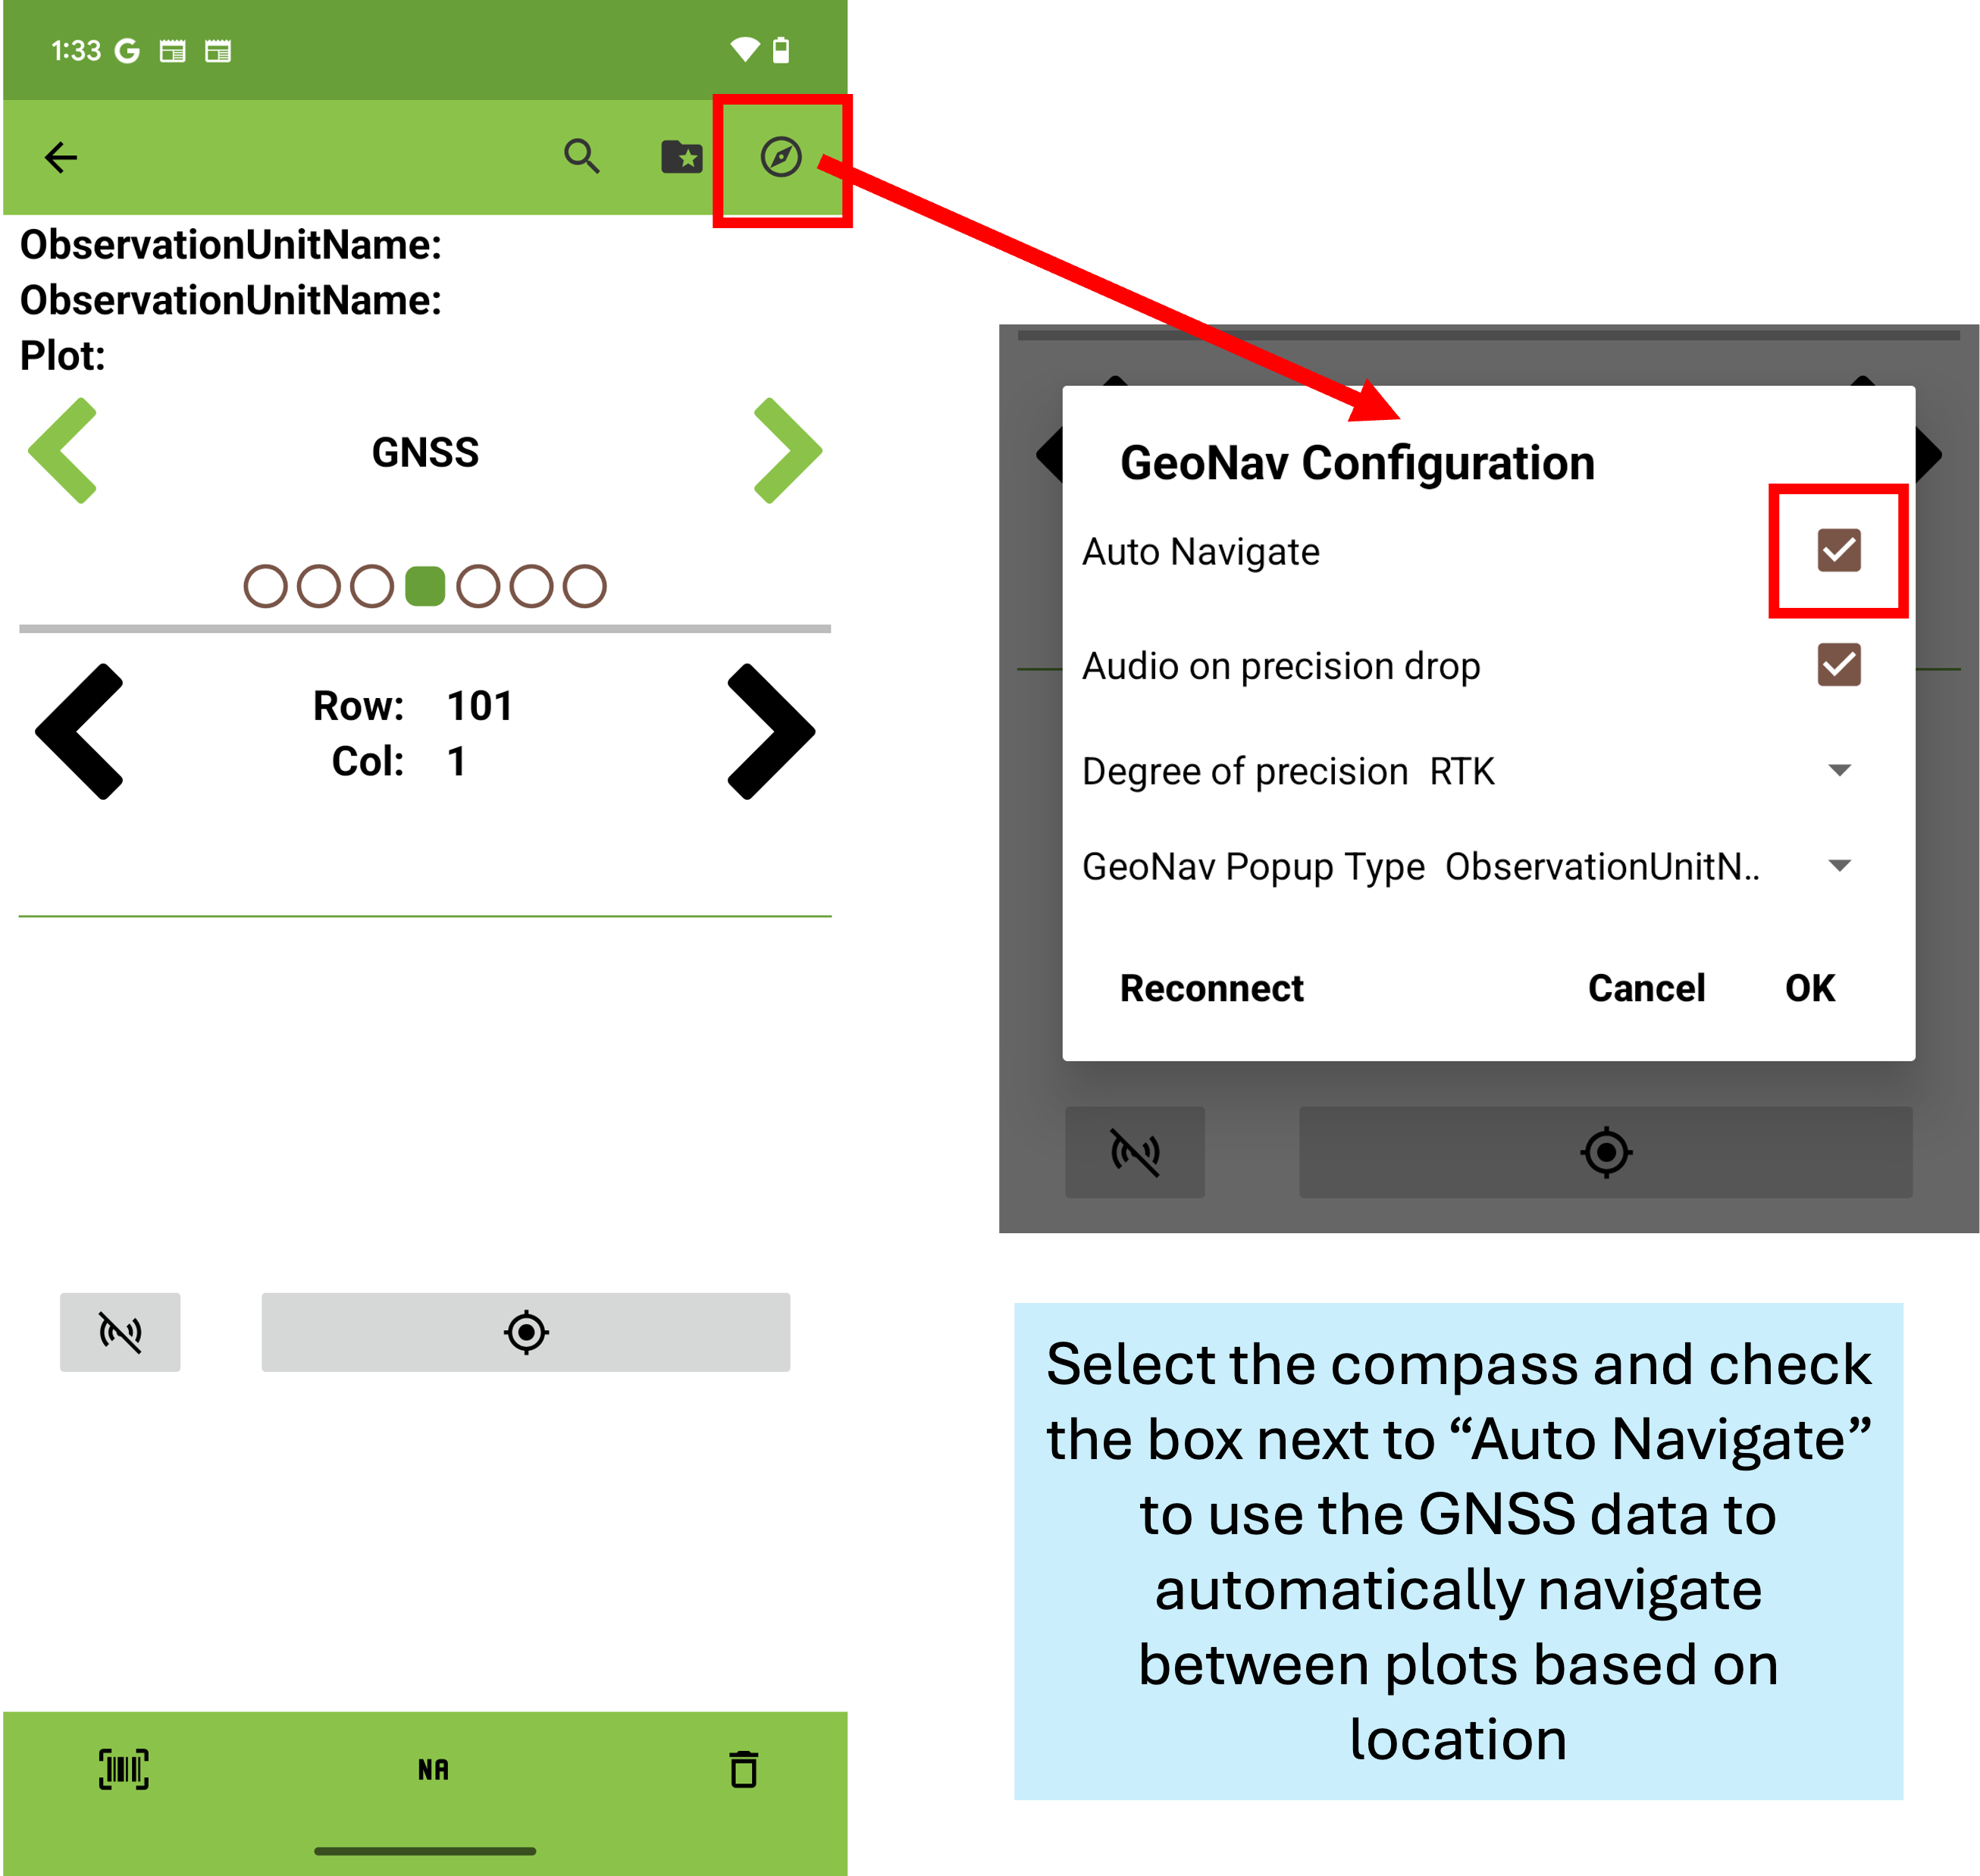
Once the gnss data has been taken, it can be used to automatically identify individual plots by location. To enable, select the compass at the top right of the collection screen. On the pop-up, select the check box next to “Auto Navigate”. Now, when walking around the field with the rover, you can automatically identify plant IDs based on location.
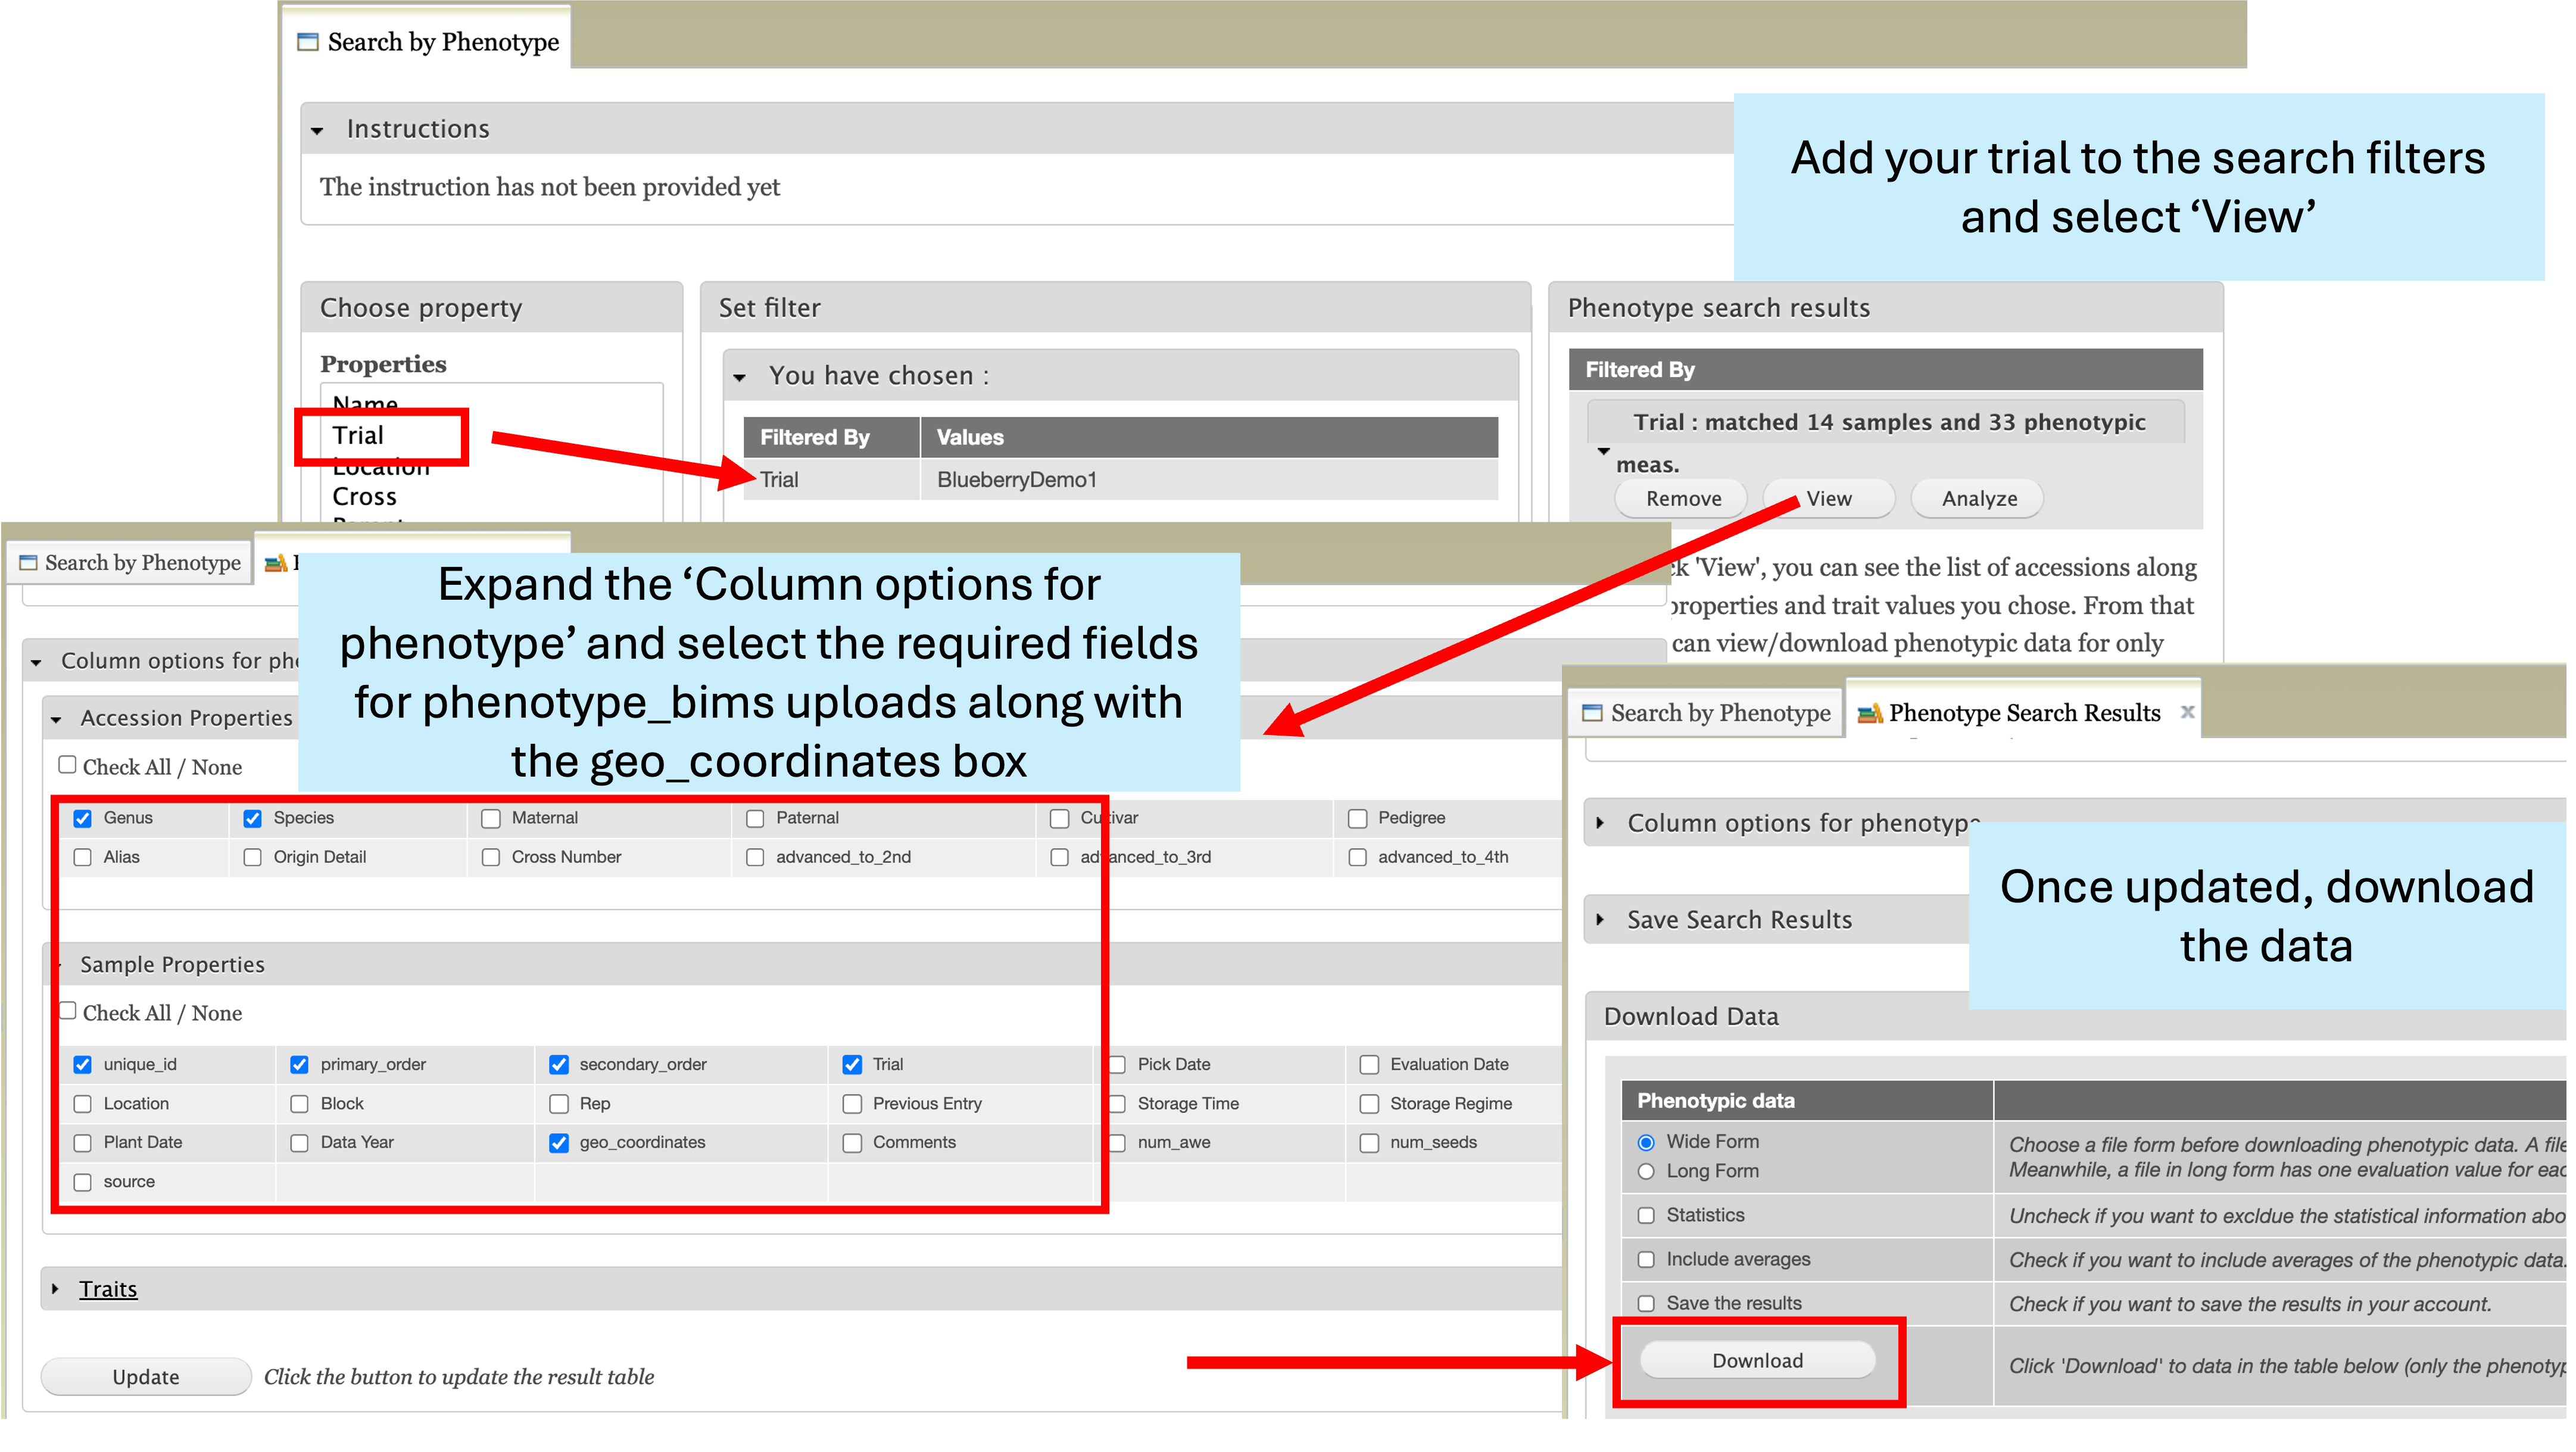
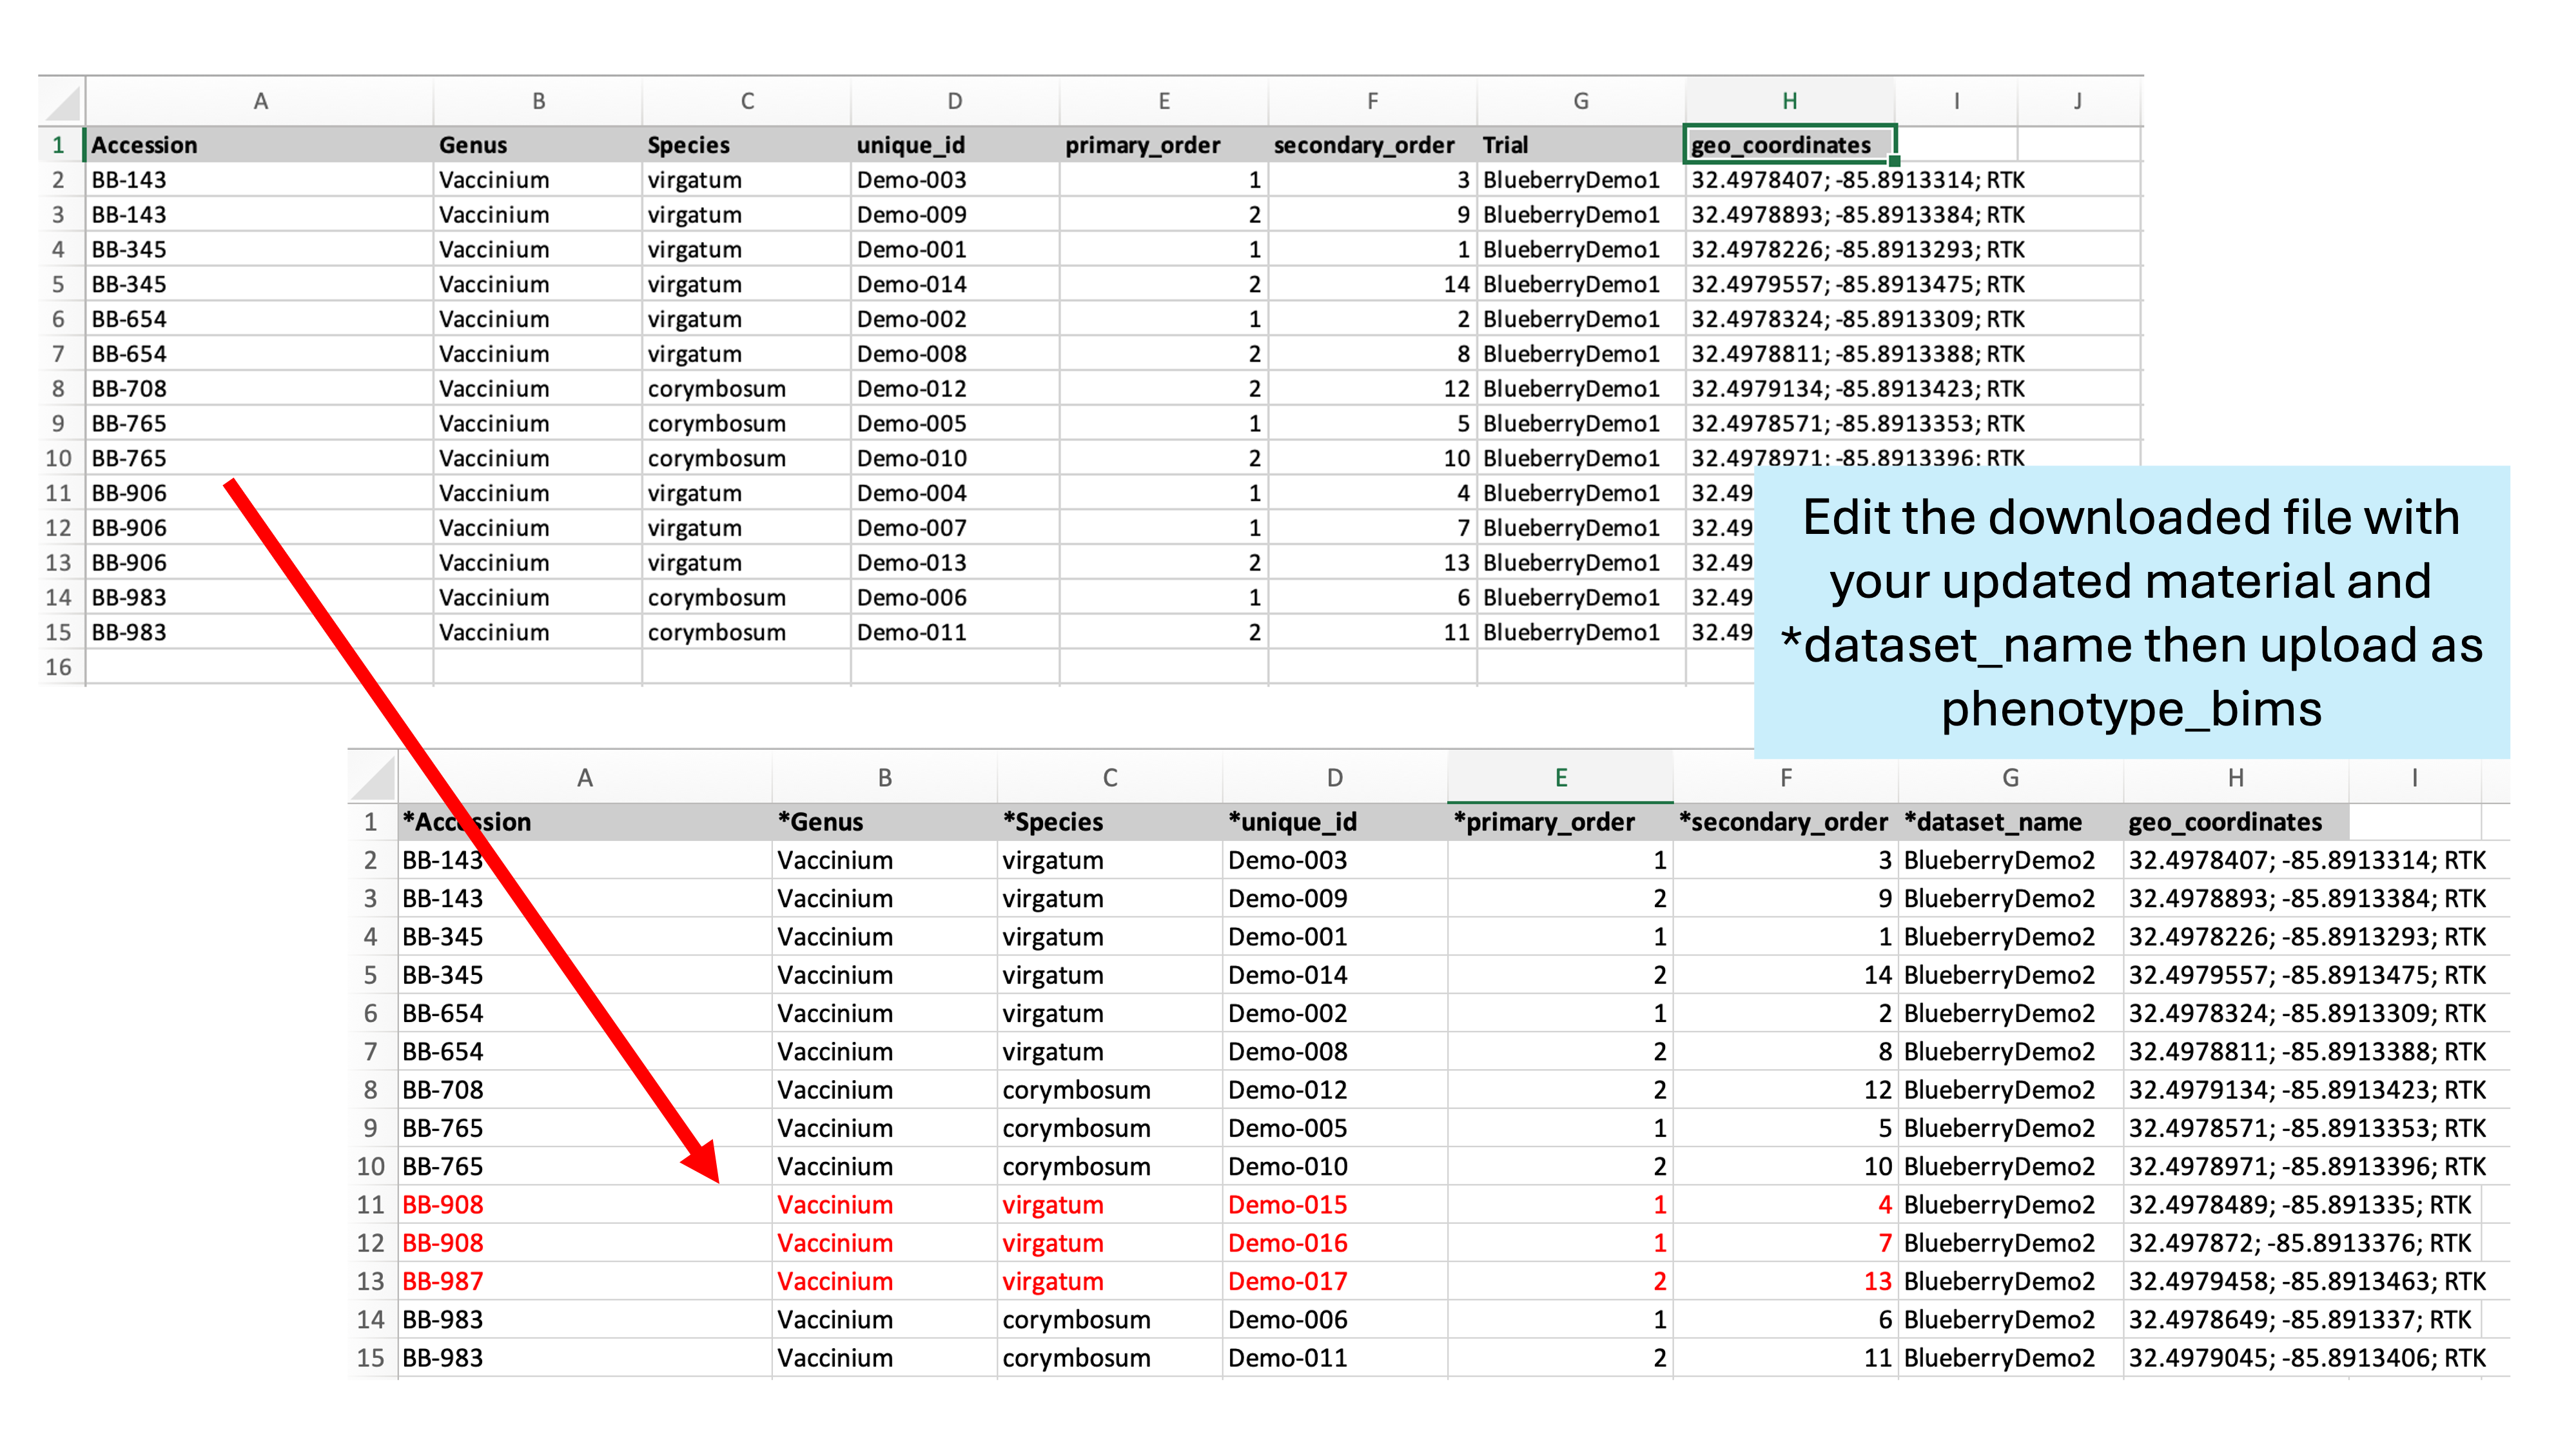
Location data can be downloaded directly from BIMS and re-used in subsequent trials, which is especially useful for tree crops where multi-year trials are common. The gnss data will download in a column titled “geo_coordinates” and can be uploaded using the same column title in the phenotype_bims template with a new trial name. If some plants have died and been replaced, only those plant names need to be updated.